
- Home
- Using Location Data (Map)
- Using Location Logs
- Adding Location Data Based on Location Log
Font size
- S
- M
- L
Adding Location Data Based on Location Log
Using a location log saved by a camera, mobile phone, or receiver that can obtain location data, you can find the track point closest to the shooting time of an image, and add the location data recorded for that track point to the image.
Before performing this procedure, import location log files to your computer, or save them on a memory card and connect it to your computer using a card reader. For details about how to save and transfer location, altitude (barometer), and depth logs, refer to the user manual supplied with your camera, mobile phone, or satellite navigation system receiver.
- Select the images to which you want to add location data.
Select either the Filmstrip or Photo Tray.
- Click
 on the Toolbar.
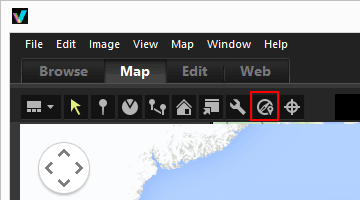 The [Log Matching] area is displayed.
- Click [Add...].
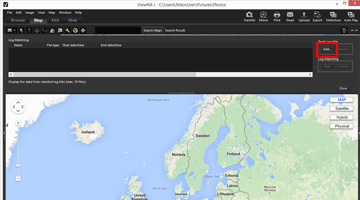 A screen for selecting a location log file from your computer or card reader is displayed.
- Select the location log file that you want to load, and click [Open].
The location log file is loaded in the [Log Matching] area.The log file list in the [Log Matching] area shows the file names, file formats, and recording start/end times of the loaded location log files.
- If the shooting date and time of an image is within the recording period of the location log file (or within one hour before or after), location data such as longitude and latitude is assigned to the image.
- You can set how the location log data is applied to images by clicking
 on the Toolbar and selecting [Log Matching]. Configure the desired settings as necessary beforehand.
 - If the location information is not assigned correctly, the setting of the time zone may be wrong, or the internal clock of the camera might not set the correct time of shooting.
- For details, refer to "Configuring Location Log Application Settings" for setting.
- Click [Run].
The logs with a check mark are displayed on the map. Up to 10 logs are displayed.
- Click [Save].
A confirmation screen is displayed.When you click [Yes], the newly assigned location data is embedded in the images.If you click [Cancel], the operation terminates without embedding the location data in the images.
Viewing the Log Matching results
You can display the Log Matching results using the methods described below.
- Displaying
 on the map
 - You can check for and correct any positioning errors by viewing the location on the map. For details, refer to "Handling Location Data".
- Displaying icons on thumbnails
- Icons that indicate the Log Matching status are displayed on the thumbnails.
 : Targeted image, matching possible
- When clicked, changes to
 , and the image becomes untargeted for matching. When clicked again, returns to , and the image becomes targeted for matching.
 - : Untargeted image, matching possible (deselected by user)
 : Matching not possible (image date and time do not match log data)
- The icon does not change even when clicked.
Loading location log files
You can load multiple location log files and apply the location data to images.
- To load an additional location log file, click [Add...]. The loaded location log files are displayed in the log file list.
- When you click the name of a location log file name in the log file list, the route based on that location log is displayed in the map area.
- Location data is assigned to the images based on the contents of all location log files in the log file list.
- When the recording periods of multiple location log files overlap:
- In the case of an overlapped duration, a file whose log start time is later takes priority and is applied.
- When start times are the same, the file with the longer recording time takes priority and is applied.
- To remove a loaded location log file from the list, select the location log file and click [Remove].
Assigning location information
The following two ways of assigning location information to images are available.
- [Nearest track point (single point)]
- The location information of the track point closest to the time the image was taken is applied.
- Example:
- Suppose that the track points in the location log are recorded every minute, and that image A was taken between track points 1 and 2, and image B was taken between track points 2 and 3.
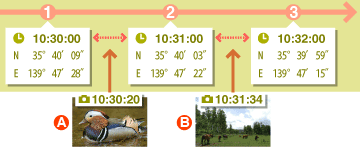
- Image A is assigned the location information of track point 1, and image B is assigned the location information of track point 3.
- [Last and next track points (two points)]
- Based on the location information logged for 2 adjacent track points, the location information of the image is estimated by its shooting time.
- Example:
- Suppose that the track points in the location log are recorded every minute, and an image was taken between track points 1 and 2.
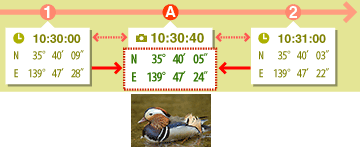
- The time between track points 1 and 2 is 1 minute = 60 seconds. The shooting time of the image is 40 seconds after track point 1.
- The location information is determined by the amount (in this case 40 seconds / 60 seconds = 2 / 3) of the elapsed time between track point 1 and 2, and the degree of change in location information between track point 1 and 2.
The assigning method is set in the setting screen. For details on the setting screen, refer to "Configuring Location Log Application Settings".
About [Time Zone and Date]
For assigning location information, the setting of the time zone is referred.
The recording time of location logs is often based on Coordinated Universal Time (UTC), which is the world time standard based on astronomical observations. The UTC time offsets used around the world are established for each region, and regions that share the same time offset are called time zones.
The shooting time for images is calculated based on the time offset between Coordinated Universal Time (UTC) and the time zone where the image was taken, and this time is used to find the data in the location log.
- If [Time Zone and Date] is embedded in the metadata of the image, the time zone set for [Time Zone and Date] of the image is referred.
- [Time Zone and Date] is metadata containing information on the time zone in which the image was taken.
- [Time Zone and Date] can be confirmed in [XMP/IPTC Information] in [Adjustments/Metadata]. For details on metadata of the image, refer to "Viewing/Editing Embedded Information of Images".
- If [Time Zone and Date] is not saved in the image metadata, the time zone specified on the setting screen is used. For details about the setting screen, refer to "Configuring Location Log Application Settings".
- Location information will not be applied to an image whose shooting time, after time difference is applied, exceeds 1 hour of the nearest track point.
Embedding location data
The location data assigned to images from a location log consists of the latitude, longitude, and Coordinated Universal Time (UTC). If the location log includes altitude (satellite navigation system) and geodetic data, this is also embedded at the same time.
- If the check mark for an image is removed, location data will not be embedded.
- If location data from a location log is assigned to an image that already contains location data, the previous data will be overwritten. To keep the previous location data, remove the check mark.