
- Home
- Using Location Data (Map)
- Showing Shooting Locations on the Map
Font size
- S
- M
- L
Showing Shooting Locations on the Map
You can display shooting locations as icons on the map, based on location data embedded in still image or movie files. The map can be freely scrolled and zoomed, enabling you to easily check where the images were shot.
You can also display images with no embedded location data on the map by adding location data to the images. For details about adding location data to images, refer to "Handling Location Data".
- Open a folder containing a file with the location data that you want to use.
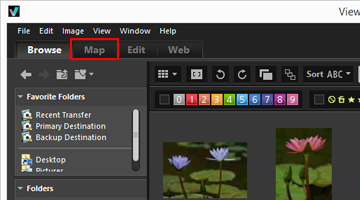
- Click [Map] to change the workspace.
 A map retrieved from an Internet map service is shown in the Image View area.Information for each item is displayed on the [Adjustments/Metadata] palette.
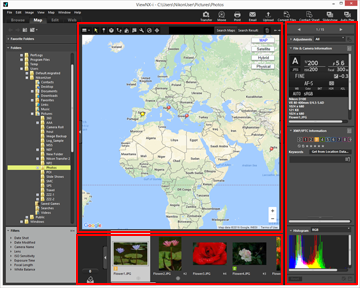 You can select files stored in the folder in the Filmstrip.To view a file in another folder, select the desired folder on the [Folders] palette in the navigation area.When the images that you want to display are stored in different folders, add the images from their respective folders to the Photo Tray. You can view the images together without actually moving them from their existing location.To view images added to the Photo Tray, click
 in the Image View area. The Filmstrip display changes to show the images added to the Photo Tray.
[Map] toolbar items

 Viewer Settings
Changes the [Map] layout.
Select from the following four options:  [Display Filmstrip Horizontally],
  [Display Filmstrip Vertically],
  [Close Filmstrip], or
  [Full Screen].
[Display Filmstrip Horizontally], [Display Filmstrip Vertically], [Close Filmstrip], or [Full Screen]. Selection button
This tool is selected by default.
When you finish operations such as editing location data, automatically becomes active.
automatically becomes active.To finish other operations, select this tool.
 Location data edit button
Adds or edits location data.
 Direction data edit button
Edits direction information.
 Route display button
Links shooting locations on the map.
 Back to home location button
Restores the map display status to the default status set in "Setting the Map".
 Open with browser button
Accesses an Internet map service to retrieve the map shown in the map area, and displays it in a web browser.
 Preferences button
Chooses a map server or sets a default display position of the map.
 Log management button
Displays the travel route on the map based on the selected location log file. Only when this button is selected, a log area that allows you to manage log data can be displayed.
 Target button
Changes the display style of the map so that the desired position can be located in the center.
Map search area
Search for a location name or address, and display it on the map. Enter a location name or address you want to display in the edit box, then click [Search Maps]. When the location name or address is searched, the displayed map switches to that location.
If no result is retrieved, a message "No results found." appears in the map search area, and the displayed map does not change.

Deletes the selected/displayed files or folders. In the [Full Screen] mode, the currently displayed image or movie is deleted.

Opens/closes the [Navigation] palette or [Adjustments/Metadata] palette.
Map display when switching to the [Map] workspace
The map display varies depending on the number or selection status of files that contain location data in the current folder. Configure the map display settings in [Shooting Location] in "Setting the Map".
Map search
When multiple search results are found, the displayed map switches to the first location in the result list. Click  to select the location name you want to display from the list.
to select the location name you want to display from the list.Icons on the map
- If you click the thumbnail of a file that contains location data, the corresponding
 on the map changes to
  .
. - Clicking on the map shows detailed information on the file in pop-up windows. For details, refer to "Checking Image Information Details on the Map".
When simultaneously recorded RAW (NEF or NRW format) and JPEG images are displayed as one file
RAW (NEF or NRW format) and JPEG images that were simultaneously recorded when shooting are displayed as a single file. When location data or metadata is edited, the changes are applied to both files simultaneously.
For details on switching the display method for simultaneously recorded images, refer to "Viewing Simultaneously Recorded Images".
About sequences
- is displayed in the corresponding location on the map only when the key image of a sequence contains location data.
- When an image in the sequence other than the key image with location data is selected, is not displayed.
- Deleting the location data of the key image also deletes the location data of the other images in the sequence.
Map area
Shows the area around the shooting location, which is shown as on the map.
on the map.Multiple files containing the same location data are shown as one . Depending on the map display scale, files containing different location data are shown as one if the distance between shooting locations is close.
. Depending on the map display scale, files containing different location data are shown as one if the distance between shooting locations is close.When only one file with direction information is selected,  is displayed instead of . When multiple files are selected, is not displayed.
is displayed instead of . When multiple files are selected, is not displayed.Operating the map
- The mouse cursor turns into a hand icon on the map, allowing you to freely scroll the map by dragging it. (In Mac OS, the mouse cursor may not change to the hand icon, depending on the version of OS.)
- Double-clicking any point on the map zooms in on the clicked point. On the map area, you can scroll or zoom in/out using tools on the screen.
- Also, you can change the display of the map to a satellite image. Display contents vary depending on language settings.
Selecting multiple icons on the map
You can select multiple files by clicking the icons while holding down the "Ctrl" key ("Command" key in Mac OS).
icons while holding down the "Ctrl" key ("Command" key in Mac OS).To cancel the selection, click the selected while holding down the "Ctrl" key (or "Command" key in Mac OS).
while holding down the "Ctrl" key (or "Command" key in Mac OS).