
- Home
- Basic Operations
- System Requirements and Basic Operations
- Starting and Exiting ViewNX-i
Font size
- S
- M
- L
Starting and Exiting ViewNX-i
Starting ViewNX-i
The windows that are displayed, the names of menu items, and the operation procedures may vary depending on the OS and version that you are using. For details, refer to the user's manual provided with your computer or OS.
Starting ViewNX-i after file transfer
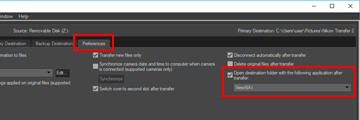
The ViewNX-i window automatically opens after Nikon Transfer 2 finishes transferring files if you make the following settings in the [Preferences] panel of Nikon Transfer 2.
- Check [Open destination folder with the following application after transfer:].
- Select [ViewNX-i] in the application selection menu.
- For the basic flow of file transfer, refer to "Basic Operations".
- For details on the above settings, refer to "Opening the Destination Folder with Another Application" and "The [Preferences] Panel".
Starting from the desktop
- Windows: Double-click the "ViewNX-i" shortcut icon on the desktop.
Mac OS: Click the [ViewNX-i] icon in "Dock".ViewNX-i starts.
Starting from the [Start] menu (Windows)
- Open [ViewNX-i] in the [Start] menu.
- Click [ViewNX-i].
ViewNX-i starts.
Starting from the [Applications] folder (Mac OS)
- Open [Applications] - [Nikon Software] - [ViewNX-i].
- Double click the [ViewNX-i] icon.
ViewNX-i starts.
Starting ViewNX-i by dragging and dropping a file or folder onto the ViewNX-i icon
Drag and drop a folder, drive, or file compatible with ViewNX-i to the "ViewNX-i" icon.
ViewNX-i starts in the same view mode you were using last time, and opens the folder/drive that you dragged and dropped. When you drop a file, ViewNX-i starts up with the file selected.
Exiting ViewNX-i
- Windows: select [Exit] from the [File] menu.
Mac OS: select [Quit ViewNX-i] from the [ViewNX-i] menu.ViewNX-i ends.