
- Home
- Adjusting Images
- Cropping Images
Font size
- S
- M
- L
Cropping Images
You can crop a desired area of an image.
Before cropping, first set the view mode to [Image Viewer] or [Full Screen] and display the image to crop in the Image View area.
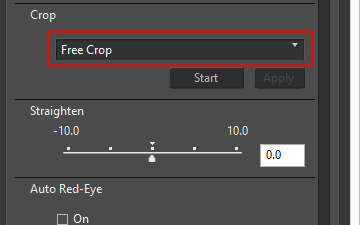
- Click
 to select the aspect ratio.
 The aspect ratio is automatically fixed according to the selected setting.
- Select [Free Crop] to crop without fixing the aspect ratio.
- The aspect ratio (in pixel dimensions) of the original image appears in the dropdown options. Select this option to apply the original aspect ratio to the cropped image.
- Click [Start].
- Drag the area to crop within the image.
 After roughly specifying a cropping area by dragging, you can finely adjust it in the following ways.
- Drag the border of the cropping area to resize it.
- Move the cursor over the cropping area and drag it after it has changed to
 to move the framed area.
- Click [Apply].
The framed area is cropped.Click [Cancel] to cancel designating the cropping area.
Notes
- If you click
 before clicking [Apply], cropping will not apply.
 - You can use other adjustment functions even before clicking [Apply]. However, if you select [Use Gray Point] for [White Balance], the cropping frame will be canceled.
- In Mac OS, when the view mode is set to [Full Screen on Secondary Display], the mouse cursor does not change to when you press the [Start] button. However you can designate the cropping area by dragging the mouse cursor on the secondary monitor.
- The editing results may not appear in thumbnails, since some types of editing are not applied to them.
When multiple images varying in aspect ratio are selected
- The images are cropped with the selected aspect ratio retained. Depending on the image, an unintended area may be cropped.
- When using the original aspect ratio to crop multiple images with different aspect ratios, the aspect ratio of the leftmost image among the selected images in the Filmstrip is applied.