
- Home
- Basic Operations
- Step 2: Transfer Files
Font size
- S
- M
- L
Step 2: Transfer Files
Transfer the selected files to the computer.
- Confirm that the thumbnails of the transferable files in the connected camera are displayed.
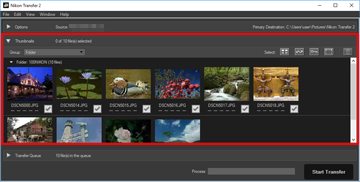
- Click [Start Transfer].
 Transfer starts.Transfer status is shown in the progress bar.
 When transfer is complete, the camera will be removed from the system and the destination folder will be displayed.
Proceed to "Step 3: View Files".
Nikon Transfer 2 transfer features
When transferring, you can simultaneously save backups of the files being transferred to a different drive, etc. You can also save information for organizing or sorting the images, as separate adjustment files.
For details, refer to "Transfer Options".
Previously transferred files
At default settings, files that have previously been transferred from the memory card or internal memory will not be transferred again. To transfer previously transferred files, remove the check from the [Transfer new files only] option in the [Preferences] panel.
Refer to "The [Preferences] Panel" for details.
If the camera is not displayed
If the camera is not displayed, check that the camera is on and connected to the computer.
Interrupting transfer
To interrupt transfer, click [Stop Transfer].

Click [Start Transfer] to resume.