
- Home
- Basic Operations
- Basic Operations of the ViewNX-i Window
Font size
- S
- M
- L
Basic Operations of the ViewNX-i Window
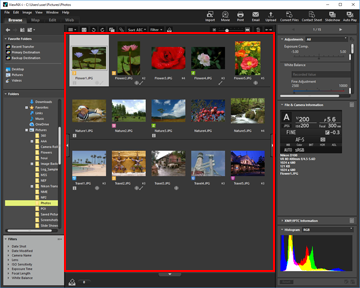
The area in the center of the ViewNX-i window is called the Image View area. The Image View area displays the thumbnail list and enlarged versions of still images or movies.
For details on the names and functions of the parts of the window, refer to "Features and Controls of the ViewNX-i Window".
- Changing the workspace
- Opening a palette
- Switching the view mode
- Displaying the Filmstrip
- Displaying the Photo Tray
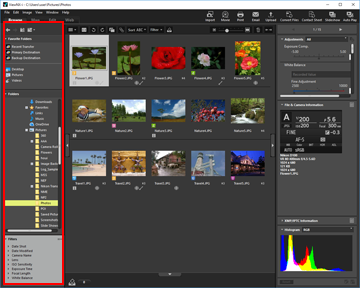
Changing the workspace
You can arrange window layout according to your actions such as viewing or adjusting images.
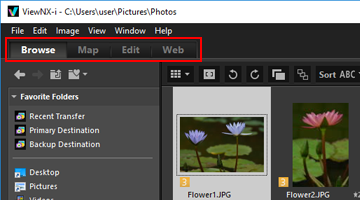
The workspace has a preset window layout where the view mode (described later) and the palette to be used are already set, targeting your possible actions. There are three types of workspaces: [Browse], [Map], [Edit], and [Web].
- Click [Browse]/[Map]/[Edit]/[Web] on the Toolbar.
 The workspace changes. The view mode and open/close status of the respective palettes change according to the selected workspace.You can still change the view mode or open/close status of the palettes after the workspace has changed.
Types of workspaces
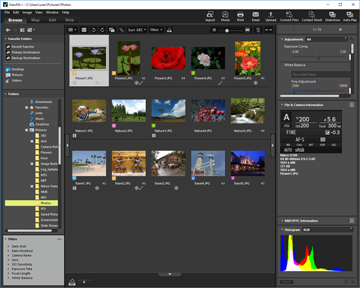
[Browse] workspace
This is the default workspace. Suited for searching a still image or movie in the thumbnail list.
[Map] workspace
Displays a map.
You can use the map function to display shooting locations on a map, based on the location data embedded in the images. You can also newly save the location data as an adjustment file of the image.

For details on the map function, refer to "Using Location Data (Map)".
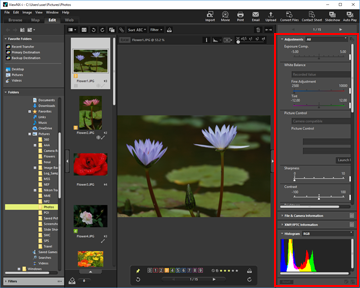
[Edit] workspace
Suited for editing images.
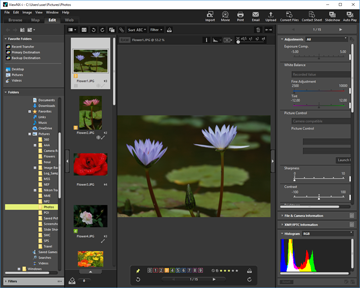
For details on image adjustment, refer to "Adjusting Images".
[Web] workspace
Allows you to access online social network services (Web services) and enjoy sharing images or movies with your friends or family.
For details on image sharing on Web services, refer to "Using Web Services".
Opening a palette
In ViewNX-i, open palettes within the ViewNX-i window to perform the operations such as opening folders containing files or editing images.
The palette on the left is called the [Navigation] palette. The one on the right is called the [Adjustments/Metadata] palette.
- Click the bar on the left edge or right edge.
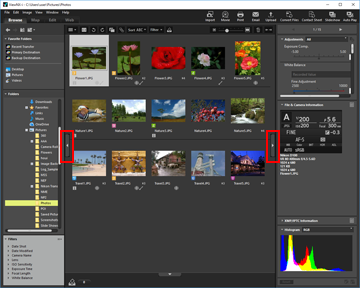 The corresponding palette opens. Click the bar again to close the palette.
- Leaving the cursor over the bar for a while without clicking will open the corresponding palette automatically.
- Moving the cursor away from the bar will close the palette.
- To keep the palette open, click the bar.
- To prevent the palette from opening automatically, select [Automatically Show] in the [Window] menu and uncheck [Navigation] or [Adjustments/Metadata] in the submenu.
[Navigation] palette
You can browse or handle files on the [Navigation] palette. You can also set folders as favorite folders or filter files with the Filters list.
[Favorite Folders]
Set folders as favorite folders. For details, refer to "Adding Folder to the Favorite Folder".
[Folders]
Use to view images or movies stored in a folder. For details, refer to "Moving/Copying/Duplicating File or Folder".
[Filters]
Display images by selecting filtering options. For details, refer to "Filtering Images with the Filters List".
[Adjustments/Metadata] palette
The [Adjustments/Metadata] palette displays metadata of images and allows you to edit the metadata or adjust images.
[Adjustments]
Images can be adjusted. For details, refer to "Adjusting Images".
[File & Camera Information]
Displays the file information of the image. For details, refer to "Viewing/Editing Embedded Information of Images".
[XMP/IPTC Information]
Displays XMP/IPTC information and lets you edit it. For details, refer to "Viewing/Editing Embedded Information of Images".
[Histogram]
Displays histograms. For details, refer to "Histogram on the [Adjustments/Metadata] palette"in "Showing Histogram".
Resizing palettes or the Image View area
Drag the border between a palette and the Image View area to resize each displayed area.

Switching the view mode
In ViewNX-i, by switching the view mode, you can view the thumbnail list of still images and movies stored in a folder or select an image to enlarge it.
- From the view mode switch menu, select the desired view mode.
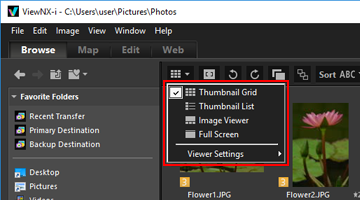 You can select the view mode from the following.
View modes
When the workspace is [Browse], [Edit] or [Web]:
 (Thumbnail Grid)
Displays thumbnails side by side in a grid in the Image View area.
 (Thumbnail List)
Displays thumbnails and their detailed information in a line as a list in the Image View area (other than [Web]).
 /
/  /
/  (Image Viewer)
Displays an enlarged image or movie in the Image View area. Thumbnails are lined up (Filmstrip) at the bottom or left of the Image View area, allowing you to select an image or movie to enlarge.
The Filmstrip is not displayed if  [Close Filmstrip] is selected in [Viewer Settings].
[Close Filmstrip] is selected in [Viewer Settings]. (Full Screen)
Uses the entire screen of the monitor to display an enlarged still image or movie.
Full Screen on Secondary Display
This command is shown only when a multiple-screen environment is detected. In a multiple-screen environment, you can operate ViewNX-i in normal display on the main monitor while displaying a selected image or movie in the full screen mode on the additional monitor.
For details, refer to "Using Multiple Screens".
When the workspace is [Map]:
 (Display Filmstrip Horizontally)
Displays the Filmstrip horizontally.
(Display Filmstrip Vertically)Displays the Filmstrip vertically.
(Close Filmstrip)Hides the Filmstrip.
 (Full Screen)
Uses the entire screen of the monitor to display the map.
Full Screen on Secondary Display
This command is shown only when a multiple-screen environment is detected. In a multiple-screen environment, you can operate ViewNX-i in normal display on the main monitor while displaying a selected image or movie in the full screen mode on the additional monitor.
For details, refer to "Using Multiple Screens".
Switching the view mode in [Full Screen] or [Full Screen] mode
The view mode switch menu can be found in the upper left of the screen.
Click  in the upper right of the screen to return to the previous view mode.
in the upper right of the screen to return to the previous view mode.
Compare
When the workspace is [Browse] or [Edit], the Image View area can be split to display two different images.
To activate comparative display, check [Compare 2 Images] under [Viewer Settings] in the view mode switch menu.

For details, refer to "Features and Controls of the ViewNX-i Window".
Displaying the Filmstrip
When the view mode is [Image Viewer], [Full Screen] or [Compare 2 Images], you can display image thumbnails in a row (Filmstrip) at the bottom or left of the window.
- Check [Filmstrip] in the [Window] menu.
 The Filmstrip opens.You can choose to display the Filmstrip vertically or horizontally, or you can hide it. Check [Display Filmstrip Vertically], [Display Filmstrip Horizontally], or [Close Filmstrip] in [Viewer Settings] in the view mode switch menu.Click a thumbnail in the Filmstrip to display an enlarged still image or movie in the Image View area.
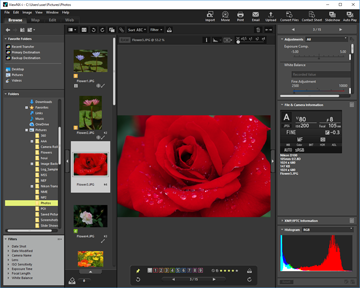
Displaying the Photo Tray
Click  at the bottom of the window to display the Photo Tray. You can temporarily collect images or movies here from different folders without changing their existing location.
at the bottom of the window to display the Photo Tray. You can temporarily collect images or movies here from different folders without changing their existing location.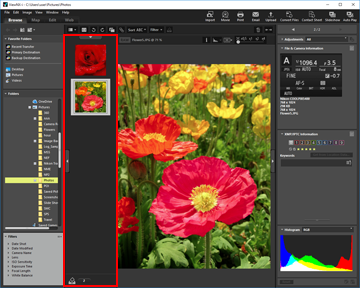
For details on the Photo Tray, refer to "Step 5: Classify Still Images or Movies".