- Home
- Editing Movies (ViewNX-Movie Editor)
Font size
- S
- M
- L
Editing Movies (ViewNX-Movie Editor)
With the ViewNX-Movie Editor movie editing software, you can convert, combine, and export movies captured on a digital camera, or combine movie files and still image files to create original movies.
Displaying the general settings window
The general settings window is displayed when you select sources (movie files and still image files) in ViewNX-i and start ViewNX-Movie Editor.
- In the ViewNX-i browser window or map window, select the source movie files and still image files.
- Click
 .
The general settings window is displayed.
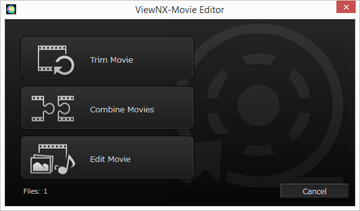
General settings window

The functions described below are available.
- [Trim Movie]
- The [Output Movie] window is displayed, enabling you to configure export settings and other properties for the selected movie before converting or exporting it. If the movie was trimmed in ViewNX-i, a file consisting of the specified playback range is extracted.
- [Combine Movies]
- The [Output Movie] window is displayed, enabling you to combine multiple movie files recorded with the same settings specified in ViewNX-i, and export them together as a single movie file.
- [Edit Movie]
- The movie creation window is displayed, and the movie files and image files selected in ViewNX-i are arranged in the Storyboard. You can edit the movie by changing the order of the sources and adding transition effects, message clips, and background music. The edited Storyboard can be exported as a new movie file.
[Output Movie] window
The [Trim Movie] and [Combine Movies] operations are performed in the displayed [Output Movie] window.
Refer to "Exporting Movies (Converting/Combining/Creating Movies)" for details about the operations in the [Output Movie] window.
Basic operation
Explains the operation flow for the movie creation window that is displayed when [Edit Movie] is selected in the general settings window.
Refer to this section for information on using recorded movie files and image files to create new original movies.
- Features of the Movie Creation Window
- Step 1: Arrange Still Images and Movies in the Storyboard
- Step 2: Set the Transition Effects and Add an Opening Clip, Ending Clip, and Background Music
- Step 3: Export the Edited Results as a Movie File
Detailed operation
Explains the detailed operations and functions. Refer to this section after having understood the basic operation flow.
- Arranging, Adding, and Deleting Sources
- Displaying Text on Still Images and Movies
- Using a Portion of the Movie by Cutting It Out (Trim)
- Inserting Background Music (Audio)
- Setting the Playback Time for Still Images. Color Clips. and Transitions
- Creating a Stop Motion Movie
- Exporting Movies (Converting/Combining/Creating Movies)
- Restoring Temporarily Saved Settings
