
- Home
- Editing Movies (ViewNX-Movie Editor)
- Getting Started
- Step 1: Arrange Still Images and Movies in the Storyboard
Font size
- S
- M
- L
Step 1: Arrange Still Images and Movies in the Storyboard
- Preparing movie files and still image files
- Adding and arranging sources in the movie creation window
Preparing movie files and still image files
- Still image files and movie files captured using a Nikon digital camera can be used as sources, in the file formats listed below.
Still image files:JPEG, TIFF, RAW (NEF, NRW)Movie file:MOV, AVI、MP4 (H.264/AAC)
- When using still image files or movie files that are saved in a memory card, copy them to your computer hard disk before registering.
Adding and arranging sources in the movie creation window
You can add still image files and movie files to the sources arranged in the Storyboard in the movie creation window.
- Click the [
 Add Movies and Images] button in the movie creation window.
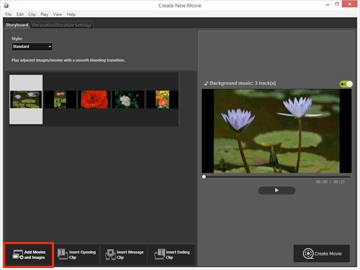 Click [OK] in the displayed confirmation window that asks whether you want to switch to the ViewNX-i window to select the source.
- Select the movie files and image files in the ViewNX-i browser window, and click
 .
The selected movie files (files indicated with
.
The selected movie files (files indicated with ) and image files are added to the Storyboard.
You can also drag and drop files directly from Explorer (Windows) or Finder (Mac OS) to add them to the Storyboard.
Perform all rearranging of movies, images, and other sources in the Storyboard.
You can drag and drop the image files and movie files in the Storyboard to arrange them in the desired playback order.
Let's try playback
You can preview the Storyboard that is being created anytime by clicking  in the preview area.
in the preview area.The following movie controls are found in the preview area.
- XX:XX / XX:XX
- Displays in format of "current playback time/total playback time".

- Indicates the current playback point or pausing point. Drag to move to any playback point.
- Click to playback a created movie.
- During playback, the button change to
 . During stop or pause, the button is displayed as .
When you click on a source in the Storyboard, the source is displayed in the preview window. The file can be played back starting from the displayed position.
