
- Home
- Editing Movies (ViewNX-Movie Editor)
- Getting Started
- Step 2: Set the Transition Effects and Add an Opening Clip, Ending Clip, and Background Music
Font size
- S
- M
- L
Step 2: Set the Transition Effects and Add an Opening Clip, Ending Clip, and Background Music
Edit the Storyboard by adding screen transition effects, message clips, and background music.
- Setting switching effect
- Adding opening clips, ending clips, and message clips
- Sorting or deleting sources
- Adding background music
Setting switching effect
Select [Style:] to set the transition effects between the sources (movies/still images/message clips) in the Storyboard.
- In the [Storyboard] tab, click on [Standard] under [Style:], and select the style.
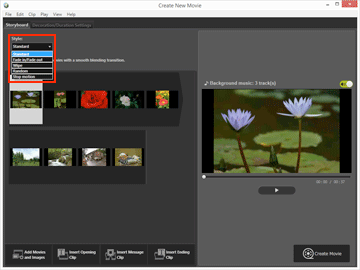 The transition effect is set. You can check the results in the preview area.[Standard]Play back still images (photos) and movies with a smooth transition between them, without losing any part of the source.[Fade in/Fade out]Play back still images (photos) and movies with a slow fade transition between them.[Wipe]Play back still images (photos) and movies with a transition that slides the next image from right to left over the previous image.[Random]Play back still images (photos) and movies with randomly applied transition effects.[Stop motion]This setting is available when sources include still images (photos). Each still image (photo) is played back for a short time (0.1 sec/0.2 sec/0.5 sec) before the next one is displayed.Use this setting to play back still images (photos) in stop motion style that resembles flip book animation.
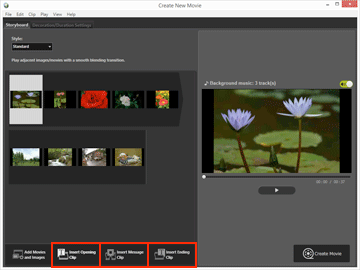
Adding opening clips, ending clips, and message clips
You can add an opening clip to the beginning of the movie and an ending clip to the end, and you can add message clips between scenes to create separation between them.
Message clips are added directly before the source that is selected in the Storyboard. Clips can be edited after they are added.
- Click [
 Insert Opening Clip], [
 Insert Message Clip], or [
 Insert Ending Clip].
 The [Text Settings] window is displayed for the clip.
- Click the text box at the top left of the [Text Settings] window, and enter the desired text.
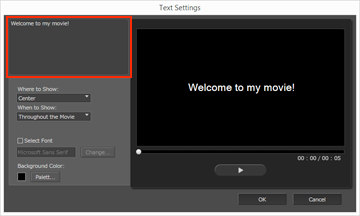 The items listed below can be set.[Where to Show:]Set the position of the displayed text.[When to Show:]Only the [Throughout the Movie] setting is available, and the text is displayed for approximately 5 seconds while the clip is displayed.[Select Font]When you add a check mark and click [Change...], you can change settings such as the font style, size, and color.[Background Color:]When you click [Palett...], you can change the background color of the text.
- Click [OK].
After making the settings, click [OK] to apply them and add the clip to the Storyboard. You can check the results in the preview area.You can edit the opening, ending, or message clips that you added by clicking the
 icon that is displayed when you position the mouse cursor over the clip.
Sorting or deleting sources
You can drag and drop the image files, movie files, and message clips that were added to the Storyboard to rearrange the order.
Refer to "Arranging, Adding, and Deleting Sources" for details on how to arrange or delete the files.
Adding background music
You can add background music to the project in the Storyboard.
Prepare a music (audio) file to use for the background music, and register it in the [Decoration/Duration Settings] tab in the movie creation window. Standard audio files are supported.
Music file formats that can be registered are WAV and AAC.
Refer to "Inserting Background Music (Audio)" for details on registering background music.
Proceed to "Step 3: Export the Edited Results as a Movie File" next.