
- Home
- Editing Movies (ViewNX-Movie Editor)
- Detailed Operation
- Exporting Movies (Converting/Combining/Creating Movies)
Font size
- S
- M
- L
Exporting Movies (Converting/Combining/Creating Movies)
You can export the created Storyboard as a new movie file.
Configuring movie export settings
- Click
 .
.
 The [Output Movie] window is displayed.
- Configure the settings.
[Output Movie] window
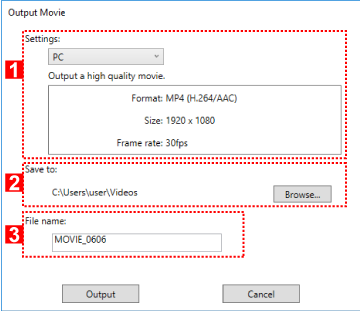
When you set the items below and click [Output], the created Storyboard and movie file are exported as a new movie file.
The displayed items vary depending on the item that is selected in the general settings window.
1
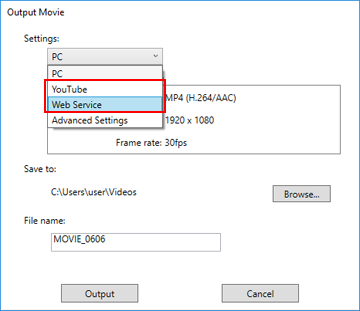
[Settings:]
When [Edit Movie] is selected in the general settings window and one of the export styles listed below is specified, the details and advanced settings of the export style (Format:, Size:, Frame rate:) are displayed.
- [PC]
- Exports a movie with high image quality. Movies that are 60 minutes or longer cannot be exported.
- [YouTube]
- Exports a compact sized movie for YouTube. Movies that are 15 minutes or longer, or 2 GB or greater, cannot be exported.
- [Web Service]
- Exports a compact sized movie for Web services. Movies that are 15 minutes or longer, or 1 GB or greater, cannot be exported.
- [Advanced Settings]
- Exports a movie with the desired advanced settings (Format:, Size:, Frame rate:). Movies that are 60 minutes or longer cannot be exported.
2
[Save to:]
The save destination folder is displayed. To change it, click [Browse...] and select a different folder.
3
[File name:]
The file name of the movie is displayed. To change it, click the input box and enter a new file name.
When [Trim Movie] is selected in the general settings window
When you select a movie file that was trimmed in ViewNX-i, start ViewNX-Movie Editor, and click [Trim Movie] in the general settings window, you can choose the export styles listed below.
- [Quick]
- Quickly extract the portion that was specified for playback in ViewNX-i (processed in approximately 1-sec increments/H.264 movie only).
- [Advanced Settings]
- Export the portion that was specified for playback in ViewNX-i, using the desired settings.
When [Combine Movies] is selected in the general settings window
When you select multiple movies that were recorded using the same settings in ViewNX-i, start ViewNX-Movie Editor, and click [Combine Movies] in the general settings window, the export style shown below is displayed.
- [Quick]
- Quickly combine the selected movies into a single movie file.
Items to be set
The displayed export style details vary depending on the item that is selected in the general settings window. If you select [Trim Movie] or [Edit Movie] and display the [Output Movie] window, you can select [Advanced Settings] to set or check the items below. The items that are displayed or available vary depending on the source type or the selected export style.
[Format:]
Select the file format from the 3 types listed below.
- [MP4 (H.264/AAC)]
- Extension: .mp4
- Video compression format: H.264
- Audio format: AAC
- [MOV (H.264/AAC)]
- Extension: .mov
- Video compression format: H.264
- Audio format: AAC
- [MOV (H.264/Linear PCM)]
- Extension: .mov
- Video compression format: H.264
- Audio format: Linear PCM
Select [MOV (H.264/AAC)] for a smaller file size when exporting the movie.
[Size:]
Selectable items will vary depending on factors such as the aspect ratio of the movie to be exported.
- 640 x 424 (3:2)
- 640 x 480 (4:3)
- 960 x 540 (16:9)
- 1280 x 720 (16:9)
- 1920 x 1080 (16:9)
The default size is selected based on the size of the image and movie files used in the Storyboard.
The [1920 x 1080] size is selected if the Storyboard only includes still images.
[Frame rate:]
The number of frames per second is displayed for the movie to be exported. The optimum frame rate is selected based on selected export style (50 fps/60 fps for [PC], and 24 fps/25 fps/30 fps for [YouTube] or [Web Service]).
File name and save destination
When exporting, you can specify the file name and save destination.
[File name:]
Enter file name of the exported movie.
If the number of characters in the file name and folder name exceeds the limit, the [Output] button at the bottom of the screen is temporarily disabled (Windows only).
[Save to:]
Set the save destination of the movie to be exported.
Setting the size of the created movie
The size of the created movie is automatically determined based on the largest movie file (i.e. the movie with the largest area in terms of horizontal and vertical pixel dimensions) in the Storyboard, in the order of priority described below.
- When export style is [PC] or [YouTube]:
- The [1920 x 1080] size is applied when the source size is [1920 x 1080] or larger in area.
- When export style is [Web Service]:
- The [1280 x 720] size is applied when the source size is [1280 x 720] or larger in area.
- When the aspect ratio of the movie is 3:2:
- The [640 x 424] size is applied.
- When the aspect ratio of the movie is 4:3:
- The [640 x 480] size is applied.
- When none of the conditions above apply:
- The [1280 x 720] size is applied.
About frame rate
The actual number of frames per second for the [Frame rate:] settings are as follows.
- 24 fps: playback 23.976 frames per second.
- 25 fps: playback 25 frames per second.
- 30 fps: playback 29.97 frames per second.
- 50 fps: playback 50 frames per second.
- 60 fps: playback 59.94 frames per second.
Creating movies for upload to Web services
When exporting movies, you can select [YouTube] or [Web Service] for the export style, which reduces file size and configures other properties to make movies easy to upload.
- In the [Output Movie] window, select [YouTube] or [Web Service].
- Click [Output].
If the movie is 15 minutes or longer, or if the file size exceeds 2 GB (for YouTube or NIKON IMAGE SPACE) or 1 GB (for Web Service), an error message is displayed and the movie is not exported. Return to the Storyboard and modify the sources.