
- Home
- Basic Operations
- Step 5: Classify Still Images or Movies
Font size
- S
- M
- L
Step 5: Classify Still Images or Movies
In ViewNX-i, you can sort still images or movies and display only files filtered by specific conditions. You can also apply labels and ratings to images and use them as filter conditions. If using the Photo Tray, you can add images from different folders to it.
Set the workspace to [Browse] when classifying files.
- Labeling or rating
- Showing only desired files (Filter bar)
- Adding images or movies to the Photo Tray
Labeling or rating
Labeling is a function to classify images. There are labels from 1 to 9, and 0 is automatically assigned to non-labeled images. Each label is identified by its unique color.
Rating is a function to rate the value or importance of images or movies on a scale of one to five using stars, or assign a mark to images that are candidates for deletion.
You can apply either a label, rating, or both to an image.
- Select the image or movie to label or rate.
- Select [Apply Labels]/[Apply Ratings] in the [Image] menu.
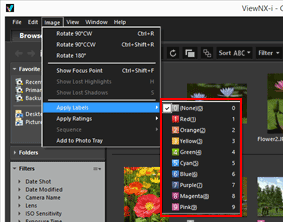 The selected image is labeled or rated.Labeling and rating can be performed with the access button, which is displayed when you locate the cursor on a thumbnail.For details on the access button, refer to "Thumbnail Arrangement".For details on labeling or rating images, refer to "Viewing/Editing Embedded Information of Images".
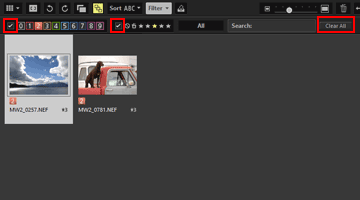
Showing only desired files (Filter bar)
You can display only the files that meet your specified conditions in the current folder. This is convenient for narrowing down the desired files when uploading to a Web service or printing.
- Click [Filter].
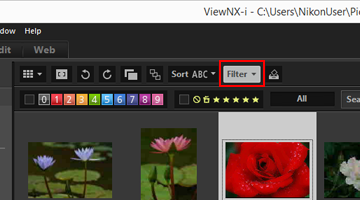 The Filter bar is displayed.
Showing files by selecting the desired file format
- Click the area on the right of the rating icons to display the dropdown list, and select a desired file format.
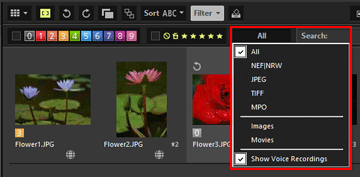 Only images in the selected file format are displayed in the Image View area or Filmstrip.
Filtering images by label or rating
- Specify the filter options by selecting a label or rating on the Filter bar.
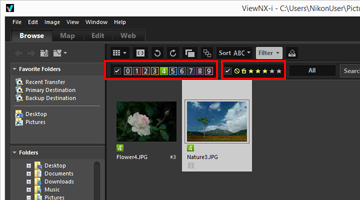 Click the desired label or rating icons to specify the filter conditions.
- Only images that meet your specified conditions are displayed in the Image View area or Filmstrip.
- Multiple label numbers can be selected. You can specify a range of ratings based on star marks. Also, you can set conditions combining label numbers with ratings.
- Filter conditions will remain after you select another folder.
Canceling filtering
- To cancel filtering by label or rating, click
 .
. - To cancel all filter settings, click [Clear All] on the Filter bar.
- While filtering files, you can hide the Filter bar and temporarily cancel the filter by clicking [Filter].
Click [Filter] again to filter the files based on the same conditions.
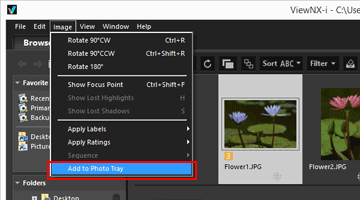
Adding images or movies to the Photo Tray
You can temporarily add images or movies to the Photo Tray without changing their existing location. This is convenient for collecting the desired files from multiple folders when uploading to a Web service or printing. The Photo Tray is displayed at the bottom of the window. Click  /
/ to close it.
/ to close it.
- Select the thumbnail to add to the Photo Tray.
- Select [Add to Photo Tray] in the [Image] menu.
 The number of added files is displayed, and the added images are also displayed in the Photo Tray if it is open.When [Image Viewer] or [Full Screen] is selected, the orientation of the Photo Tray matches that of the Filmstrip. When the Filmstrip is vertically displayed, the Photo Tray is also vertically displayed.The Photo Tray is not displayed if [Close Filmstrip] is selected. For details on the Filmstrip display settings, refer to "Basic Operations of the ViewNX-i Window".
Adding to the Photo Tray
- Dragging and dropping a thumbnail onto the Photo Tray can also add the image to it.
 is displayed in the Toolbar, Photo Tray, and access button. After selecting an image, clicking also adds the image to the Photo Tray.
- For details on the access button, refer to "Thumbnail Arrangement".
- The Photo Tray content will be restored when ViewNX-i is rebooted.
- Folders cannot be added to the Photo Tray.
- Files that exist on Web services cannot be added to the Photo Tray.
- When adding Smart Photo Selector images or NEF/NRW + JPEG images that are displayed as a single image, only their key image is added.
Handling images in the Photo Tray
To select a file, click the thumbnail in the Photo Tray.
- The file selection status of thumbnails in the Photo Tray does not apply to the Image View area.
- Shooting information and XMP/IPTC information are also displayed on the palette when a file is selected in the Photo Tray.
- The Filter bar settings do not apply to the images in the Photo Tray.
Removing images from the Photo Tray
- Select the image to remove from the Photo Tray.
- Click
 on the Toolbar.
Removing images
- When removing an image, no message is displayed.
- Moving files using ViewNX-i or other applications removes the files from the Photo Tray.
- Deleting files using ViewNX-i or other applications removes the files from the Photo Tray.
- If an image added to the Photo Tray no longer exists, the image is removed from the Photo Tray.