The Levels and Tone Curves Tool
![]() Watch and learn! Digitutor
Watch and learn! Digitutor
Adjust contrast, tone curves (brightness), and color balance. Adjustments can be made to specific portions of the tone range, enhancing pictures without sacrificing detail. This can be used to exploit the gamut and dynamic range of specific printers, monitors, or other devices to the full.
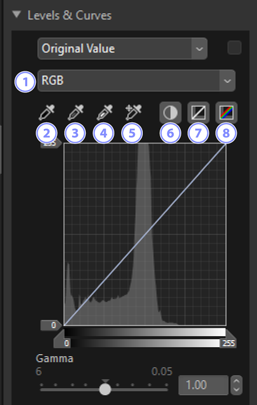
 Channel
- Choose the channel to which changes will apply.
 Set Black Point
- Click this button and then click the picture to sample the colors for the pixel under the cursor. The black point sliders for the [Red], [Green], and [Blue] channels will be set to the values for the selected pixel.
 Set Neutral Point
- Click this button and then click the picture to sample the colors for the pixel under the cursor. Gamma for the [Red], [Green], and [Blue] channels will be adjusted to equalize the RGB values for the selected pixel.
 Set White Point
- Click this button and then click the picture to sample the colors for the pixel under the cursor. The white point sliders for the [Red], [Green], and [Blue] channels will be set to the selected pixel.
 Add Anchor Point
- Click this button and then click the picture to add points to the curves for all channels corresponding to the values of the pixel under the cursor.
 Auto Contrast
- Set white and black points automatically to adjust the distribution of colors for each channel.
 Reset Current Channel
- Restore the default curve for the current channel.
 Reset All Channels
- Restore the default curves for all channels.
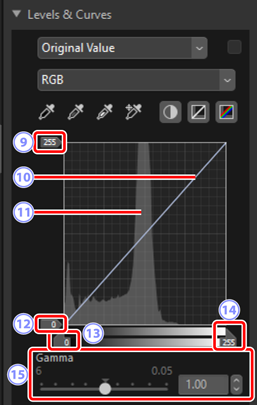
 White-Point Output-Level Slider
- Choose the maximum output level for the current picture. Dragging the slider down lowers the brightness of the brightest pixels.
 Tone Curve
- The slope and shape of the curve determines the brightness of the picture in the corresponding portion of the tone range. Anchor points added to the curve can be deleted by pressing the delete key or dragging them out of the palette.
 Histogram
- View how the pixels in the picture are distributed with respect to brightness.
 Black-Point Output-Level Slider
- Choose the minimum output level for the current picture. Dragging the slider up increases the brightness of the darkest pixels.
 Black-Point Input Slider
- Dragging the slider to the right sets the pixels in the portion of the tone range to its left to the minimum output level (black, or when a specific color channel is selected, no color); the remaining pixels are fitted to the new tone range.
 White-Point Input Slider
- Dragging the slider to the left sets the pixels in the portion of the tone range to its right to the maximum output level (white, or when a specific color channel is selected, the maximum value for that channel); the remaining pixels are fitted to the new tone range.
 [Gamma]
- Dragging the slider to the left increases the brightness of mid-tones, while dragging it to the right makes mid-tones darker.
Sampling the Current Channel
To apply the auto contrast, black point, white point, and add anchor point tools only to the current channel, click the tool while pressing the control (or in macOS, the option) key.