The Adjustments Tab
![]() Watch and learn! Digitutor
Watch and learn! Digitutor
Enhance pictures using the tools in the adjustments/info palette [Adjustments] pane.
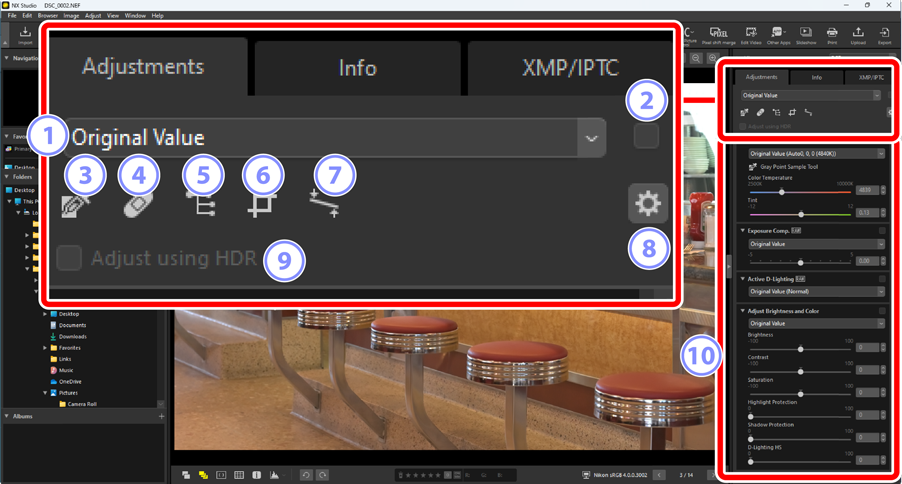
 Adjustments Manager
- Copy adjustments from one picture to another or save current settings for later use. You can also cancel all changes and restore pictures to their original, unenhanced state (0 Copying Adjustments).
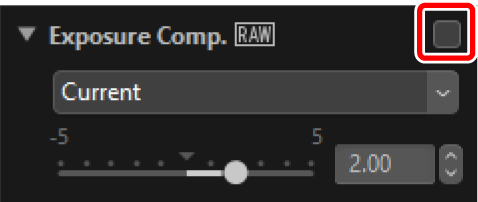
 “Apply” Check Box
- A check appears in this box whenever you make adjustments. Remove the check to hide adjustments.
 Gray Point Sample Tool
- Activate the gray point sample tool. Click anywhere in the picture to adjust white balance so that the sampled pixel takes on a neutral gray color (0 The White Balance Tool).
 Retouch Brush
- Remove dust and scratches (0 The Retouch Brush).
 Color Control Point Tool
- Enhance pictures using color control points (0 The Color Control Point Tool).
 Crop
Crop- Crop pictures (0 Cropping Pictures).
 Straighten Tool
- Straighten pictures (0 The Straighten Tool).
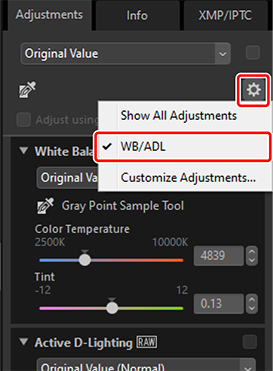
 Palette Options
- Choose the items displayed in the adjustments palette.
 [Adjust using HDR]
- Available only with RAW and merged pixel shift HLG pictures recorded on cameras that support tone-mode selection. Select this option to adjust pictures using the HDR tone range (0 “Adjust Using HDR” Enabled). Remove the check to use the SDR tone range (0 “Adjust Using HDR” Disabled).
 Adjustments Palette
- Enhance pictures.
The Adjustments Palette
The tools in the image adjustments palette are grouped into categories. Click the  /
/ buttons or the category name to view or hide each tool. The tools available vary with whether [Adjust using HDR] is enabled. In addition, those among them that can be adjusted vary with the type of file selected (0 Tools Available with HLG Photos).
Hiding Adjustments
With the exception of [Versions], edits are indicated by a check mark at each tool’s top right corner. Removing the check hides the changes.
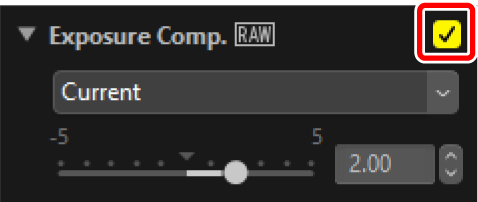

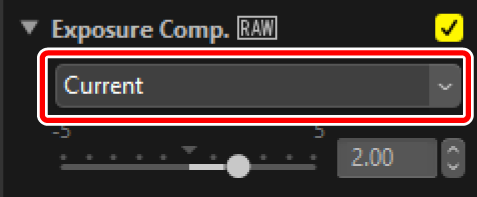
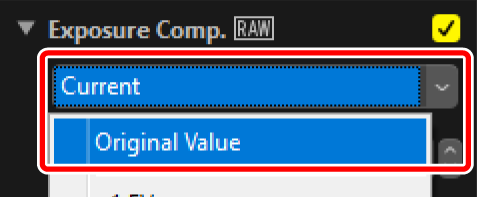
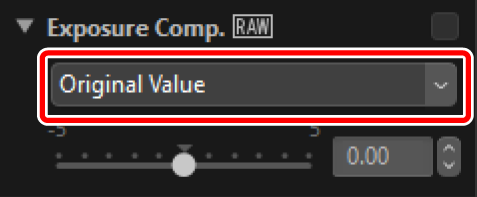
Reverting Adjustments
Each tool offers a pull-down menu that changes to [Current] when edits are made. Select [Original Value] to revert to the settings in effect when the picture was created.
“Adjust Using HDR” Disabled
Adjustments are made in the SDR tone range (0 HDR Pictures). HLG pictures recorded on cameras that support tone-range selection will be darkened due to this tone range being narrower than that of the original image.
[Basic Edit Palettes]
This category consists chiefly of tools for working with RAW and merged pixel shift pictures, such as [Picture Control], [Exposure Comp.], and [White Balance].
- [Picture Control]*: Adjust Picture Controls (0 The Picture Controls Tool).
- [White Balance]*: Adjust white balance (0 The White Balance Tool).
- [Exposure Comp.]*: Adjust exposure (0 The Exposure Compensation Tool).
- [Active D‑Lighting]*: Adjust Active D‑Lighting (0 The Active D‑Lighting Tool).
- [Adjust Brightness and Color]: Adjust overall brightness, contrast, and saturation or reveal details in highlights and shadows (0 The Adjust Brightness and Color Tool).
- [Dehaze]: Adjust overall contrast and saturation to reduce haziness (0 The Dehaze Tool).
* This tool is only available with RAW pictures and merged pixel shift pictures.
[Levels & Curves]
Adjust contrast, tone curves (brightness), and color balance (0 The Levels and Tone Curves Tool).
[Lightness, Chroma, and Hue Adjustment]
Adjust colors.
- [LCH]: Make adjustments to lightness, chroma, and hue channels (0 The LCH Tool).
- [Color Booster]: Optimize saturation to make colors more vivid (0 The Color Booster Tool).
[Portrait Enhancements]
Adjust skin softening, hue, and brightness for human portrait subjects.
- [Skin softening]*: Adjust skin softening (0 The Skin Softening Tool).
- [Portrait impression balance]*: Adjust hue and brightness (0 The Portrait Impression Balance Tool).
* This tool is only available with RAW pictures and merged pixel shift pictures.
[Adjust Details]
Reduce image noise and adjust sharpness.
- [Noise Reduction]: Reduce image noise (0 The Noise Reduction Tool).
- [Sharpness Adjustment]: Increase sharpness by making outlines more distinct (0 The Sharpness Adjustment Tool).
- [Film grain]: Add a grainy texture to the image (0 The Film Grain Tool).
[Touch-up]
Target selected areas for dust removal or color enhancement.
- [Retouch Brush]: Remove dust and scratches (0 The Retouch Brush).
- [Color Control Point]: Make targeted adjustments to color and brightness (0 The Color Control Point Tool).
[Adjust Composition]
Crop and straighten pictures and correct for the effects of perspective.
- [Crop]: Crop pictures (0 Cropping Pictures).
- [Straighten]: Straighten pictures (0 The Straighten Tool).
- [Perspective Control]: Correct for the effects of perspective (0 The Perspective Control Tool).
[Camera and Lens Corrections]
Correct for chromatic aberration and other artifacts.
- [Camera Corrections]: Correct for moiré, dust on the image sensor, and red-eye (0 The Camera Corrections Tool).
- [Lens Corrections]: Correct for axial and lateral color aberration and other artifacts originating with the lens (0 The Lens Corrections Tool).
[Versions]
Choose whether to apply changes made using Capture NX or Capture NX 2 (0 The Versions Tool).
“Adjust Using HDR” Enabled
Adjustments are made in the HDR tone range (0 HDR Pictures). We recommend that you use an HDR-compatible monitor to determine whether adjustments produce the desired results. Other monitors may fail to accurately reproduce highlights and saturated colors.
[Basic Edit Palettes]
This category consists chiefly of tools for working with RAW and merged pixel shift pictures, such as [Set Picture Control (HLG)], [Exposure Comp.], and [White Balance].
- [Set Picture Control (HLG)]*: Adjust Picture Controls (0 The Picture Controls (HLG) Tool).
- [White Balance]*: Adjust white balance (0 The White Balance Tool).
- [Exposure Comp.]*: Adjust exposure (0 The Exposure Compensation Tool).
* This tool is only available with RAW pictures and merged pixel shift pictures.
[Levels & Curves]
Adjust contrast, tone curves (brightness), and color balance (0 The Levels and Tone Curves Tool).
[Portrait Enhancements]
Adjust skin softening, hue, and brightness for human portrait subjects.
- [Skin softening]*: Adjust skin softening (0 The Skin Softening Tool).
- [Portrait impression balance]*: Adjust hue and brightness (0 The Portrait Impression Balance Tool).
* This tool is only available with RAW pictures and merged pixel shift pictures.
[Adjust Details]
Reduce image noise.
- [Noise Reduction]: Reduce image noise (0 The Noise Reduction Tool).
[Touch-up]
Target selected areas for dust removal.
- [Retouch Brush]: Remove dust and scratches (0 The Retouch Brush).
[Adjust Composition]
Crop and straighten pictures and correct for the effects of perspective.
- [Crop]: Crop pictures (0 Cropping Pictures).
- [Straighten]: Straighten pictures (0 The Straighten Tool).
- [Perspective Control]: Correct for the effects of perspective (0 The Perspective Control Tool).
[Camera and Lens Corrections]
Correct for chromatic aberration and other artifacts.
- [Lens Corrections]: Perform auto distortion control or correct for chromatic aberration and other artifacts originating with the lens (0 The Lens Corrections Tool).
Customizing the Adjustments Palette
![]() Watch and learn! Digitutor
Watch and learn! Digitutor
Choose the tools displayed in the adjustments palette to create custom workspaces. Custom workspaces can be recalled via the  menu.
menu.
Click
in the [Adjustments] tab and select [Customize Adjustments].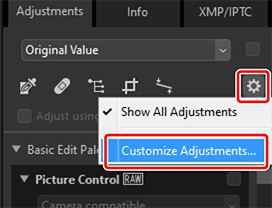
A dialog will be displayed, click [New] (
) and name the workspace ().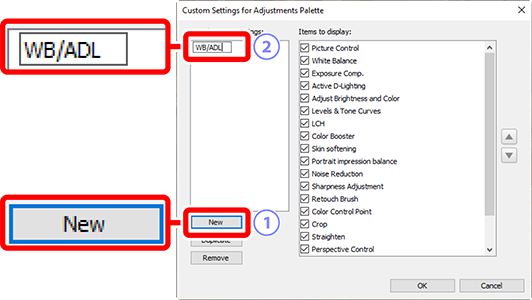
Select the tools that will be displayed in the adjustments palette. You can change the order of the tools using the
 and
and  buttons. Click [OK] to save the new workspace when changes are complete.
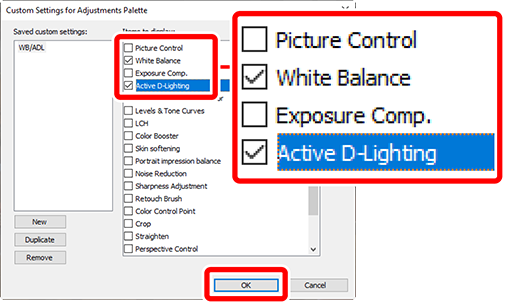
To display only the tools selected in Step 3, click
in the [Adjustments] tab and choose the workspace from the list.