The Picture Controls Tool
![]() Watch and learn! Digitutor
Watch and learn! Digitutor
Adjust Picture Control settings for the SDR tone range. Note that this tool is only available with RAW pictures and merged pixel shift pictures.
 Color Reproduction Process
Choose a color reproduction process. The choice of Picture Controls varies with the option selected. For RAW pictures in NRW format or pictures that were taken with a camera that supports the latest Picture Controls, this setting cannot be selected because it is fixed at the same setting for [Color Reproduction Process] under [NEF (RAW) Processing] in the options dialog (0 The Options Dialog, [NEF (RAW) Processing]).
- [Latest Picture Control]: Colors are processed using the latest Picture Controls, including those identified as [Creative Picture Control]. Picture Controls and parameters added with recent cameras can be applied to RAW pictures taken with models that do not offer these options.
- [Camera compatible]: Colors are processed using the Picture Controls for the camera that took the picture. Choose this option for color reproduction matching that used on the camera.
Color Reproduction Process
The option selected by default in the case of pictures for which two color reproduction options are available can be chosen using [NEF (RAW) Processing] > [Color Reproduction Process] in the options dialog (0 The Options Dialog, [NEF (RAW) Processing]).
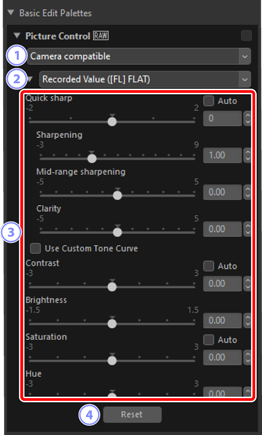
 Picture Control
- Choose a Picture Control for the pictures in the current selection. Select [Add to Custom Picture Controls] to save the adjusted picture control as a separate picture control (Custom Picture Control) in NX Studio (0 Custom Picture Controls).
 [Advanced Settings]
Adjust Picture Control parameters (0 “Advanced Settings”). Where available, parameters can be adjusted automatically by selecting [Auto]. Note that even in the case of pictures taken under similar conditions, the results may vary with exposure and the position and size of the subject in the frame.
Caution: Enabling or Disabling “Adjust Using HDR”
Enabling or disabling [Adjust using HDR] resets all Picture Control settings.
- Enabling [Adjust using HDR] after choosing [Monochrome] or [Flat] for [Picture Control] changes the selection to the corresponding [Set Picture Control (HLG)] option, respectively [[HLG MC] Monochrome] or [[HLG FL] Flat]. If an option other than [Monochrome] or [Flat] is selected, the Picture Control will change instead to [[HLG SD] Standard].
 [Reset]
- Reset all parameters to their default values.
“Advanced Settings”
Adjust the values for each parameter in [Advanced Settings] to fine-tune the selected Picture Control. Parameters displayed depend on whether or not the latest Picture Control has been applied to the picture.
Images with the Latest Picture Controls Applied
Selecting pictures taken with a camera using the latest Picture Controls (the color reproduction process option fixed to [Camera compatible]) or pictures with the color reproduction process set to [Latest Picture Control] displays the following parameters. If you select [Flexible Color] as the Picture Control option, see "The Picture Controls (Flexible Color) Tool" (0The Picture Controls (Flexible Color) Tool).
- [Quick sharp]
Apply sharpening to areas of contrast within the picture.
- Adjusting [Quick sharp] simultaneously adjusts [Sharpening], [Mid-range sharpening], and [Clarity] for well-balanced results. Choose higher values for heightened sharpness and lower values for greater softness.
- [Sharpening], [Mid-range sharpening], and [Clarity] each apply to different areas within the picture. Each can be adjusted individually.
- [Sharpening]: Apply sharpening to small areas of contrast.
- [Mid-range sharpening]: Apply sharpening to areas of contrast larger than those affected by [Sharpening] and smaller those affected by [Clarity].
- [Clarity]: Apply sharpening to large areas of contrast. Fine outlines and the brightness and contrast of the picture as a whole are unaffected.
- [Use Custom Tone Curve]
- Select this option to display a custom tone curve, allowing you to adjust the contrast and tone curves (brightness) of the currently selected Picture Control (0 Using a Custom Tone Curve). These parameters cannot be adjusted when [Auto] or [Creative Picture Control] is selected for Picture Control.
- [Contrast]
- Adjust the contrast of the overall image. Choose lower values for less contrast, higher values for more contrast. This parameter cannot be adjusted if the image has been adjusted with a custom tone curve.
- [Brightness]
- Brighten or darken mid-tones (tones that fall in the range between highlights and shadows). The effect does not extend to highlights and shadows, ensuring that details in these areas of the image are preserved. This parameter is not available with the [Auto] or [Creative Picture Control] Picture Controls. It cannot be adjusted if the image has been adjusted with a custom tone curve.
- [Saturation]
- Control the vividness of colors. Choose lower values for more muted colors and higher values for more vivid colors. This parameter is not available with the [Monochrome], [Flat Monochrome], [Deep Tone Monochrome], [Sepia], [Blue], [Red], [Pink], [Charcoal], [Graphite], [Binary], or [Carbon] Picture Controls.
- [Hue]
- Adjust hue. This parameter is available only with the [Standard], [Neutral], [Vivid], [Portrait], [Rich Tone Portrait], [Landscape], [Flat], [Dream], [Morning], [Pop], and [Sunday] Picture Controls.
- [Filter Effect]
- Simulate the effects of color filters on monochrome pictures. This parameter is available only with the [Monochrome], [Flat Monochrome], [Deep Tone Monochrome], [Sepia], [Blue], [Red], [Pink], [Charcoal], [Graphite], [Binary], and [Carbon] Picture Controls.
- [Toning]
- Choose a tint for monochrome pictures. Choose from nine different tints including cyanotype and old-fashioned sepia, as well as [B&W] (black and white). This parameter is available only with the [Monochrome], [Flat Monochrome], [Deep Tone Monochrome], [Charcoal], [Graphite], [Binary], and [Carbon] Picture Controls.
- [Adjust Saturation]
- Adjust the saturation of the tint selected for [Toning]. This parameter is available only with the [Monochrome], [Flat Monochrome], [Deep Tone Monochrome], [Charcoal], [Graphite], [Binary], and [Carbon] Picture Controls. Note, however, that saturation cannot be adjusted when [B&W] is selected for [Toning].
- [Toning]
- Choose the shade of color used. This parameter is available only with the [Sepia], [Blue], [Red], and [Pink] Picture Controls.
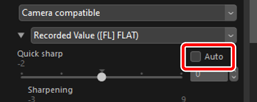
“Auto”
When the [Auto] Picture Control is selected, settings can be adjusted in the range [A−2] to [A+2].
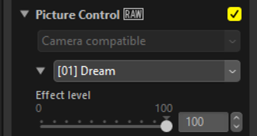
Creative Picture Controls
An [Effect level] slider is displayed when a [Creative Picture Control] such as [Dream], [Morning], or [Pop] is selected. Use the slider to choose the effect level.
Images with Earlier Picture Controls Applied
Selecting pictures with the color reproduction process set to [Camera compatible] displays the following parameters.
- [Quick Adjust]/[Quick sharp]
Either [Quick Adjust] or [Quick sharp] will be displayed depending on the selected picture.
- [Quick Adjust] allows you to perform across-the-board adjustments to Picture Control parameters. The effect of the selected Picture Control can be muted by dragging the slider left or heightened by dragging the slider right. [Quick Adjust] affects all Picture Control settings simultaneously and cancels any changes made separately to the individual parameters.
[Quick sharp] allows you to apply sharpening to areas of contrast within the picture.
- Adjusting [Quick sharp] simultaneously adjusts [Sharpening], [Mid-range sharpening], and [Clarity] for well-balanced results. Choose higher values for heightened sharpness and lower values for greater softness.
- [Sharpening], [Mid-range sharpening], and [Clarity] each apply to different areas within the picture. Each can be adjusted individually.
- [Sharpening]: Apply sharpening to small areas of contrast.
- [Mid-range sharpening]: Apply sharpening to areas of contrast larger than those affected by [Sharpening] and smaller those affected by [Clarity].
- [Clarity]: Apply sharpening to large areas of contrast. Fine outlines and the brightness and contrast of the picture as a whole are unaffected.
- [Use Custom Tone Curve]
- Select this option to display a custom tone curve, allowing you to adjust the contrast and tone curves (brightness) of the currently selected Picture Control (0 Using a Custom Tone Curve). These parameters cannot be adjusted with the [Auto] or [Creative Picture Control] Picture Controls, or for pictures taken with some cameras.
- [Sharpening]
- Control the sharpness of outlines. Choose higher values for more sharpening.
- [Clarity]
- Adjust clarity. This option is available only with pictures taken using cameras that support the [Clarity] parameter.
- [Contrast]
- Adjust the contrast of the overall image. Choose lower values for less contrast, higher values for more contrast.
- [Brightness]
- Brighten or darken mid-tones (tones that fall in the range between highlights and shadows). The effect does not extend to highlights and shadows, ensuring that details in these areas of the image are preserved. This parameter is not available with the [Auto] or [Creative Picture Control] Picture Controls.
- [Saturation]
- Control the vividness of colors. Choose lower values for more muted colors and higher values for more vivid colors. This parameter is not available with the [Monochrome], [Sepia], [Blue], [Red], [Pink], [Charcoal], [Graphite], [Binary], or [Carbon] Picture Controls.
- [Hue]
- Adjust hue. This parameter is available only with the [Standard], [Neutral], [Vivid], [Portrait], [Landscape], [Flat], [Dream], [Morning], [Pop], and [Sunday] Picture Controls.
- [Filter Effect]
- Simulate the effects of color filters on monochrome pictures. This parameter is available only with the [Monochrome], [Sepia], [Blue], [Red], [Pink], [Charcoal], [Graphite], [Binary], and [Carbon] Picture Controls.
- [Toning]
- Choose a tint for monochrome pictures. Choose from nine different tints including cyanotype and old-fashioned sepia, as well as [B&W] (black and white). This parameter is available only with the [Monochrome], [Charcoal], [Graphite], [Binary], and [Carbon] Picture Controls.
- [Adjust Saturation]
- Adjust the saturation of the tint selected for [Toning]. This parameter is available only with the [Monochrome], [Charcoal], [Graphite], [Binary], and [Carbon] Picture Controls. Note, however, that saturation cannot be adjusted when [B&W] is selected for [Toning].
- [Toning]
- Choose the shade of color used. This parameter is available only with the [Sepia], [Blue], [Red], and [Pink] Picture Controls.
Using a Custom Tone Curve
Adjust the contrast and tone curves (brightness) of the currently selected Picture Control. Adjustments can be made to specific portions of the tone range, enhancing pictures without sacrificing detail. These parameters cannot be adjusted with the [Auto] or [Creative Picture Control] Picture Controls, or for pictures taken with some cameras.
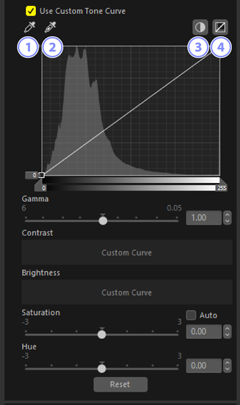
- Set Black Point
- Click this button and then click the picture to automatically adjust the black point slider so that the pixel under the cursor becomes the darkest tint (black).
- Set White Point
- Click this button and then click the picture to automatically adjust the white point slider so that the pixel under the cursor becomes the brightest tint (white).
- Auto Contrast
- Automatically adjust black and white points so that the brightest pixel in the image becomes white, and the darkest pixel in the image becomes black. The tones are shifted accordingly to adjust the contrast of the overall image.
- [Reset]
- Restore the default curve.
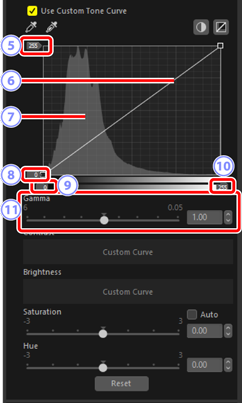
 White-Point Output-Level Slider
- Choose the maximum output level for the current picture. Dragging the slider down lowers the brightness of the brightest pixels.
 Tone Curve
- The slope and shape of the curve determines the brightness of the picture in the corresponding portion of the tone range. Anchor points added to the curve can be deleted by pressing the delete key or dragging them out of the palette.
 Histogram
- View how the pixels in the picture are distributed with respect to brightness.
 Black-Point Output-Level Slider
- Choose the minimum output level for the current picture. Dragging the slider up increases the brightness of the darkest pixels.
 Black-Point Input Slider
- Dragging the slider to the right sets the pixels in the portion of the tone range to its left to the minimum output level (black); the remaining pixels are fitted to the new tone range.
 White-Point Input Slider
- Dragging the slider to the left sets the pixels in the portion of the tone range to its right to the maximum output level (white); the remaining pixels are fitted to the new tone range.
 [Gamma]
- Dragging the slider to the left increases the brightness of mid-tones, while dragging it to the right makes mid-tones darker.
Applying Picture Controls with Custom Tone Curves to Existing Pictures
Picture Controls with custom tone curves can be saved as Custom Picture Controls and applied to existing pictures (0 Custom Picture Controls).
Applying Picture Controls with Custom Tone Curves While Shooting
Picture Controls with custom tone curves can be saved as Custom Picture Controls and exported as Picture Control files (0 Exporting Custom Picture Control Files). Custom Picture Controls can be applied while shooting by importing Custom Picture Control files on the camera.