The Picture Control (Flexible Color) Tool
![]() Watch and learn! Digitutor
Watch and learn! Digitutor
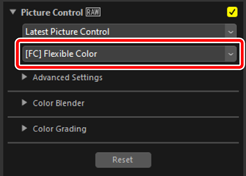
Selecting [Flexible Color] for Picture Control allows you to make a variety of adjustments with a high degree of freedom. Using NX Studio to create your preferred image processing settings, saving them as Custom Picture Controls, and importing them to your camera allows you to take pictures with a unique atmosphere. [Flexible Color] has [Color Blender] and [Color Grading] options in addition to the [Advanced Settings] parameters, allowing you to intuitively adjust the tint.
“Flexible Color”
All the following conditions must be met to use [Flexible Color] for Picture Control.
- Pictures taken in SDR tone mode.
- Pictures taken with a camera that supports the latest Picture Controls (pictures with the color reproduction process option fixed to [Camera compatible]) or pictures with the color reproduction process set to [Latest Picture Control].
Cautions: Custom Picture Controls Based on “Flexible Color”
- Only cameras that support [Flexible Color] can import these Custom Picture Controls.
- Custom Picture Controls based on [Flexible Color] cannot be adjusted on the camera.
“Reset” Button
Click the [Reset] button to reset [Advanced Settings], [Color Blender], and [Color Grading] to their default values.
“Advanced Settings”
Adjust Picture Control parameters.
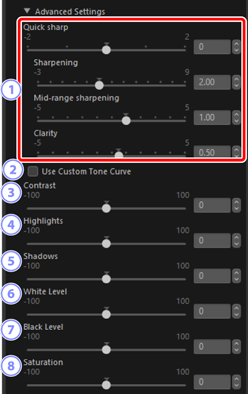
 [Quick sharp]
Apply sharpening to areas of contrast within the picture.
- Adjusting [Quick sharp] simultaneously adjusts [Sharpening], [Mid-range sharpening], and [Clarity] for well-balanced results. Choose higher values for heightened sharpness and lower values for greater softness.
[Sharpening], [Mid-range sharpening], and [Clarity] each apply to different areas within the picture. Each can be adjusted individually.
- [Sharpening]: Apply sharpening to small areas of contrast.
- [Mid-range sharpening]: Apply sharpening to areas of contrast larger than those affected by [Sharpening] and smaller those affected by [Clarity].
- [Clarity]: Apply sharpening to large areas of contrast. Fine outlines and the brightness and contrast of the picture as a whole are unaffected.
 [Use Custom Tone Curve]
- Select this option to display a custom tone curve, allowing you to adjust the contrast and tone curves (brightness) of the currently selected Picture Control (0 Using a Custom Tone Curve).
 [Contrast]
- Adjust the contrast of the overall image. Choose lower values for less contrast, higher values for more contrast. This parameter cannot be adjusted if the image has been adjusted with a custom tone curve.
 [Highlights]
- Adjust brightness in the bright areas of the picture (highlights). Choose higher values to make highlights brighter or lower values to make them darker. Reduce the brightness of bright areas or make them even brighter. This parameter cannot be adjusted if the image has been adjusted with a custom tone curve.
 [Shadows]
- Adjust brightness in the dark areas of the picture (shadows). Choose higher values to make shadows brighter, lower values to make shadows darker. Brighten the dark areas or make them even darker. This parameter cannot be adjusted if the image has been adjusted with a custom tone curve.
 [White Level]
- Adjust the brightness of the brightest area of the image. Choose higher values to make highlights brighter, lower values to make highlights darker. Reduce the brightness of white areas or emphasize their transparency. This parameter cannot be adjusted if the image has been adjusted with a custom tone curve.
 [Black Level]
- Adjust the brightness of the darkest area of the image. Choose higher values to make shadows brighter, lower values to make shadows darker. Brighten the dark areas or emphasize the darkness of the shadows. This parameter cannot be adjusted if the image has been adjusted with a custom tone curve.
 [Saturation]
- Control the vividness of colors. Choose lower values for more muted colors and higher values for more vivid colors.
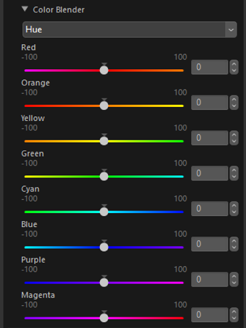
“Color Blender”
Adjust the tint for eight different colors in the image. Adjustments can be made in the [Color], [Hue], [Chroma], and [Brightness] channels. Available options vary with the selected channel.
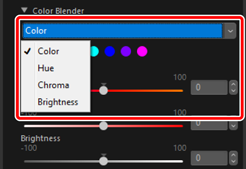
[Color]
Click one of the eight colors to adjust the [Hue], [Chroma], and [Brightness].
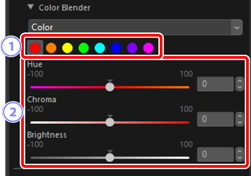
- Color Selection
- Click the color you want to adjust in the image. A yellow mark will appear in the upper right corner for the adjusted color.
- [Hue]/[Chroma]/[Brightness]
- Adjust the hue, chroma (saturation), and brightness of the selected color.
[Hue]
Adjust hue for each color. This also reflects the result of that adjustment if the [Hue] parameter under [Color] was adjusted.
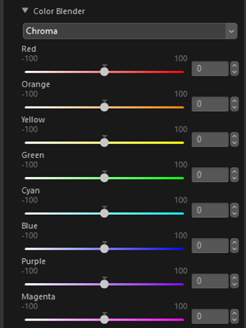
[Chroma]
Adjust chroma (saturation) for each color. This also reflects the result of that adjustment if the [Chroma] parameter under [Color] was adjusted.
[Brightness]
Adjust brightness for each color. This also reflects the result of that adjustment if the [Brightness] parameter under [Color] was adjusted.

“Color Grading”
Adjust the tints of highlights, mid-tones, and shadows with [Hue] and [Chroma], or brightness with [Brightness]. Select colors intuitively with the color wheel.
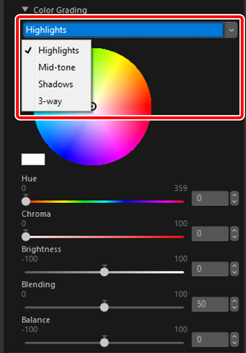
[Highlights]/[Mid-tone]/[Shadows]
Adjust the tint and brightness for highlights, mid-tones, and shadows. Select the color to be applied from the color wheel and the [Hue] and [Chroma] sliders.
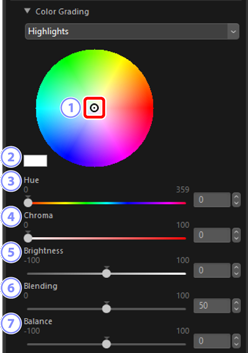
- Wheel Handle
- To apply a color to the image, click inside the color wheel or drag the wheel handle. The [Hue] and [Chroma] sliders will move with the wheel handle.
- Selected Color
- Display the color currently selected on the wheel handle or the [Hue] and [Chroma] sliders. The brightness is fixed at 100 and will not change even if you adjust the [Brightness] slider.
- [Hue]
- Select a color. The wheel handle will move with the slider.
- [Chroma]
- Adjust chroma for the selected hue. The wheel handle will move with the slider.
- [Brightness]
- Adjust brightness.
- [Blending]
Adjust the degree of overlap of [Highlights], [Mid-tone] and [Shadows]. Increase the [Blending] value to blend the color set for each area. If the value is reduced, the color set for each area will be less affected by the colors of other areas.
- The [Blending] value is a common value among [Highlights], [Mid-tone], [Shadows] and [3-way]. Adjusting the [Highlights] value also adjusts the [Mid-tone], [Shadows], and [3-way] values.
- [Balance]
Adjust the balance between highlights and shadows. Choose higher (positive) values to widen the range of highlights, lower (negative) values to widen the range of shadows.
- The [Balance] value is a common value among [Highlights], [Mid-tone], [Shadows] and [3-way]. Adjusting the [Highlights] value also adjusts the [Mid-tone], [Shadows], and [3-way] values.
[3-Way]
Simultaneously adjust the tint for [Highlights], [Mid-tone], and [Shadows].
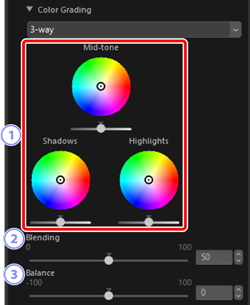
- Color Wheel/Brightness Slider
Color wheels for [Highlights], [Mid-tone], and [Shadows].
- Move the wheel handle to select a color.
- Adjust the brightness with the slider beneath each color wheel.
- [Blending]
Adjust the degree of overlap of [Highlights], [Mid-tone] and [Shadows]. Increase the [Blending] value to blend the color set for each area. If the value is reduced, the color set for each area will be less affected by the colors of other areas.
- The [Blending] value is a common value among [Highlights], [Mid-tone], [Shadows] and [3-way]. Adjusting the [3-way] value also adjusts the [Highlights], [Mid-tone] and [Shadows] values.
- [Balance]
Adjust the balance between highlights and shadows. Choose higher (positive) values to widen the range of highlights, lower (negative) values to widen the range of shadows.
- The [Balance] value is a common value among [Highlights], [Mid-tone], [Shadows] and [3-way]. Adjusting the [3-way] value also adjusts the [Highlights], [Mid-tone], and [Shadows] values.