The LCH Tool
![]() Watch and learn! Digitutor
Watch and learn! Digitutor
Make adjustments to lightness, chroma, and hue channels. Choose a channel using the menu in the LCH tool. The options available vary with the channel selected. The LCH tool is not displayed when [Adjust using HDR] is enabled.
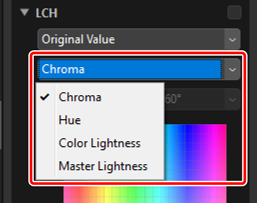
Chroma
Adjust color saturation (vividness). Increase or decrease color saturation over the entire picture or a portion of the color range, making colors more or less vivid.
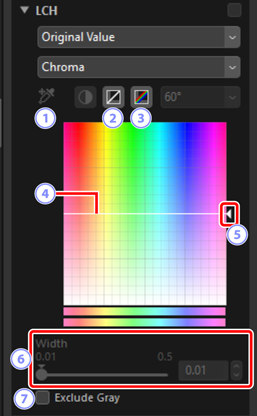
 Add Anchor Point
- Click this button and then click the picture to add a point to the chroma curve corresponding to the value of the pixel under the cursor.
 Reset Current Channel
- Reset the chroma curve to linear.
 Reset All Channels
- Reset the [Chroma], [Hue], [Color Lightness], and [Master Lightness] curves to linear.
 Chroma Curve
- Moving an anchor point on the curve upwards makes colors in the affected portion of the color range more vivid, while moving it downward makes the affected colors less vivid (grayer). Anchor points added to the curve can be deleted by pressing the delete key or dragging them out of the palette.
 Output Slider
- Increase or decrease the saturation of all colors in the image. Overall saturation can be increased by moving the slider up or decreased by moving it down.
 [Width]
- Adjust the width of the chroma curve. Move the slider right to increase the range of colors affected by changes to chroma, centered on the currently-selected point. Move the slider left to decrease the range of colors affected.
 [Exclude Gray]
- Select this option to adjust chroma without affecting grays. This allows chroma to be increased without introducing a cast to neutral colors.
Hue
Adjust hue over the entire picture or a portion of the color range. One application might be to deepen the colors in a pale blue sky.
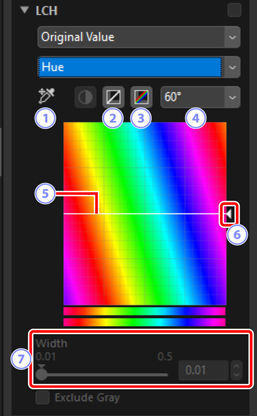
- Add Anchor Point
- Click this button and then click the picture to add a point to the hue curve corresponding to the value of the pixel under the cursor.
- Reset Current Channel
- Reset the hue curve to linear.
- Reset All Channels
- Reset the [Chroma], [Hue], [Color Lightness], and [Master Lightness] curves to linear.
- Scale
- Click to change the vertical scale from 60 ° through 120 ° to 180 ° and back again. The degrees in this case refer to a 360 ° color wheel. Increasing the scale increases the range of hues visible in the display, while decreasing the scale increases precision.
- Hue Curve
- Select an anchor point on the curve that corresponds to the desired input color and drag it up or down until it intersects with the desired output color. Anchor points added to the curve can be deleted by pressing the delete key or dragging them out of the palette.
- Output Slider
- Drag the slider up or down to modify the hue of all colors in the picture. The range of hues available varies with the option selected for scale (): ±60° when 60° is selected, ±120° when 120° is selected, or ±180° when 180° is selected.
- [Width]
- Adjust the width of the hue curve. Move the slider right to increase the range of colors affected by changes to hue, centered on the currently-selected point. Move the slider left to decrease the range of colors affected.
Color Lightness
Adjust the lightness of selected colors. This can be used, for example, to brighten the blue of a dark sky without affecting chroma or hue.
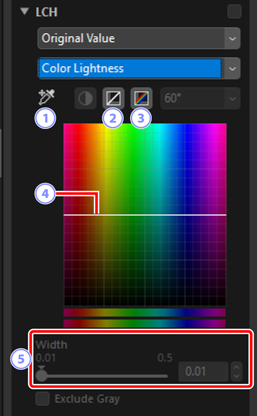
- Add Anchor Point
- Click this button and then click the picture to add a point to the color lightness curve corresponding to the value of the pixel under the cursor.
- Reset Current Channel
- Reset the color lightness curve to linear.
- Reset All Channels
- Reset the [Chroma], [Hue], [Color Lightness], and [Master Lightness] curves to linear.
- Color Lightness Curve
- The vertical axis corresponds to lightness, the horizontal axis to color. Moving an anchor point on the curve upwards makes colors in the affected portion of the color range brighter, while moving it downward makes the affected colors darker. Anchor points added to the curve can be deleted by pressing the delete key or dragging them out of the palette.
- [Width]
- Adjust the width of the color lightness curve. Move the slider right to increase the range of colors affected by changes to color lightness, centered on the currently-selected point. Move the slider left to decrease the range of colors affected.
Master Lightness
Adjust overall lightness without affecting chroma or hue. Settings can be adjusted using sliders or by directly editing the lightness curve.
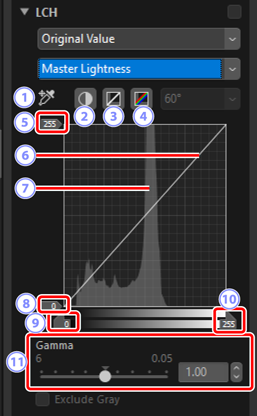
- Add Anchor Point
- Click this button and then click the picture to add a point to the master lightness curve corresponding to the value of the pixel under the cursor.
- Auto Contrast
- Increase contrast by setting the white and black points to exclude a set proportion of the brightest and darkest pixels in the image.
- Reset Current Channel
- Reset the master lightness curve to linear.
- Reset All Channels
- Reset the [Chroma], [Hue], [Color Lightness], and [Master Lightness] curves to linear.
- White-Point Output-Level Slider
- Choose the maximum output level (white point).
- Luminosity Curve
- The slope and shape of the curve determines the lightness of the picture in the corresponding portion of the tone range. Anchor points added to the curve can be deleted by pressing the delete key or dragging them out of the palette.
- Histogram
- View how the pixels in the picture are distributed with respect to lightness. The horizontal axis corresponds to lightness (in the range 0–255), the vertical axis to the number of pixels.
 Black-Point Output-Level Slider
- Choose the minimum (black point) output level.
 Black-Point Input Slider
- Choose the minimum (black point) input level.
 White-Point Input Slider
- Choose the maximum (white point) input level.
 [Gamma]
- Choose the midpoint (gamma value).