Combining Photos and Videos
Create new videos combining video and photos shot with your camera.
Basic Steps
The basic steps involved in creating videos are described below.
Supported File Types
Videos can include photos and video recorded with Nikon digital cameras in the following formats:
- Photos: JPEG, TIFF, HEIF, and RAW (NEF/NRW)
Merged pixel shift (NEFX) pictures cannot be spliced into videos. - Video: MOV, AVI, and MP4 (H.264/AAC)
Note that files with thumbnails marked cannot be spliced into MOV videos.
Format
The combined video will be saved in SDR using H.264 compression, no matter what the format of the original files.
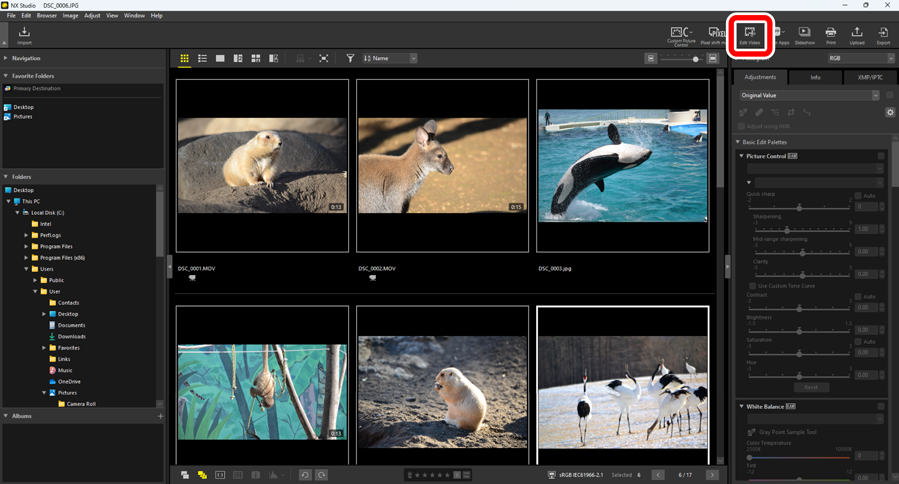
Click [Edit Video] in the toolbar after selecting files for the video in filmstrip or thumbnail view. Videos can include up to 200 photos and 20 video clips.
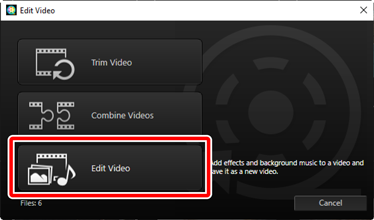
Select [Edit Video] from the action list when prompted.
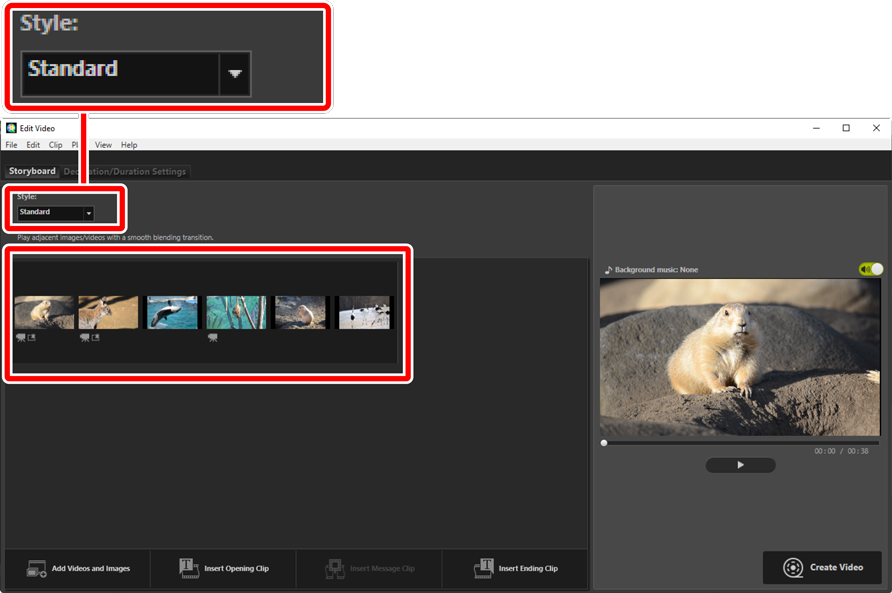
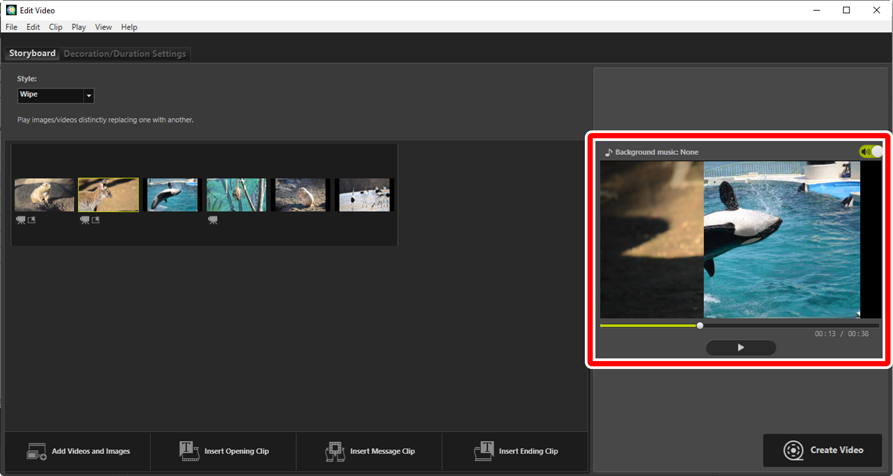
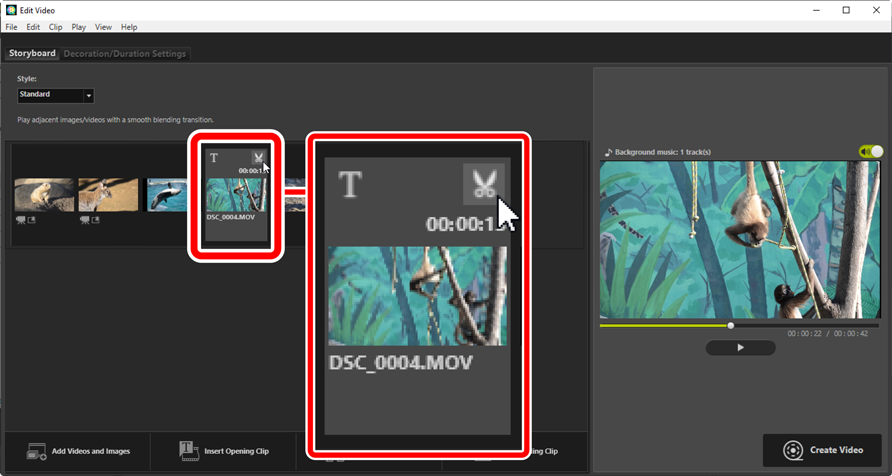
The [Edit Video] window will be displayed with the photos and videos you selected in Step 1 shown in the [Storyboard] tab (0 The [Storyboard] Tab). The items will be spliced together in the order listed, starting from the top left corner. Arrange the items in the desired order using drag and drop. Choose the transitions between items in the [Style] menu (0 Transitions).
Preview the video in the preview area. To mute background music or the audio recorded with the original video clips, click the
 toggle off (
 ).
).
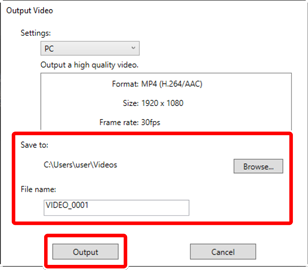
Click [Create Video] to display the [Output Video] dialog. After choosing the file type, frame size, and destination and adjusting other settings as desired, click [Output] to save the video (0 Exporting the Current Work).
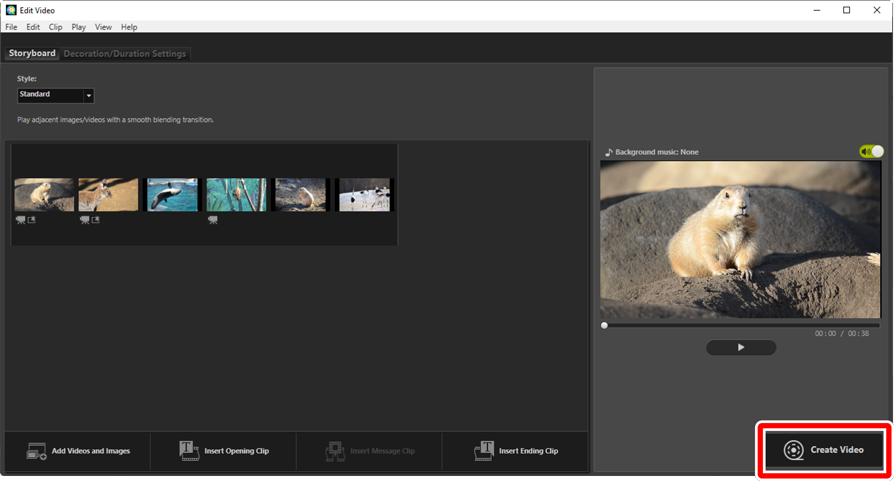
If desired, you can insert opening and closing titles or add captions to photos and video clips (0 Adding Text). You can also add background music (0 Background Tracks).
Saving/Recalling Works in Progress
If you close the [Edit Video] window while editing is in progress, a confirmation dialog will be displayed prompting you to save your work to date. Work can be resumed by selecting [Load Saved Settings] in the [File] menu.
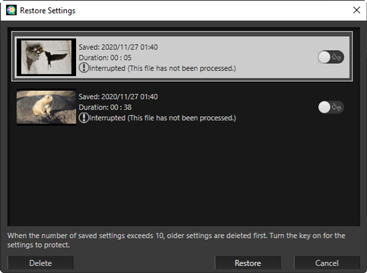
- You can save up to 10 works in progress. Once this limit is exceeded, an existing work will be deleted with each new work added, starting from the oldest work. To protect an existing work from deletion, click the
 toggle on (
 ). Up to five works can be protected at a time.
 - To resume a work in progress and display it in the storyboard, highlight it and click [Restore].
- If you select [Load Saved Settings] while working on another video, you will be prompted to save the current work.
The “Edit Video” Window
The elements of the “Edit Video” window are shown below.
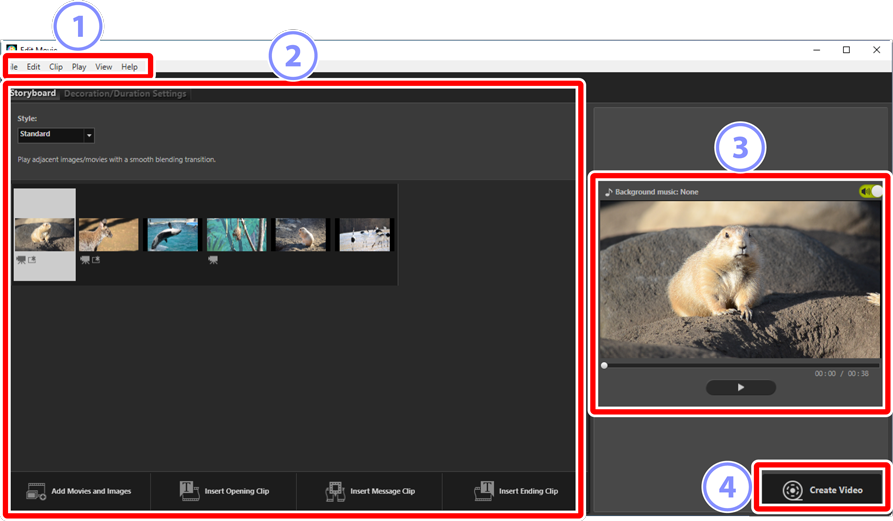
 Menu Bar
- Select menu options (0 Menu Items in the [Edit Video] Window).
 Settings Area
- The settings area features two tabs: a [Storyboard] tab where you can choose the transitions between slides and add, order, delete, and edit photos and video clips (0 The [Storyboard] Tab), and a [Decoration/Duration Settings] tab where you can select background music, add effects, and choose how long elements are displayed (0 The [Decoration/Duration Settings] Tab).
 Preview Area
- Preview the current work.
 [Create Video]
- View the [Output Video] dialog, where you can save your work as a new video (0 Exporting the Current Work).
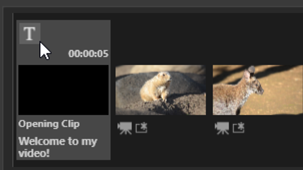
The [Storyboard] Tab
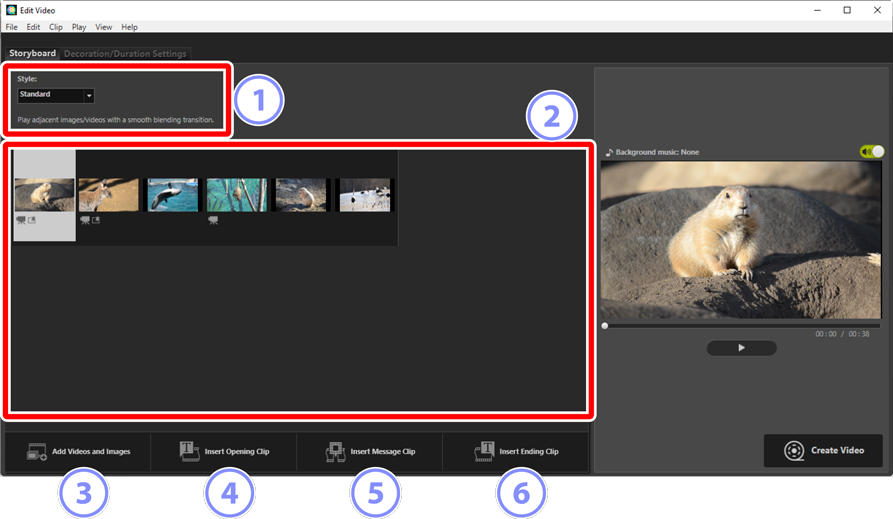
- [Style]
- Choose the transitions between items.
- Storyboard
Choose the order in which photos and video clips will appear, add titles, and perform other editing tasks.
- Items can be arranged in the desired order using drag and drop.
- Items can also be dragged into the storyboard from Windows Explorer or the Finder.
- Highlighted items can be deleted by pressing the delete key.
- [Add Videos and Images]
- Add photos and video clips to the current work. Click this button and then click [OK] to return to NX Studio when prompted. Select pictures in NX Studio and click [Edit Video] to add the items at the end of the storyboard in the [Edit Video] window.
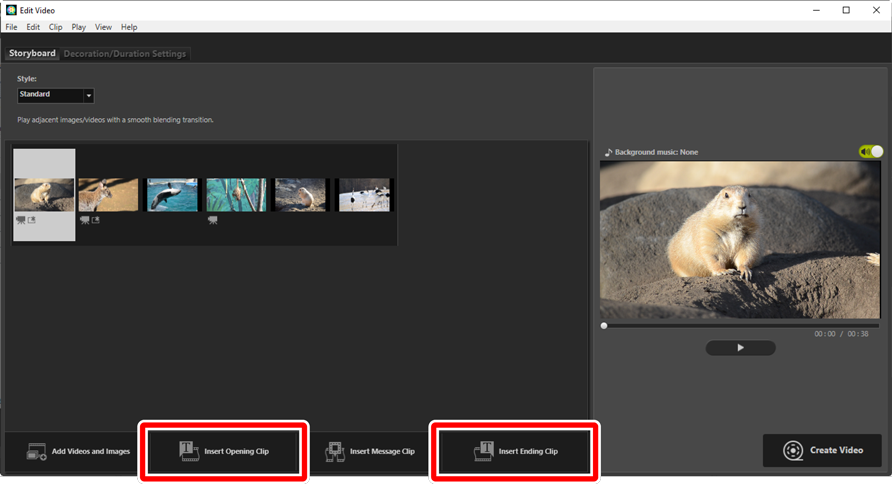
- [Insert Opening Clip]
A [Text Settings] dialog will be displayed where you can enter opening titles for the current work (0 The [Text Settings] Dialog).
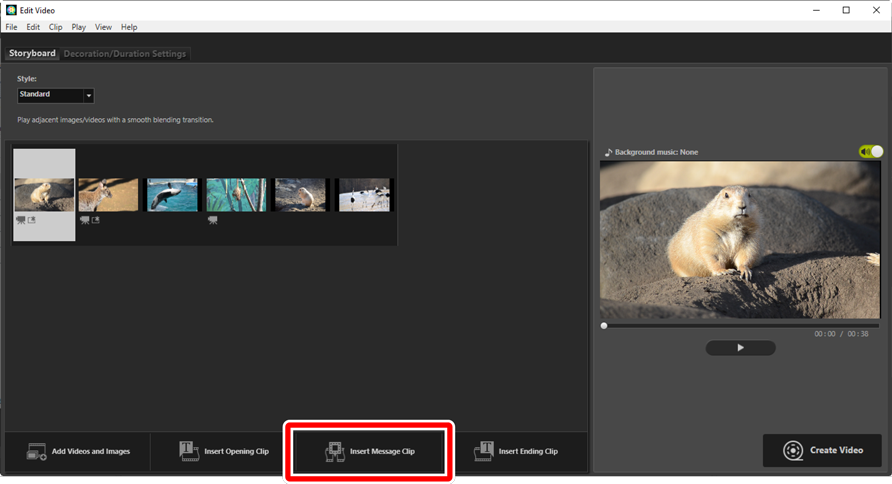
 [Insert Message Clip]
- A [Text Settings] dialog will be displayed where you can enter an intertitle to be inserted before the item currently selected in the storyboard (0 The [Text Settings] Dialog).
 [Insert Ending Clip]
- A [Text Settings] dialog will be displayed where you can enter closing titles for the current work (0 The [Text Settings] Dialog).
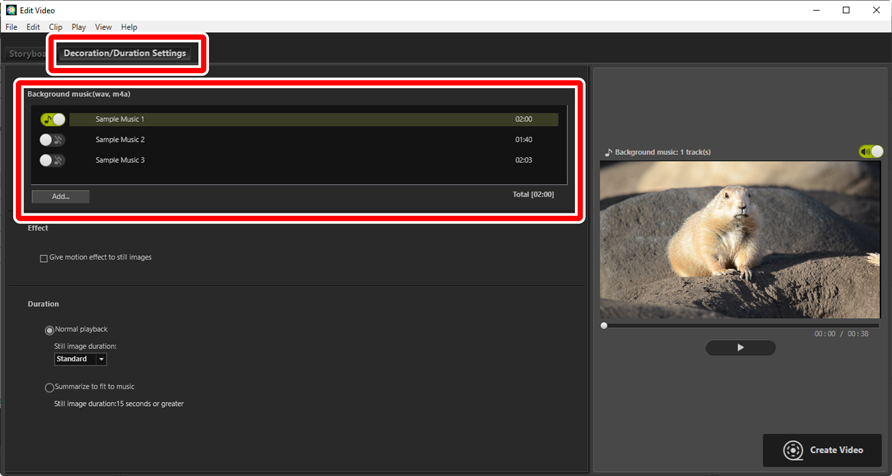
The [Decoration/Duration Settings] Tab
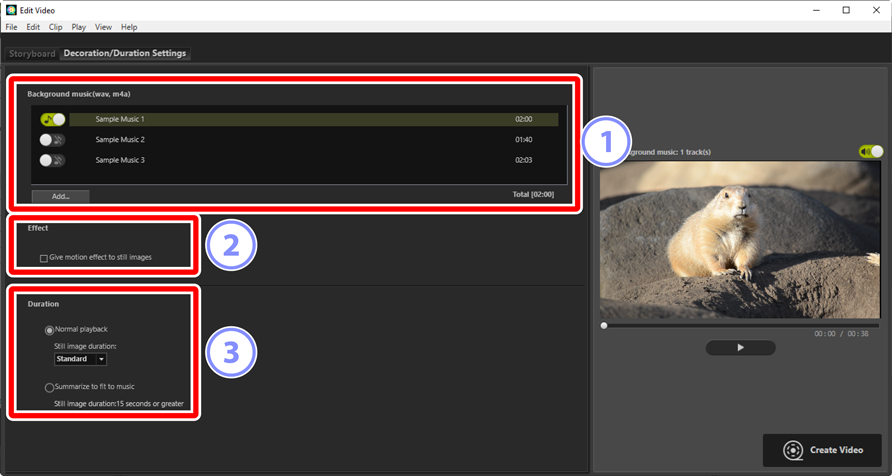
- [Background music (wav, m4a)]
- A list of the tracks that can be added as background music to the current work (0 Background Tracks).
- [Effect]
- Select [Give motion effect to still images] to add slow zoom and pan effects to photos.
- [Duration]
Choose how long photos are displayed.
- [Normal playback]: Choose an option for [Still image duration] from [Short], [Standard], and [Long] (display photos for about 3, 5, or 10 seconds respectively).
- [Summarize to fit to music]: This option is available when background music is enabled. It adjusts the display time for each photo so that the total matches the length of the background track. It cannot be selected if it would result in each photo being displayed for less than 2 seconds or for 15 seconds or more. For example, a minute-long background track requires at least 5, and no more than 30, photos.
Transitions
Use the [Style] menu in the storyboard tab to choose the transitions between items. The effect can be previewed in the preview area.
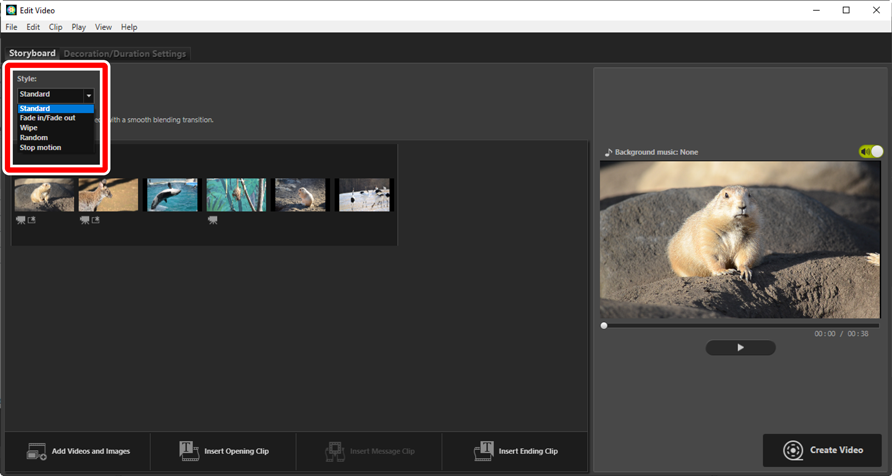
- [Standard]
- Choose for smooth transitions between items with no fade in or fade out.
- [Fade In/Fade Out]
- Choose for a fade transition between items.
- [Wipe]
- Each new item slides in from the right.
- [Random]
- The transition between each item is selected randomly.
- [Stop motion]
- Photos are displayed in quick succession with an abrupt, flip-book style transition between each image. The length of time each photo is displayed can be selected in the [Still image duration] menu, where you can choose from [0.1 sec], [0.2 sec], and [0.5 sec].
[Stop motion]
- If [Normal playback] is selected for [Duration] in the [Decoration/Duration Settings] tab, you will be able to choose the number of times the footage is repeated.
- If [Summarize to fit to music] is selected for [Duration] in the [Decoration/Duration Settings] tab, the footage will be repeated as necessary to match the length of the background track and [Repeat count] will be set automatically. Footage cannot however be matched to the length of the background track if this would result in a value for [Repeat count] of 31 or more.
- In some operating environments, transitions may not display correctly when [0.1 sec] or [0.2 sec] is selected for [Still image duration]. This can be addressed by reducing the size of the preview area.
Adding Text
You can add text to the current work. You can add opening and closing titles that are displayed for about 5 seconds each or add subtitles or other captions to photos and video clips.
Opening and Closing Titles
Selecting [Insert Opening Clip] or [Insert Ending Clip] in the [Storyboard] tab displays a [Text Settings] dialog where you can enter opening or closing titles. Clicking [OK] adds the text as a five-second clip to the beginning or end of the current work (0 The [Text Settings] Dialog).
Intertitles
Selecting [Insert Message Clip] in the [Storyboard] tab displays a [Text Settings] dialog where you can enter an intertitle. Clicking [OK] adds the text as a five-second clip before the item currently selected in the storyboard (0 The [Text Settings] Dialog).
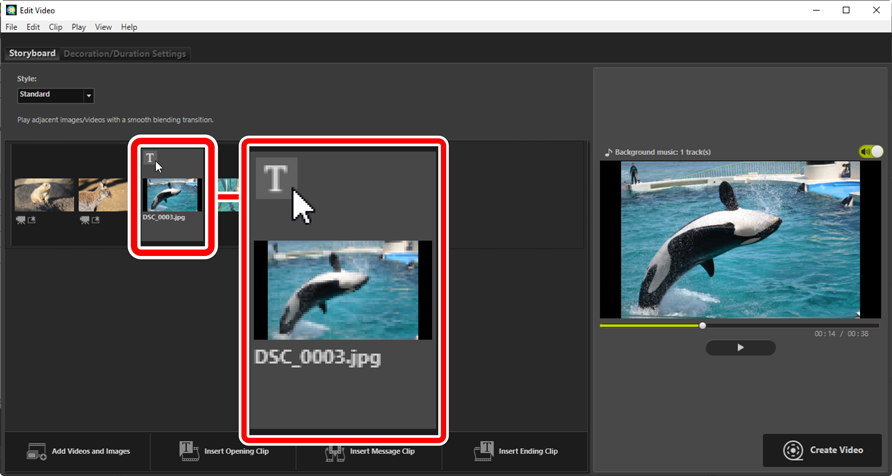
Captions
You can add captions to photos and videos. Click  to display the [Text Settings] dialog, where you can add a caption to the currently-selected item (0 The [Text Settings] Dialog).
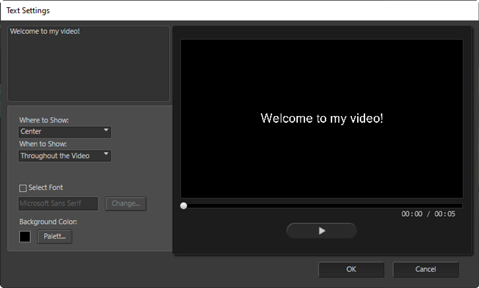
The [Text Settings] Dialog
Settings for titles and captions can be adjusted in the [Text Settings] dialog.
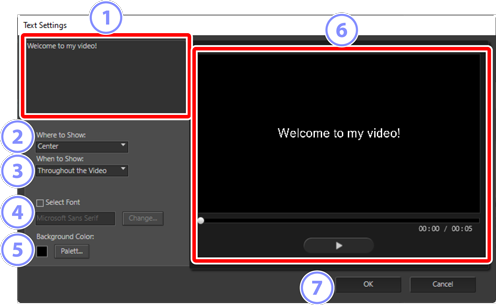
- Text Box
- Insert titles and captions here.
- [Where to Show]
- Position the text in the frame.
- [When to Show]
Choose when the text is displayed.
- If you select [Throughout the Video], captions will be displayed for the duration of the clip (or, in the case of photos, as long as the photo is on the screen).
- Select [From the Beginning for] or [From the End for] to display captions for up to 3, 5, or 7 seconds after the item begins or before it ends.
- The only option available for titles is [Throughout the Video]. Titles are displayed for about 5 seconds.
- [Select Font]
- To choose the font, font size, and font color, select this option and click [Change].
- [Background Color]
- This option is available for title clips only. Click [Palette] and choose a background color.
- Preview
- Preview titles and captions here.
 [OK]
[OK]- Add titles or captions to the storyboard. Captions are displayed superimposed on the selected item.
Editing Existing Text
Titles and items with captions are indicated by  icons. The text can be displayed by mousing over the title segment or item. Clicking displays the [Text Settings] dialog, where you can edit the text for the item in question.
Trimming Clips
You can trim clips for inclusion in a longer work. Only the selected portions will be included in the final video.
Choosing a Clip
Video clips in the storyboard are marked with a  icon. Mouse over a clip and click
  to display the [Duration Settings] dialog.
The [Duration Settings] Dialog
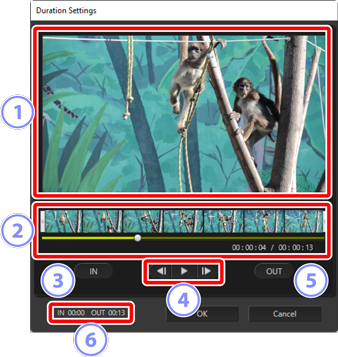
- Preview Area
- View the clip and confirm the start and end points.
- Time-line
- The clip is divided into seven sections with thumbnails showing its overall flow. Drag the handles (
 ) at either end to choose the start and end points.
 - [IN]
- Click this button during playback and use the playback slider (
 ) to choose the start point.
 - Playback Controls
- Start, pause, or resume playback or rewind or advance the clip a frame at a time.
- [OUT]
- Click this button during playback and use the playback slider () to choose the end point.
- Start/End Point Counters
- The playback position (in minutes and seconds) of the new start and end points.
Trimming the Clip
The start and end points for the portion of the clip that will be used in the final work can be chosen in the [Duration Settings] dialog. Drag the handles at either end of the time-line to choose the start and end points. Click [OK] once the desired start and end points are selected.
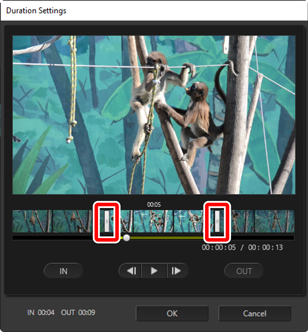
- The position of the frame displayed in the preview area is shown by the playback slider ().
- The time stamp for the current frame is shown below the bottom right corner of the preview area, together with the total clip length.
- Click the playback button (
 ) to preview the selected portion of the clip.
 - Use the frame advance (
 ) and rewind (
 ) controls to advance and rewind a frame at a time. Click the [IN] or [OUT] button to reset the start or end point to the current frame.
 - To undo the operation after selecting start and end points, position the start and end point handles at the beginning and end of the clip and click [OK].
Background Tracks
You can add background tracks in the [Decoration/Duration Settings] tab (0 The [Decoration/Duration Settings] Tab).
- Click the toggles in the track list to toggle tracks off (
 ) and on (
 ).
). - The list includes three default sample files.
- Each work can include multiple background tracks. Total playback length is shown below the bottom right corner of the list.
- The current background track will fade out at the end of the video. If the selected background tracks are shorter than the video, they will repeat until the video ends.
- You can drag tracks to new positions in the track list. Tracks play in the order listed.
- To add tracks (up to a maximum of ten), click [Add]. Choose from WAV and AAC audio files. WAV files with bit depths greater than 16 bits are not supported.
- To remove a file from the track list, right-click (or in macOS, control-click) the file and select [Delete]. The default sample files cannot be removed from the list.
Background Tracks
Background tracks are mixed with the original audio. You can suppress the original audio so that only the background tracks are audible by selecting [Clip] > [Set Volume of All Videos to 0]. To restore original audio to its recorded levels, select [Revert Video Volume to Default].
Exporting the Current Work
Clicking [Create Video] displays the [Output Video] dialog. After choosing the file type, frame size, and destination and adjusting other settings as desired, click [Output] to save the video.
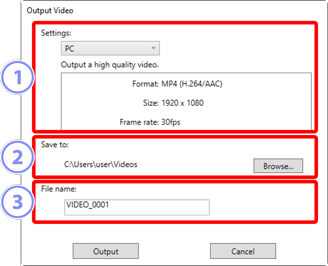
- [Settings]
Adjust settings according to the video’s intended destination. If an option other than [Advanced Settings] is selected, the file format, frame size, and frame rate will be chosen automatically.
- [PC]: Select for high-quality video. Videos recorded using this option can be up to 60 minutes long.
- [YouTube]: Create compact files for upload to YouTube. Videos recorded using this option can be up to 15 minutes long and no more than 2 GB in size.
- [Web Service]: Keep file size to a minimum for upload to the Web. Videos recorded using this option can be up to 15 minutes long and no more than 1 GB in size.
- [Advanced Settings]: Adjust settings individually. Videos recorded using this option can be up to 60 minutes long (0 [Advanced Settings]).
- [Save to]
- The destination folder. To choose a different folder, click [Browse].
- [File name]
- Enter a file name for the video.
[Advanced Settings]
Selecting [Advanced Settings] for [Settings] in the [Output Video] dialog lets you choose the file type, frame size, and frame rate.

- [Format]
Choose a file type. All formats use H.264 compression.
- [MP4 (H.264/AAC)]: Save the video in MP4 format (extension “.mp4”) with audio recorded using AAC.
- [MOV (H.264/AAC)]: Save the video in MOV format (extension “.mov”) with audio recorded using AAC. Choose this option for smaller file sizes.
- [MOV (H.264/Linear PCM)]: Save the video in MOV format (extension “.mov”) with audio recorded using linear PCM.
- [Size]
- Choose a frame size.
- [Frame rate]
- Choose a frame rate.
Frame Rate
The actual frame rates for the listed options are as follows:
- [60 fps]: 59.94 fps
- [50 fps]: 50 fps
- [30 fps]: 29.97 fps
- [25 fps]: 25 fps
- [24 fps]: 23.976 fps