The [File] Menu
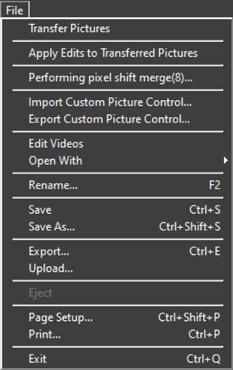
- [Transfer Pictures]
- Launch Nikon Transfer 2.
- [Take Pictures Remotely Using Camera Control Pro 2]
- Launch Camera Control Pro 2. This option is displayed only if Camera Control Pro 2 is installed.
- [Take Pictures Remotely with NX Tether]
- Launch NX Tether. This option is displayed only if NX Tether is installed.
- [Show Image Immediately After Shooting]
If this option is enabled, pictures will automatically be displayed in NX Studio after being downloaded to the computer using other applications.
- This option is displayed only if supported applications are installed.
- This option takes effect only if the corresponding option is enabled in the application used to download the pictures (for more information, see the online help for the application in question):
- Wireless Transmitter Utility: Select [NX Studio] for [Open images with this application after transfer].
- Camera Control Pro 2: Select [Show it with NX Studio] for [When a new image is received from the camera].
- NX Tether: Select [NX Studio] for [Display Pictures After Transfer].
- [Apply Edits to Transferred Pictures]
- Enable this option to automatically apply the adjustments last selected in the [Adjustments] tab to new pictures downloaded to the same folder.
- [Performing pixel shift merge]
- Merge pictures taken using pixel shift on the camera and save them as separate files (0 Merge Pictures Taken Using Pixel Shift).
- [Import Custom Picture Control]
- Import Custom Picture Control files created with compatible cameras and software (0 Importing Custom Picture Control Files).
- [Export Custom Picture Control]
- Export Custom Picture Controls saved on NX Studio as files (0 Exporting Custom Picture Control Files).
- [Edit Videos]
- Edit videos (0 Editing Videos).
- [Launch Picture Control Utility 2]
- Launch Picture Control Utility 2. This option is displayed only if Picture Control Utility 2 is installed.
- [Open With]
- Open the current picture using other software. Software can be added to the menu using [Register].
- [Rename]
- Rename the current picture.
- [Save]
- Save changes to image adjustments or XMP/IPTC metadata (0 [Save]).
- [Save As]
- Save the current picture under a new name.
- [Export]
- Export the current picture in a selected format (0 Saving Pictures in Other Formats).
- [Upload]
- Upload photos and videos to NIKON IMAGE SPACE (0 Web Services, NIKON IMAGE SPACE).
- [Eject] or [Disconnect](Windows)/[Eject] (macOS)
- Eject removable media. In Windows, this option can also be used to disconnect a selected network drive.
- [Page Setup]
- Adjust printer settings.
- [Print]
- Print the current picture (0 Printing Pictures).
- [Exit] (Windows Only)
- Exit NX Studio.
Epson Printers
If installed, the Epson Easy Photo Print utility or Epson Print Layout plugin can be launched from NX Studio.
- Installing Epson Easy Photo Print adds a [Print with E-Photo] option to the [File] menu.
- Likewise, installing Epson Print Layout adds a [Print with Epson Print Layout] option to the [File] menu.
- [E-Photo] and [Epson Print Layout] icons are also added to the toolbar and can be used to launch the corresponding software.