The Nikon 1 V3
When Nikon 1 V3 is connected, photographs can be framed in the live view window.
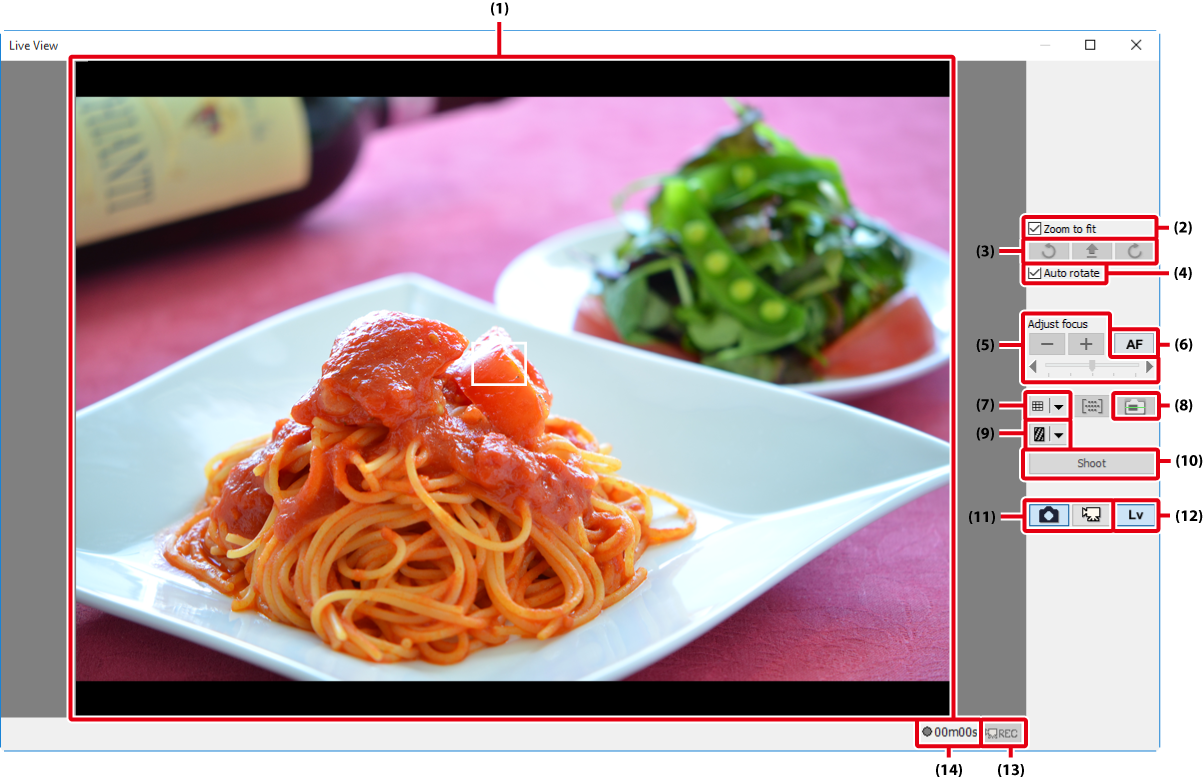
| (1) |
Image area Shows the view through the camera lens, updated in real time (“live view”). If single-point AF is selected for AF-area mode, a white square ( |
|---|---|
| (2) |
“Zoom to fit” Automatically fit the live view display to the image area. |
| (3) |
Rotate buttons Rotate the live view display in the image area. |
| (4) |
“Auto rotate” If this option is selected, the live view display will automatically be rotated with the camera. |
| (5) |
“Adjust focus” Click these buttons to adjust focus by the amount selected with the slider. Click + to move the focal point away from the camera, – to bring it toward the camera. |
| (6) |
“AF” button Click to initiate hybrid phase-detection/contrast-detect autofocus; click again to end autofocus. |
| (7) |
Framing grid button Display or hide a framing grid. |
| (8) |
Virtual horizon button Display or hide a virtual horizon. |
| (9) |
Highlight button Press to turn the highlight display on or off. Highlights are indicated by shading; press |
| (10) |
“Shoot” The camera will take a picture after focusing using hybrid AF. No picture will be taken if the camera is unable to focus. |
| (11) |
“Live view selector” buttons Select photo or movie live view. |
| (12) |
“Lv” button Click to start or stop live view. |
| (13) |
“REC” button Start or stop movie recording. Movie recording ends automatically when the maximum length is reached or there is no additional space on the storage device. |
| (14) |
Time available The amount of additional movie footage that can be recorded. |
 ) will be displayed showing the focus point, which can be moved to a new location by clicking in the image area (the focus point is not displayed when auto-area AF is selected). If Face detection is selected in the “Mechanical” tab, faces detected by the camera will be indicated by a border (
 ) and the current focus point by a
  icon.
icon.The Framing Grid
Click the ![]() button in the framing grid display to choose from the following framing grids:
button in the framing grid display to choose from the following framing grids:
- 3 × 3: A grid with three evenly spaced-vertical and horizontal lines.
-
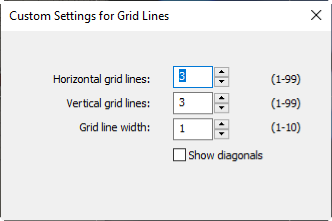
Custom Settings: Selecting this option displays the following dialog, where you can choose the number and thickness of the lines in the framing grid.
-
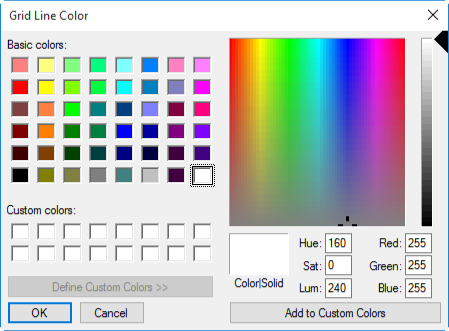
Grid Line Color: Selecting this option displays the following dialog, where you can choose the color of the lines in the framing grid.
Live View
Some functions may not be available when live view is off. These functions will be re-enabled when live view starts.
Active Selection
If Active Selection is enabled in best moment capture mode, the Shoot button will change to Buffering. Clicking the button starts buffering and changes the button label back to Shoot; click Shoot to record 40 photographs.