D780 / Z 9 / Z 8 / Z 7II / Z 6II / Z 7 / Z 6 / Z 5 / Z 50
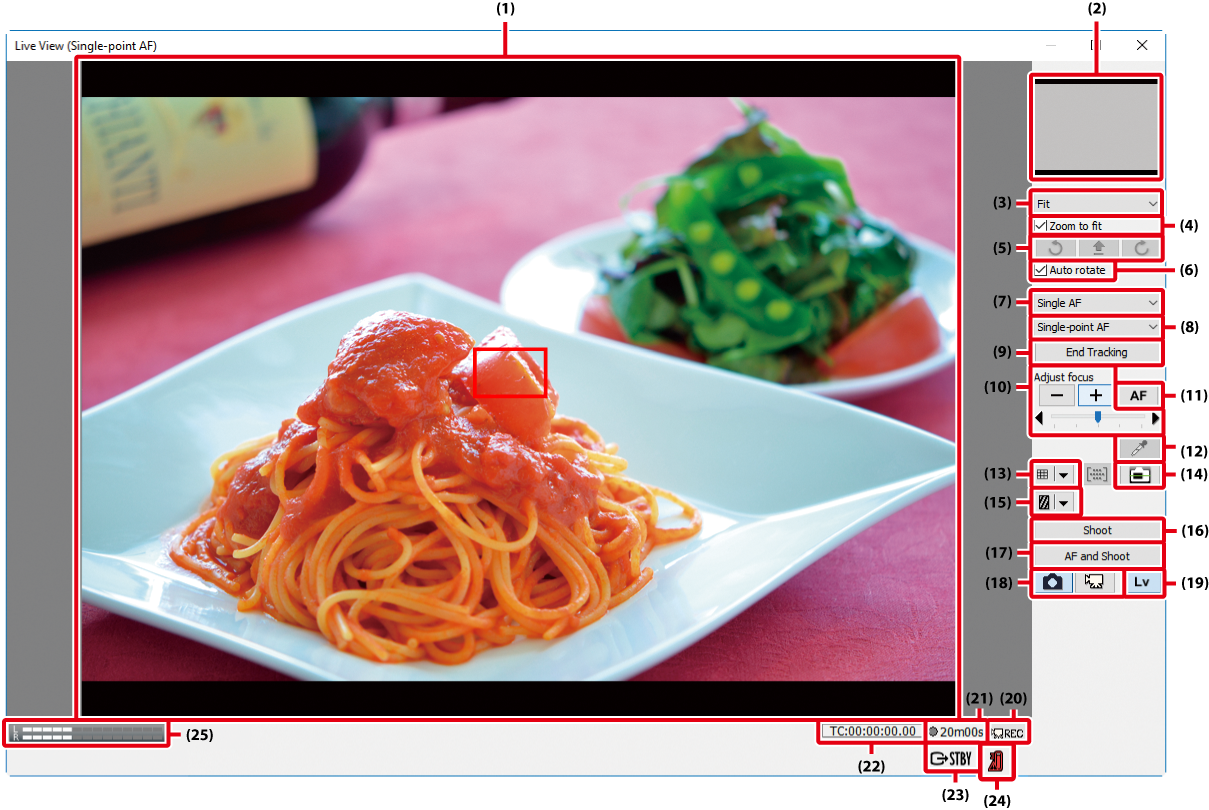
When a Z 9, Z 8, Z 7II, Z 6II, Z 7, Z 6, Z 5, or Z 50 is connected, photographs can be framed in the live view window. If you are using a D780, open the live view window by clicking the Lv button.
| (1) |
Image area Shows the view through the camera lens, updated in real time, with the focus point ( |
|---|---|
| (2) |
Navigation area When the live view display is zoomed in, the navigation window shows the position of the area currently displayed in the monitor. |
| (3) |
Magnification ratio Choose a zoom ratio to zoom the view in the image area in or out. |
| (4) |
“Zoom to fit” Automatically fit the live view display to the image area. |
| (5) |
Rotate buttons Rotate the live view display in the image area. |
| (6) |
“Auto rotate” If this option is selected, the live view display will automatically be rotated with the camera. |
| (7) |
Focus mode Choose a focus mode for live view or movie recording. |
| (8) |
AF area mode Choose an AF area mode option for live view autofocus. |
| (9) |
“End Tracking” button End subject tracking, or end focus on the subject chosen by the camera using auto-area AF. Available only when Subject-tracking AF (Z 9 and Z 8 only) or Auto-area AF is selected for AF-area mode. |
| (10) |
“Adjust focus” Click these buttons to adjust focus by the amount selected with the slider. Click + to move the focal point away from the camera, – to bring it toward the camera. |
| (11) |
“AF” button Click to initiate hybrid phase-detection/contrast-detect autofocus; click again to end autofocus. |
| (12) |
Spot white balance button Click this button and then click the preview in the image area to set preset manual white balance to the sampled value (spot white balance). |
| (13) |
Framing grid button Display or hide a framing grid. |
| (14) |
Virtual horizon button Display or hide a virtual horizon. |
| (15) |
Highlight button Press to turn the highlight display on or off. Highlights are indicated by shading; press |
| (16) |
“Shoot” Take a picture. |
| (17) |
“AF and Shoot” Focus using hybrid AF and then take a picture. No picture will be taken if the camera is unable to focus. |
| (18) |
“Live view selector” buttons Select Photo live view or Movie live view. Not available when Enable Controls on Camera Body is selected. |
| (19) |
“Lv” button Click to start or stop live view. |
| (20) |
“REC” button Start or stop movie recording. Movie recording ends automatically when live view ends, the maximum length is reached, or there is no additional space on the storage device. |
| (21) |
Time available The amount of additional movie footage that can be recorded. |
| (22) |
Time code (D780 / Z 9 / Z 8 / Z 7II / Z 6II / Z 7 / Z 6/ Z 5) Displayed when Record timecodes is enabled. The display varies with the option selected for Drop frame. |
| (23) |
External video (Z 9 / Z 8) Shows the status of external recorders connected via HDMI when Control HDMI External Recording (Z 9 / Z 8) is enabled in the Camera menu. Movie live view is indicated by |
| (24) |
Temperature warning (Z 9 firmware version 2.00 or later) / Z 8 A series of warning icons will be displayed as the camera’s internal temperature rises. If the temperature rises still further, a countdown timer will appear in the top left corner of the live view window. The camera turns off automatically when the timer reaches zero. |
| (25) |
Sound volume indicator Display the sound level during movie live view and movie recording. |
 ) superimposed. The focus point can be moved to a new location by clicking in the image area. If face or eye detection is active, the focus point (
 ) will automatically move to faces or eyes detected by the camera. Likewise, if animal face- or eye-detection is active, the focus point (
 , movie recording by
  .
.Live View Autofocus
Focus can be adjusted using hybrid AF by double-clicking the subject in the live view display; the effect is the same as clicking the AF button. If autofocus is in progress, double-clicking the live view display will end the focus operation.
The Live View Countdown Display
The camera’s internal temperature may rise if live view is used for extended periods. To prevent damage to the camera’s internal circuits, live view will end automatically before the camera overheats. A countdown display will appear 30 s before live view ends. At high ambient temperatures, this display may appear immediately when live view mode is selected. For more information on live view, see the camera manual.
Live View
Depending on the camera mode, some functions may be disabled during live view. In such a case, try again after finishing live view.
Using Camera Controls
If Enable Controls on Camera Body is selected in the Camera menu, camera settings can be adjusted both in Camera Control Pro 2 and via the controls on the camera body. Some settings cannot be adjusted using Camera Control Pro 2 or the controls on the camera body.
The Framing Grid
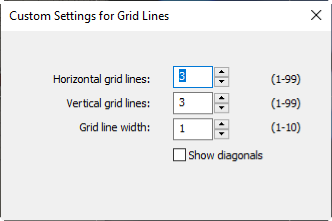
Click the ![]() button in the framing grid display to choose from the following framing grids:
button in the framing grid display to choose from the following framing grids:
- 3 × 3: A grid with three evenly spaced-vertical and horizontal lines.
-
Custom Settings: Selecting this option displays the following dialog, where you can choose the number and thickness of the lines in the framing grid.
-
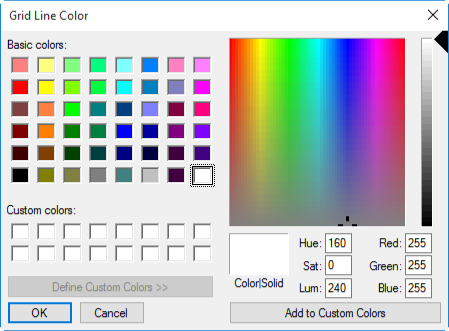
Grid Line Color: Selecting this option displays the following dialog, where you can choose the color of the lines in the framing grid.
Caution: Framing HLG Photos in Live View
Even HLG-compatible monitors will not reproduce colors accurately in live view if HLG is enabled on cameras that support tone-mode selection. Colors will, however, be reproduced accurately when HLG photos are viewed on HLG-compatible monitors using NX Studio.
Spot White Balance
Spot white balance is not available during live view photography with cameras other than D780 or when Enable Controls on Camera Body is selected in the Camera menu, an option other than preset manual is selected for white balance, or the value currently selected for preset manual white balance is protected. Spot white balance is also unavailable when an option other than Off is selected for HDR Mode (Z 9 / Z 8 / Z 7II / Z 6II / Z 5 excluded) or when movie recording is assigned to the shutter-release button in the camera Custom Settings menu and the live view selector is in the movie position (Z 9 / Z 8 / Z 7II / Z 6II / Z 5 / Z 50 excluded). Spot white balance is also unavailable when C15 (Z 9 firmware version 5.00 or later), C30, C60 (for Z 9, firmware version 3.00 or later), or C120 is selected for Release Mode.
Mirror Up Shooting (D780)
In mirror-up release mode, the AF and Shoot and Shoot buttons change to AF and Mup Shoot and Mup Shoot, respectively. Both can be used to take pictures in mirror-up mode: in the former case, the picture will be taken after the camera focuses, while in the latter the picture will be taken when the button is clicked.
Live View Image Quality
When the camera and computer are connected via a wireless network, the live view refresh rate in Camera Control Pro 2 may drop due to network conditions, causing the display to stutter. This can be addressed by right-clicking (or in macOS, control-clicking) the live view display to view the Live view image quality menu and selecting Frame-rate priority, which offers a better refresh rate than Quality priority.