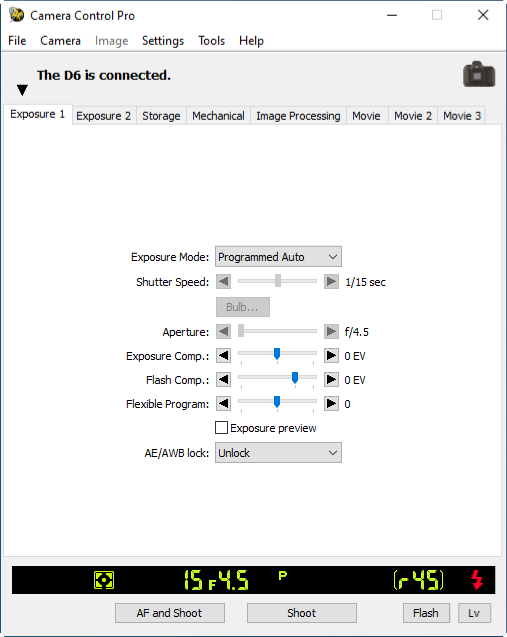
Capturing Photographs to Disk
If Camera Control Pro 2 is running when a supported camera connected, pictures taken with the camera will be stored on your computer hard disk instead of (or, in some cases, in addition to) the camera memory card. Pictures can be taken using either the “shoot” buttons in the Camera Control Pro 2 window or, if Enable Controls on Camera Body is selected in the Camera menu, using the camera shutter-release button.
Simultaneous Recording (D3X / D3 / D700 / D300 Series / D90 / D5000 Excluded)
If camera that supports this feature is connected, photographs can be recorded simultaneously to both the computer hard disk and camera memory cards, or separately to either the computer hard disk or camera memory cards. See Record to for details.
-
Start Camera Control Pro 2. If a Z 9, Z 8, Z 7II, Z 6II, Z 7, Z 6, Z 5, Z 50, or Nikon 1 V3 is connected, the live view window will be displayed.
-
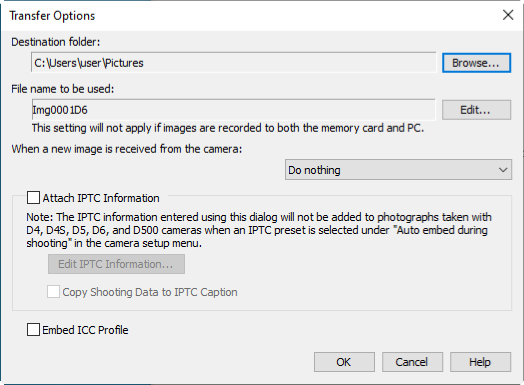
Select Transfer Options in the Tools menu to display transfer options.
-
Adjust capture options:
- Destination folder
- Select the folder to which photographs will be saved as they are taken.
- File name to be used
-
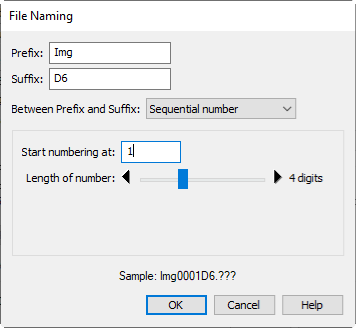
Shows how images saved to the computer will be named. To change how files are named, click Edit. The dialog shown below will be displayed. Using the sample file name as a guide, enter a prefix and suffix and choose the starting number and number of digits for automatic file numbering. You can also use the shooting date and time in the file name.
File Naming Conventions
Windows
File names should contain no more than one hundred characters. File names may not contain quotes or any of the following characters: “\” “/” “:” “*” “?” “<” “>” and “|”. Periods (“.”) may not appear at the beginning or the end of file names.
macOS
The maximum length for macOS file names is twenty characters. Colons (“:”) are not allowed.
Extensions
Extensions are assigned automatically. The following extensions are used: “.JPG” (JPEG images), “.TIF” (TIFF images), “.HIF” (HEIF images), “.NEF” (NEF/RAW images), and “.NDF” (Image Dust Off reference data).
“PC+CARD”/“CARD” (D3X / D3 / D700 / D300 Series /D90 / D5000 Excluded)
The file name selected for File name to be used is not available when PC+CARD or CARD is selected for Record to. If PC+CARD is selected, file name saved to the computer will be assigned the same as the file name saved to the memory card. An underscore and a four-digit number will automatically be added if a file with the same name already exists.
- When a new image is received from the camera
-
Choose the task performed after captured photographs are saved to disk.
- Do nothing: Photographs are not displayed after being saved to the computer hard disk.
- Show it with NX Studio/ViewNX-i/ViewNX 2 (available only if the corresponding application is installed): The selected application starts automatically and displays the captured images.
- Send it to Capture NX 2 watched folder (available only if Capture NX 2 is installed and a “Watched folder” has been selected): If Capture NX 2 (available separately) is running, photographs will be saved in the folder currently selected as the “watched” folder in Capture NX 2 (see the Capture NX 2 manual for details). Pictures will automatically be processed according to the batch settings in Capture NX 2.
- Attach IPTC Information
-
Check this option to add IPTC information to captured images (HEIF pictures excluded) and enable the Edit IPTC Information and Copy Shooting Data to IPTC Caption options. Note that the IPTC information entered using Camera Control Pro 2 will not be added to photographs taken with D6, D5, D4-series, D500, Z 9, and Z 8 cameras when Auto embed during shooting is selected for IPTC in the camera setup menu, which will instead contain the IPTC information selected using the camera regardless of the option selected in Camera Control Pro 2.
- Edit IPTC Information
- Clicking this button displays a dialog where you can select the IPTC information, including keywords and captions, that will be added to images as they are captured.
- Copy Shooting Data to IPTC Caption
- Check this option to copy shooting data to the caption field of images as they are captured.
- Embed ICC Profile
- Select this option to embed an ICC profile according to the camera Color Space settings. The ICC profile is embedded in JPEG and TIFF images as they are captured.
Image Authentication (D3 Series / D700 / D300 Series)
The Attach IPTC Information and Embed ICC Profile options do not apply to photographs taken with Image Authentication on. Image authentication information is not embedded in TIFF photographs when images are captured using Camera Control Pro 2.
Images Saved to Memory Cards (D3X / D3 / D700 / D300 Series / D90 / D5000 Excluded)
IPTC information and ICC color profiles are not embedded in images saved to the camera memory cards when PC+CARD or CARD is selected for Record to.
-
After adjusting options as described in Step 3, click OK to exit the dialog and apply settings to subsequent photographs. Note that if On or Automatic (the default setting) is selected for the auto image rotation option in the camera menus or during live view, the camera will detect camera orientation and automatically embed this information in photographs (note in the case of the D300, D90, D5100, and D5000, the orientation for the first image in each burst taken in continuous mode applies to all images in the series, even if camera orientation is changed during shooting). If Off is selected, camera orientation will not be recorded. To add information on picture orientation during transfer, open the Image menu and select Rotate images by 90 degrees CW to mark pictures as being rotated 90° to the right, or Rotate images by 90 degrees CCW to mark pictures as being rotated 90° to the left.
Image Authentication (D3 Series / D700 / D300 Series)
The “Rotate images” options do not apply to photographs taken with Image Authentication on. Image authentication information is not embedded in TIFF photographs when images are captured using Camera Control Pro 2.
-
Take pictures using the camera shutter-release button or the “shoot” buttons in Camera Control Pro 2. The Status dialog shown below will be displayed.
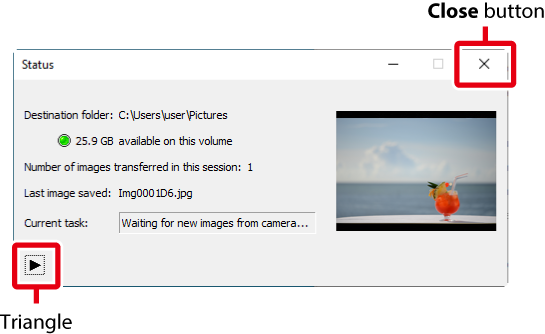
To display a histogram of the current image, click the triangle at the bottom of the Status dialog.
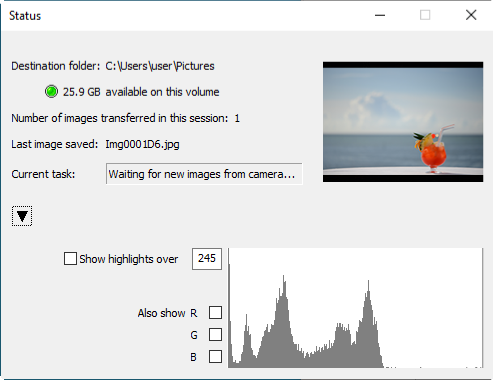
If the Show highlights over option is checked, any areas of the preview image with a brightness over the value entered in the neighboring text box will be indicated by a flashing border. To display histograms (graphs showing the distribution of pixels of different brightnesses in the image) for the red (R), green (G), and blue (B) channels, put a check in the corresponding box.