Performing Auto Capture Operations on NX MobileAir (Supported Cameras Only)
Supported Cameras
This feature is available with:
- Z9 cameras (“C” firmware version 5.00 or later)
NX MobileAir can be used to start, suspend, or adjust settings for auto capture on the camera.
What Is “Auto Capture”?
Auto capture is a function in which the camera takes photos automatically when the camera recognizes a subject. By choosing the trigger criteria for auto capture, photographers create what is effectively an unmanned camera that can take photos automatically without further action on their part.

- For details on auto capture, refer to the supplemental instructions for “C” firmware version 5.00 in the Z9 Reference Guide.
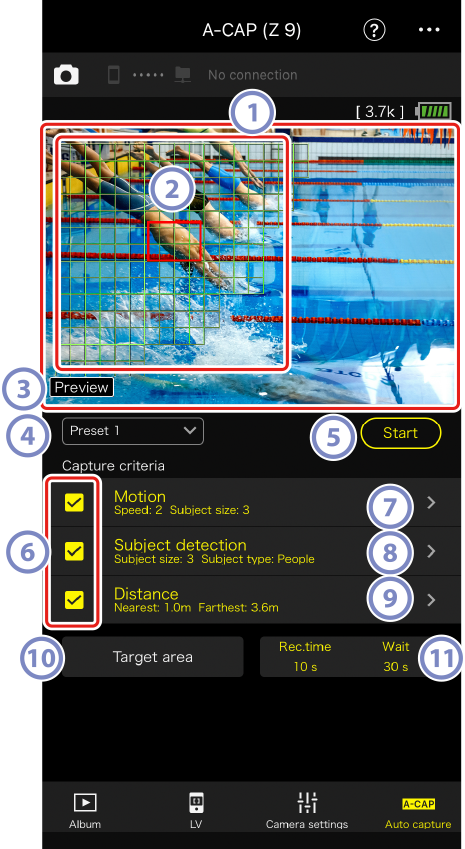
The Auto Capture Operations Display
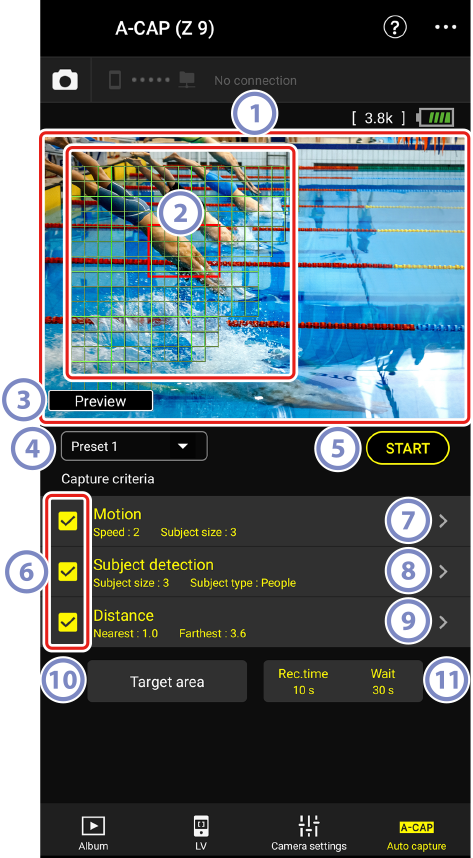
Enable remote photography in the album list menu and tap [Auto capture] in the remote operation tab to display this screen (0Enabling Remote Photography). You can configure auto capture settings, view a preview, load user presets, and start or suspend auto capture.
 Live View
-
Before starting auto capture, you can check whether the camera recognizes the subject as intended. When the camera recognizes a subject that meets the configured criteria, green boxes appear on the subject.
 Focus Point/Auto Capture Detection Area
- The focus point is displayed in red, and the auto capture detection areas are displayed in green. If a setting other than [Auto-area AF] is configured for the AF-area mode on the camera, you can tap the screen to move the focus point.
 The Auto Capture Status Display
- When auto capture is suspended, this indicator will read [Preview], and when it is running, it will read [A-CAP in progress].
 The User Preset Selection Button
- User presets for auto capture stored in the camera can be loaded by selecting them from the pull-down menu. Changes made to auto capture settings using NX MobileAir are also automatically reflected in user presets.
 The Start/End Button
-
Tap the [Start] button to start auto capture with configured settings. Tap the [End] button to end auto capture.
Disabled [Start] Button
If the [Start] button is disabled, check whether the camera can perform auto capture operations.
- The [Start] button will be disabled if no memory card is inserted in the camera.
 The [Capture Criteria] Check Boxes
Checked settings will be effective during auto capture.
- Only checked items can be tapped to open the options display.
- At least one checkbox must be checked. When switching capture criteria, first check the checkbox of the destination to be switched to.
 The [Motion] Button
- The configured speed and size of motion are displayed. Tap to display motion settings (0[Capture Criteria]: [Motion]).
 The [Subject Detection] Button
- The size and target of subject detection are displayed. Tap to display subject detection settings (0[Capture Criteria]: [Subject Detection]).
 [Distance] Button
- The configured nearest and farthest distances to the subject are displayed. Tap to display distance settings (0[Capture Criteria]: [Distance]).
 [Target Area] Button
-
Tap to display target area settings (0Configuring the Target Area).
- This option is available if either of the following criteria is met:
- The focus mode is set to a mode other than MF and the AF-area mode is set to [Auto-area AF].
- The focus mode is set to MF and the [Distance] capture criteria checkbox is unchecked.
- This option is available if either of the following criteria is met:
 The Recording Time/Wait Button
- Displays the duration the camera continues to shoot and the interval between shots. Tap to display recording time settings (0Configuring the Recording Time).
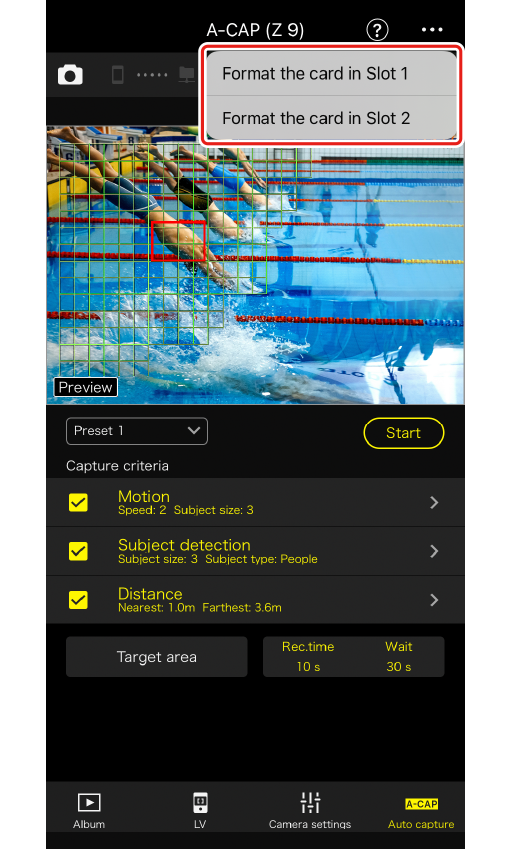
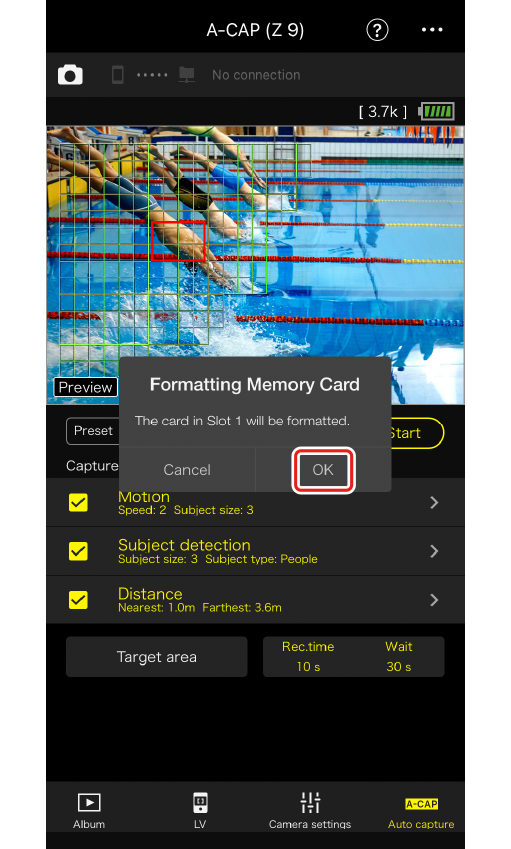
Low Memory Card Storage
The memory card in Slot 1 (or the primary slot) or Slot 2 (or the secondary slot) can be formatted from the auto capture display menu.
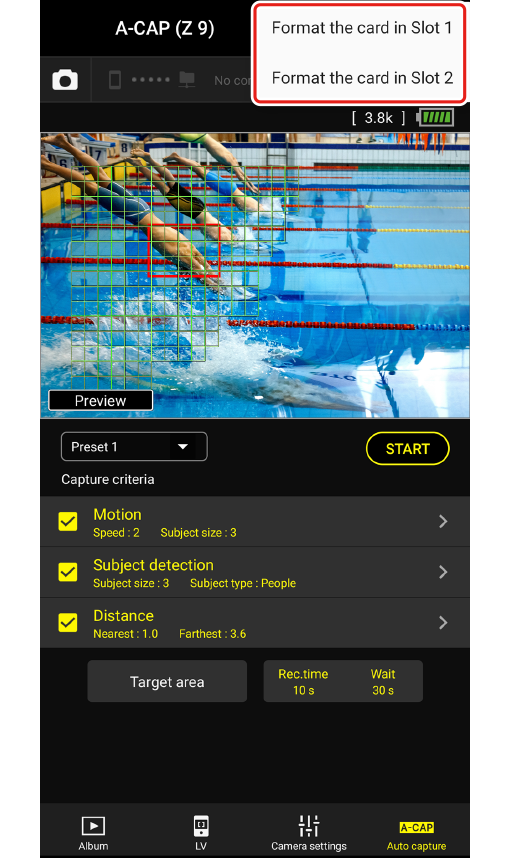


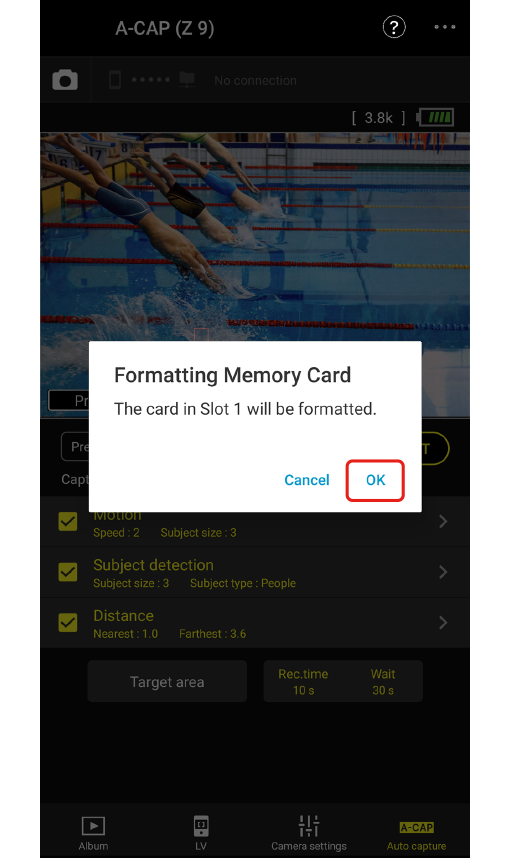
- Formatting a card will cause all the stored data to be deleted. If there is any data you want to keep on the card, transfer it to a computer or another device before formatting.
Configuring Capture Criteria
Configure the criteria for performing auto capture. The configurable criteria are [Motion], [Distance], and [Subject detection]. If multiple criteria are selected, shooting will only be performed when all of the criteria are satisfied.
[Capture Criteria]: [Motion]
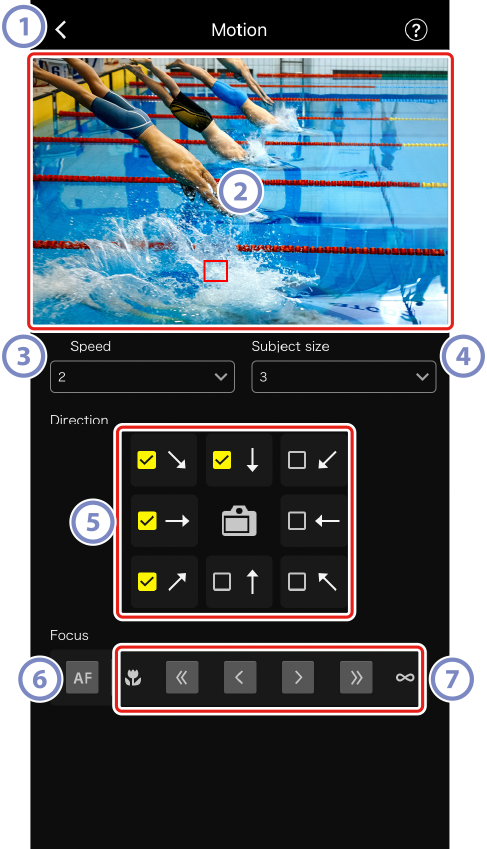
Tap the [Motion] button on the auto capture operations display to open the motion settings display. You can configure the direction of movement, speed, and size of the subject.

- The Back Button
- Save settings and return to the previous display.
- Live View
Preview how the camera recognizes the subject under the configured motion criteria.
- You can configure the point where you want to focus by tapping the position where the subject is expected to enter the angle of view.
- [Speed]
-
Configure a value that corresponds to the speed measured as the time taken for the subject to cross the frame horizontally. Each option roughly corresponds to the following number of seconds.
- [1 (Low)]: About 5 s or less
- [2]: About 4 s or less
- [3]: About 3 s or less
- [4]: About 2 s or less
- [5 (High)]: About 1 s or less
- [Subject Size]
-
You can configure the size of the subject. Choose from the following five options corresponding to the number of points consisting of the auto capture detection areas (the green boxes displayed in live view).
- [1 (Small)]: 4 points or larger
- [2]: 8 points or larger
- [3]: 14 points or larger
- [4]: 24 points or larger
- [5 (Large)]: 34 points or larger
Size Settings for [Motion] and [Subject Detection]
When both [Motion] and [Subject detection] are checked under [Capture criteria] in the auto capture operations display, the [Subject size] setting in the motion settings display and the [Subject size] setting in the subject detection settings display are separate settings. Changing the [Subject size] setting in the motion settings display will not affect the [Subject size] setting for subject detection. The subject will be identified according to both settings, and shooting will be performed when both criteria are satisfied.
- The [Direction] Check Boxes
- Select the direction in which the subject should move in order for the camera to shoot. Multiple directions can be selected.
- The AF Button
- Tap to perform autofocus at the position where the focus point is configured.
- The Manual Focus Button
- Tap
 or
or  to move the focus position to the near side or the infinity side in fixed step widths. To adjust the focus position in smaller step widths, tap
  or
or  .
.
[Capture Criteria]: [Subject Detection]
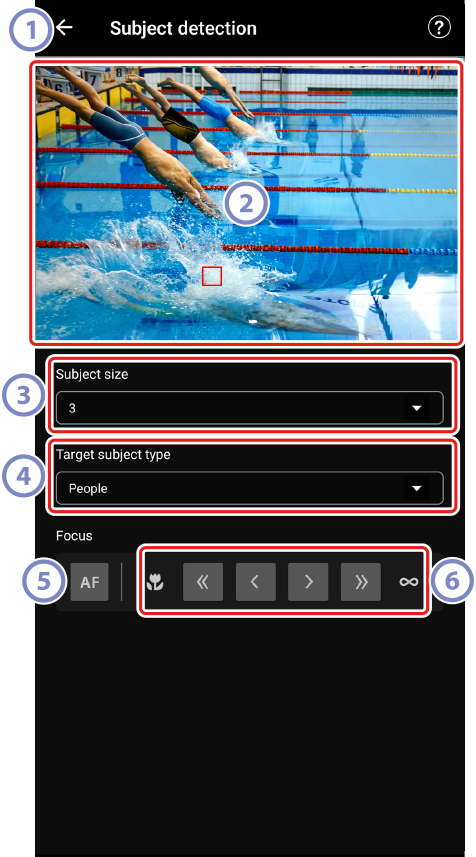
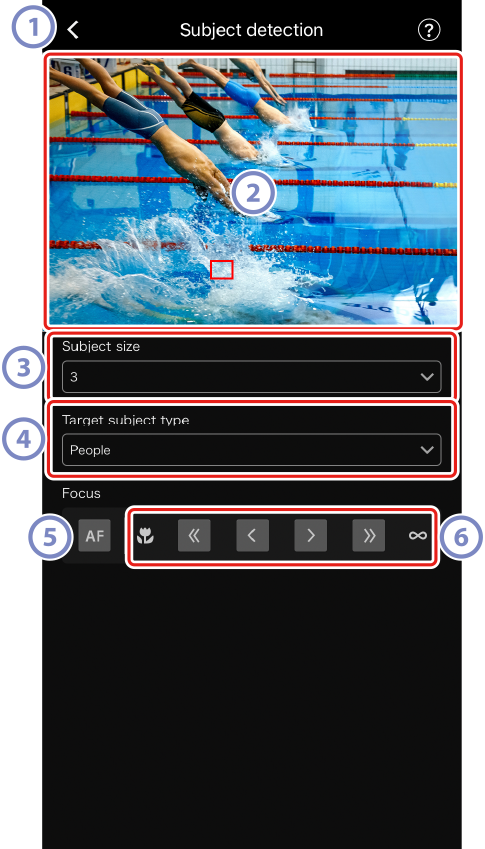
Tap the [Subject detection] button on the auto capture operations display to open the subject detection settings display. You can configure the size and type (such as animal or vehicle) of the subject.
- The Back Button
- Save settings and return to the previous display.
- Live View
Preview how the camera recognizes the subject under the configured subject detection criteria.
- You can configure the point where you want to focus by tapping the position where the subject is expected to enter the angle of view.
- [Subject Size]
You can configure the size of the subject as a percentage of the angle of view. Each option roughly corresponds to the following percentages.
- [1 (Small)]: 2.5% or more
- [2]: 5% or more
- [3]: 10% or more
- [4]: 15% or more
- [5 (Large)]: 20% or more
Size Settings for [Motion] and [Subject Detection]
When both [Motion] and [Subject detection] are checked under [Capture criteria] in the auto capture operations display, the [Subject size] setting in the motion settings display and the [Subject size] setting in the subject detection settings display are separate settings. Changing the [Subject size] setting in the motion settings display will not affect the [Subject size] setting for subject detection. The subject will be identified according to both settings, and shooting will be performed when both criteria are satisfied.
- [Target Subject Type]
- Choose a subject type from [Auto], [People], [Animal], [Vehicle], or [Airplanes].
- The AF Button
- Tap to perform autofocus at the position where the focus point is configured.
- The Manual Focus Button
- Tap or to move the focus position to the near side or the infinity side in fixed step widths. To adjust the focus position in smaller step widths, tap or .
[Capture Criteria]: [Distance]
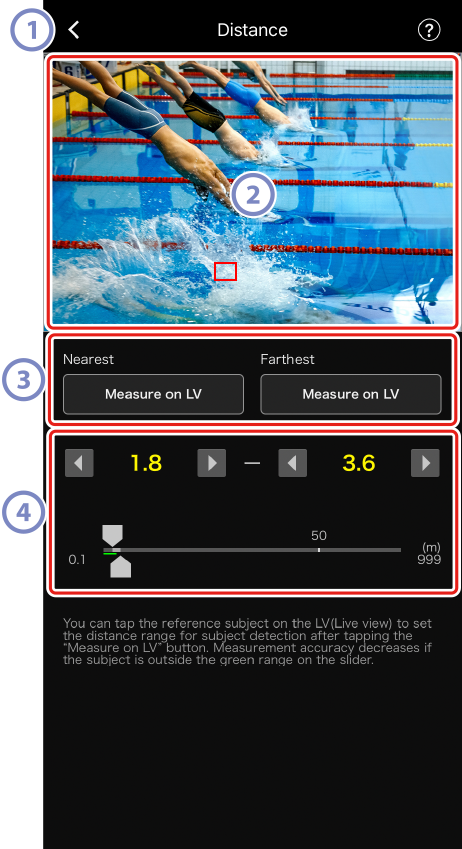
Tap the [Distance] button on the auto capture operations display to open the distance settings display. You can configure the nearest and farthest distances at which the camera will recognize the subject.

- The Back Button
- Save settings and return to the previous display.
- Live View
Preview how the camera recognizes the subject under the configured distance criteria.
- Tap the [Measure on LV] button for the nearest or farthest distance to display the focus index point in live view. Tap anywhere in live view to move the focus index point and change the distance value.
- The [Measure on LV] Buttons
- Tap these buttons to apply changes to the nearest or farthest distance made by tapping the screen in live view. While the setting is being adjusted, the operations with the other buttons and the slider will be disabled. Tap [End] to finish the process of making adjustments by tapping in live view.
- This option is not available when the focus mode is set to MF.
- The Distance Adjustment Buttons/Slider
-
Tap the left and right buttons to adjust the nearest and farthest distances in fixed step widths. The step widths will vary according to the distance. You can also drag the slider to change the distance.
- Adjust the distance within the range indicated by the green guide at the bottom of the slider. Setting the distance outside the guide range will reduce the accuracy of recognizing the distance to the subject.
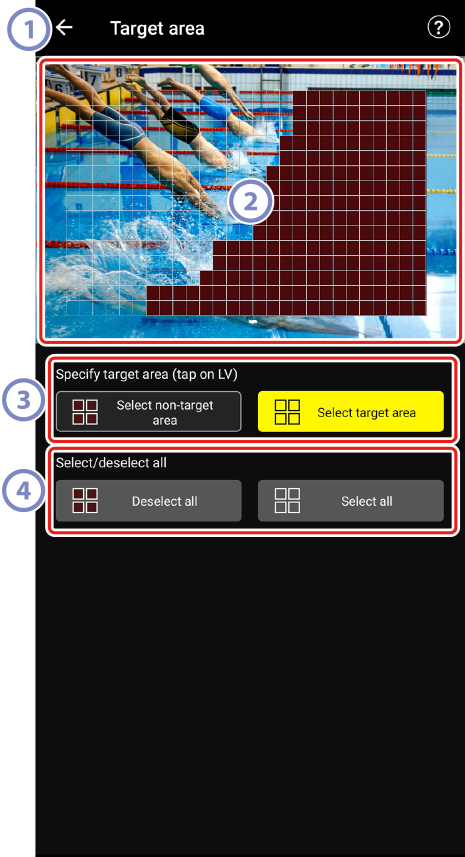
Configuring the Target Area
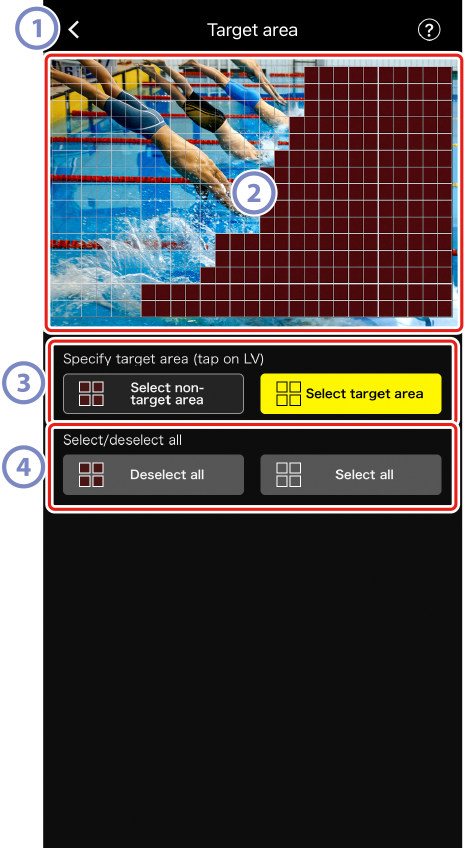
Tap the [Target area] button on the auto capture operations display to open the target area settings display. By specifying non-target areas, such as areas with obstacles within the angle of view, you will be able to capture the subject more accurately.
- This option is available if either of the following criteria is met:
- The focus mode is set to a mode other than MF and the AF-area mode is set to [Auto-area AF].
- The focus mode is set to MF and the [Distance] capture criteria checkbox is unchecked.
- The Back Button
- Save settings and return to the previous display.
- Live View
Preview how the camera recognizes the subject within the target area.
- [Specify target area (tap on LV)]
-
After tapping the [Select non-target area] or [Select target area] button, you will be able to tap points in live view to set them as non-target or target areas. Contiguous points can be selected together by dragging your finger across the screen.
- [Select/deselect all]
- Target and non-target areas for subject recognition can be configured all at once.
Tip for Configuring the Target Area
If the non-target area is larger, tap [Deselect all], or if the target area is larger, tap [Select all], then use [Specify target area (tap on LV)] to quickly configure the target area.
Configuring the Recording Time
Tap the Recording Time/Wait button on the auto capture operations display to open the recording time settings display. You can configure the duration the camera continues to shoot after auto capture is triggered and the minimum amount of time it will wait before shooting again.

- The Back Button
- Save settings and return to the previous display.
- [Recording Time Selection]
Select the amount of time to record for each shot from 1 second to 30 minutes, or select [None]. If a setting other than [None] is selected, the camera will continue to record for the configured amount of time even if the subject is no longer detected. If [None] is selected, the camera will only record while the subject is detected.
- Depending on the settings on the camera, it may not be possible to record for the configured amount of time.
- [Wait after shooting]
- Select the amount of time to wait after shooting from 1 second to 30 minutes. The camera will not start shooting until the configured amount time has elapsed since the previous shot, even if the subject is detected earlier.
Supported Cameras
This feature is available with:
- Z9 cameras (“C” firmware version 5.00 or later)
NX MobileAir can be used to start, suspend, or adjust settings for auto capture on the camera.
What Is “Auto Capture”?
Auto capture is a function in which the camera takes photos automatically when the camera recognizes a subject. By choosing the trigger criteria for auto capture, photographers create what is effectively an unmanned camera that can take photos automatically without further action on their part.
- For details on auto capture, refer to the supplemental instructions for “C” firmware version 5.00 in the Z9 Reference Guide.
The Auto Capture Operations Display
Enable remote photography in the album list menu and tap [Auto capture] in the remote operation tab to display this screen (0Enabling Remote Photography). You can configure auto capture settings, view a preview, load user presets, and start or suspend auto capture.
- Live View
-
Before starting auto capture, you can check whether the camera recognizes the subject as intended. When the camera recognizes a subject that meets the configured criteria, green boxes appear on the subject.
- Focus Point/Auto Capture Detection Area
- The focus point is displayed in red, and the auto capture detection areas are displayed in green. If a setting other than [Auto-area AF] is configured for the AF-area mode on the camera, you can tap the screen to move the focus point.
- The Auto Capture Status Display
- When auto capture is suspended, this indicator will read [Preview], and when it is running, it will read [A-CAP in progress].
- The User Preset Selection Button
- User presets for auto capture stored in the camera can be loaded by selecting them from the pull-down menu. Changes made to auto capture settings using NX MobileAir are also automatically reflected in user presets.
- The Start/End Button
-
Tap the [Start] button to start auto capture with configured settings. Tap the [End] button to end auto capture.
Disabled [Start] Button
If the [Start] button is disabled, check whether the camera can perform auto capture operations.
- The [Start] button will be disabled if no memory card is inserted in the camera.
- The [Capture Criteria] Check Boxes
Checked settings will be effective during auto capture.
- Only checked items can be tapped to open the options display.
- At least one checkbox must be checked. When switching capture criteria, first check the checkbox of the destination to be switched to.
- The [Motion] Button
- The configured speed and size of motion are displayed. Tap to display motion settings (0[Capture Criteria]: [Motion]).
- The [Subject Detection] Button
- The size and target of subject detection are displayed. Tap to display subject detection settings (0[Capture Criteria]: [Subject Detection]).
- [Distance] Button
- The configured nearest and farthest distances to the subject are displayed. Tap to display distance settings (0[Capture Criteria]: [Distance]).
- [Target Area] Button
-
Tap to display target area settings (0Configuring the Target Area).
- This option is available if either of the following criteria is met:
- The focus mode is set to a mode other than MF and the AF-area mode is set to [Auto-area AF].
- The focus mode is set to MF and the [Distance] capture criteria checkbox is unchecked.
- This option is available if either of the following criteria is met:
- The Recording Time/Wait Button
- Displays the duration the camera continues to shoot and the interval between shots. Tap to display recording time settings (0Configuring the Recording Time).
Low Memory Card Storage
The memory card in Slot 1 (or the primary slot) or Slot 2 (or the secondary slot) can be formatted from the auto capture display menu.
- Formatting a card will cause all the stored data to be deleted. If there is any data you want to keep on the card, transfer it to a computer or another device before formatting.
Configuring Capture Criteria
Configure the criteria for performing auto capture. The configurable criteria are [Motion], [Distance], and [Subject detection]. If multiple criteria are selected, shooting will only be performed when all of the criteria are satisfied.
[Capture Criteria]: [Motion]
Tap the [Motion] button on the auto capture operations display to open the motion settings display. You can configure the direction of movement, speed, and size of the subject.
- The Back Button
- Save settings and return to the previous display.
- Live View
Preview how the camera recognizes the subject under the configured motion criteria.
- You can configure the point where you want to focus by tapping the position where the subject is expected to enter the angle of view.
- [Speed]
-
Configure a value that corresponds to the speed measured as the time taken for the subject to cross the frame horizontally. Each option roughly corresponds to the following number of seconds.
- [1 (Low)]: About 5 s or less
- [2]: About 4 s or less
- [3]: About 3 s or less
- [4]: About 2 s or less
- [5 (High)]: About 1 s or less
- [Subject Size]
-
You can configure the size of the subject. Choose from the following five options corresponding to the number of points consisting of the auto capture detection areas (the green boxes displayed in live view).
- [1 (Small)]: 4 points or larger
- [2]: 8 points or larger
- [3]: 14 points or larger
- [4]: 24 points or larger
- [5 (Large)]: 34 points or larger
Size Settings for [Motion] and [Subject Detection]
When both [Motion] and [Subject detection] are checked under [Capture criteria] in the auto capture operations display, the [Subject size] setting in the motion settings display and the [Subject size] setting in the subject detection settings display are separate settings. Changing the [Subject size] setting in the motion settings display will not affect the [Subject size] setting for subject detection. The subject will be identified according to both settings, and shooting will be performed when both criteria are satisfied.
- The [Direction] Check Boxes
- Select the direction in which the subject should move in order for the camera to shoot. Multiple directions can be selected.
- The AF Button
- Tap to perform autofocus at the position where the focus point is configured.
- The Manual Focus Button
- Tap
 or
or  to move the focus position to the near side or the infinity side in fixed step widths. To adjust the focus position in smaller step widths, tap
  or
or  .
.
[Capture Criteria]: [Subject Detection]
Tap the [Subject detection] button on the auto capture operations display to open the subject detection settings display. You can configure the size and type (such as animal or vehicle) of the subject.
- The Back Button
- Save settings and return to the previous display.
- Live View
Preview how the camera recognizes the subject under the configured subject detection criteria.
- You can configure the point where you want to focus by tapping the position where the subject is expected to enter the angle of view.
- [Subject Size]
You can configure the size of the subject as a percentage of the angle of view. Each option roughly corresponds to the following percentages.
- [1 (Small)]: 2.5% or more
- [2]: 5% or more
- [3]: 10% or more
- [4]: 15% or more
- [5 (Large)]: 20% or more
Size Settings for [Motion] and [Subject Detection]
When both [Motion] and [Subject detection] are checked under [Capture criteria] in the auto capture operations display, the [Subject size] setting in the motion settings display and the [Subject size] setting in the subject detection settings display are separate settings. Changing the [Subject size] setting in the motion settings display will not affect the [Subject size] setting for subject detection. The subject will be identified according to both settings, and shooting will be performed when both criteria are satisfied.
- [Target Subject Type]
- Choose a subject type from [Auto], [People], [Animal], [Vehicle], or [Airplanes].
- The AF Button
- Tap to perform autofocus at the position where the focus point is configured.
- The Manual Focus Button
- Tap or to move the focus position to the near side or the infinity side in fixed step widths. To adjust the focus position in smaller step widths, tap or .
[Capture Criteria]: [Distance]
Tap the [Distance] button on the auto capture operations display to open the distance settings display. You can configure the nearest and farthest distances at which the camera will recognize the subject.
- The Back Button
- Save settings and return to the previous display.
- Live View
Preview how the camera recognizes the subject under the configured distance criteria.
- Tap the [Measure on LV] button for the nearest or farthest distance to display the focus index point in live view. Tap anywhere in live view to move the focus index point and change the distance value.
- The [Measure on LV] Buttons
- Tap these buttons to apply changes to the nearest or farthest distance made by tapping the screen in live view. While the setting is being adjusted, the operations with the other buttons and the slider will be disabled. Tap [End] to finish the process of making adjustments by tapping in live view.
- This option is not available when the focus mode is set to MF.
- The Distance Adjustment Buttons/Slider
-
Tap the left and right buttons to adjust the nearest and farthest distances in fixed step widths. The step widths will vary according to the distance. You can also drag the slider to change the distance.
- Adjust the distance within the range indicated by the green guide at the bottom of the slider. Setting the distance outside the guide range will reduce the accuracy of recognizing the distance to the subject.
Configuring the Target Area
Tap the [Target area] button on the auto capture operations display to open the target area settings display. By specifying non-target areas, such as areas with obstacles within the angle of view, you will be able to capture the subject more accurately.
- This option is available if either of the following criteria is met:
- The focus mode is set to a mode other than MF and the AF-area mode is set to [Auto-area AF].
- The focus mode is set to MF and the [Distance] capture criteria checkbox is unchecked.
- The Back Button
- Save settings and return to the previous display.
- Live View
Preview how the camera recognizes the subject within the target area.
- [Specify target area (tap on LV)]
-
After tapping the [Select non-target area] or [Select target area] button, you will be able to tap points in live view to set them as non-target or target areas. Contiguous points can be selected together by dragging your finger across the screen.
- [Select/deselect all]
- Target and non-target areas for subject recognition can be configured all at once.
Tip for Configuring the Target Area
If the non-target area is larger, tap [Deselect all], or if the target area is larger, tap [Select all], then use [Specify target area (tap on LV)] to quickly configure the target area.
Configuring the Recording Time
Tap the Recording Time/Wait button on the auto capture operations display to open the recording time settings display. You can configure the duration the camera continues to shoot after auto capture is triggered and the minimum amount of time it will wait before shooting again.

- The Back Button
- Save settings and return to the previous display.
- [Recording Time Selection]
Select the amount of time to record for each shot from 1 second to 30 minutes, or select [None]. If a setting other than [None] is selected, the camera will continue to record for the configured amount of time even if the subject is no longer detected. If [None] is selected, the camera will only record while the subject is detected.
- Depending on the settings on the camera, it may not be possible to record for the configured amount of time.
- [Wait after shooting]
- Select the amount of time to wait after shooting from 1 second to 30 minutes. The camera will not start shooting until the configured amount time has elapsed since the previous shot, even if the subject is detected earlier.