- Home
- Menu Guide
Font size
- S
- M
- L
Menu Guide
- The File Menu
- The Capture NX-D Menu (Mac Only)
- The Edit Menu
- The View Menu
- The Image Menu
- The Adjust Menu
- The Tool Menu
- The Window Menu
- The Help Menu
The File Menu
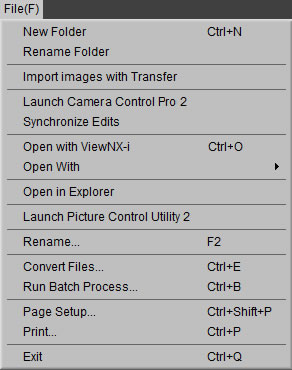
- New Folder
- Create a new sub-folder in the current folder.
- Rename Folder
- Rename the current folder.
- Import images with Transfer
- Launch Nikon Transfer 2.
- Launch Camera Control Pro 2
- Launch Camera Control Pro 2.
- Synchronize Edits
- Select this option to apply current settings to any images subsequently added to the current folder.
- Open with View NX-i
- View the current image or images in ViewNX-i. The images are displayed in their current state including any changes made using Capture NX-D and, in the case of NEF/NRW (RAW) images, without conversion to TIFF. This option is only available if ViewNX-i is installed.
- Open With
- Open the current image in another application. Use the Open With Application option to add applications to the menu.
- Open in Explorer (Windows)/Show in Finder (Mac)
- Open the current folder in the operating system file browser.
- Launch Picture Control Utility 2
- Launch Picture Control Utility 2.
- Rename
- Rename the current image.
- Convert Files
- Convert the currently-selected image or images to JPEG or TIFF format.
- Run Batch Process
- Perform batch processing.
- Page Setup
- Adjust printer settings.
- Print images.
- Exit (Windows only)
- Exit Capture NX-D.
The Capture NX-D Menu (Mac Only)
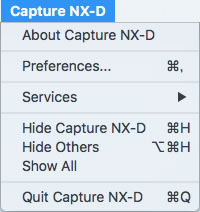
- About Capture NX-D
- Display the product version number.
- Preferences
- Open the Capture NX-D preferences dialog.
- Quit Capture NX-D
- Quit Capture NX-D.
The Edit Menu
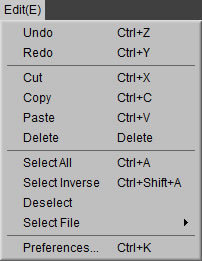
- Undo
- Undo the most recent operation.
- Redo
- Redo an operation after performing Undo.
- Cut/Copy/Paste
- Cut, copy, or paste the current selection.
- Delete
- Delete the current selection.
- Select All
- Select all images in the current folder.
- Select Inverse
- Select all images in the current folder that are not currently selected and deselect any images that are currently selected.
- Deselect
- Deselect all images.
- Select File
- Select all files in the current folder that match the criteria chosen in the Select File submenu.
- Preferences (Windows only)
- Open the Capture NX-D preferences dialog.
The View Menu
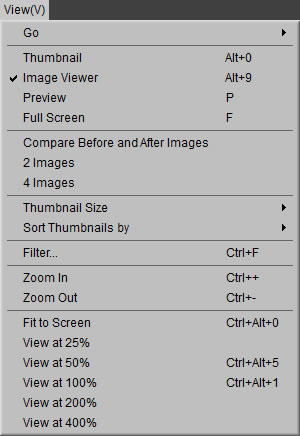
- Go
- Navigate the folder hierarchy.
- Thumbnail/Image Viewer/Preview/Full Screen
- Choose how images are displayed.
- Compare Before and After Images/2 Images/4 Images
- Compare images. The 4 Images option is available only on a computer with a 64-bit operating system and at least 4 GB of memory.
- Thumbnail Size
- Choose the thumbnail size.
- Sort Thumbnails by
- Sort thumbnails.
- Filter
- Filter images by a variety of criteria, including rating, label, and camera settings.
- Zoom In/Zoom Out/Fit to Screen/View at 25%/View at 50%/View at 100%/View at 200%/View at 400%
- Zoom the preview in or out.
The Image Menu
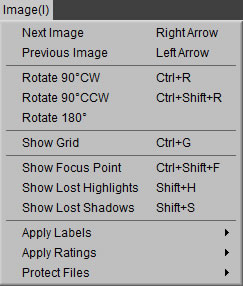
- Next Image/Previous Image
- View the next or previous image in the current folder.
- Rotate
- Rotate the current image 90 or 180 degrees.
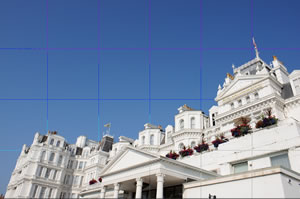
- Show Grid
- Display a grid over the preview.
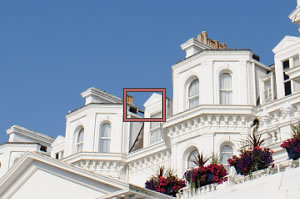
- Show Focus Point
- Show the focus point in the preview display.
- Show Lost Highlights
- View areas of the image with the maximum value for brightness and in which details may have been lost to overexposure (“washed out”). A different color is used to show the lost highlights for each of the RGB, red, green, and blue channels.

- Show Lost Shadows
- View areas of the image with the minimum value for brightness and in which details may have been lost to underexposure. A different color is used to show the lost shadows for each of the RGB, red, green, and blue channels.

- Apply Labels/Apply Ratings/Protect Files
- Label, rate or protect selected images.
The Adjust Menu
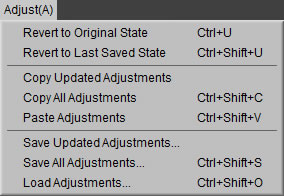
- Revert to Original State
- Reset all image adjustments and restore the picture to its original state.
- Revert to Last Saved State
- Initialize the settings file, cancelling all changes made in Capture NX-D.
- Copy Updated Adjustments
- Copy only modified adjustments.
- Copy All Adjustments
- Copy all adjustments.
- Paste Adjustments
- Apply to the current image adjustments copied using Copy Updated Adjustments or Copy All Adjustments.
- Save Updated Adjustments
- Create a file containing only modified adjustments.
- Save All Adjustments
- Save all adjustments to a file.
- Load Adjustments
- Load adjustments from a file created with Save Updated Adjustments or Save All Adjustments and apply them to the current image.
Copying and Saving Adjustments
Converting pictures to JPEG or TIFF format prevents any prior adjustments being copied or saved.
Using “Revert to Original State” with Images Modified in Other Applications
In the case of JPEG and TIFF images modified in Capture NX 2 or ViewNX 2, Revert to Original State reverts the image to its last saved state.
The Tool Menu
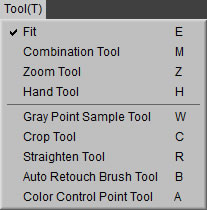
- Fit
- Zoom the preview to fit the image area. Zoom is re-adjusted to fit the preview to the image area as the size of the area changes.
- Combination Tool
- Double-click the display to alternately zoom the preview to fit the image area and zoom to a 100% view. The preview can be scrolled by dragging the cursor.
- Zoom Tool
- Click to zoom in. To zoom out, click while pressing the Alt key (or on Mac computers, the option key). Use drag to zoom in on a selected area.
- Hand Tool
- Drag to scroll the preview.
- Gray Point Sample Tool
- Set white balance by sampling the preview.
- Crop Tool
- Crop the preview.
- Straighten Tool
- Straighten the image in the preview palette.
- Auto Retouch Brush Tool
- Remove dust and scratches.
- Color Control Point Tool
- Selectively brighten, darken, or modify colors.
The Window Menu
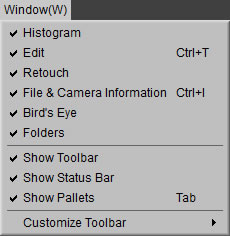
- Histogram/Edit/Retouch/File & Camera Information/Bird’s Eye/Folders
- View or hide the selected palette.
- Show Tool Bar
- View or hide the toolbar.
- Show Status Bar
- View or hide the status bar.
- Show Pallets
- View or hide all palettes.
- Customize Toolbar
- Customize the toolbar.
The Help Menu

- Capture NX-D Help
- View online help.
- Check for Updates
- Check for updates to Capture NX-D.
- About Capture NX-D (Windows only)
- Display the product version number.
