- Home
- Adjusting Selected Colors (Color Control Points)
Font size
- S
- M
- L
Adjusting Selected Colors (Color Control Points)
Use the  tool in the toolbar to selectively brighten, darken, or modify colors. Capture NX-D automatically chooses the area affected according to the placement of the control point.

Color Control Points
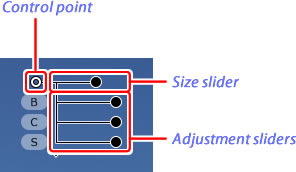
When you place a color control point, Capture NX‑D automatically detects the color at the chosen point and selects all similar colors in the surrounding area. The effect is controlled by sliders: a size slider controlling extent of the area selected and (at default settings) three adjustment sliders for adjusting Brightness, Contrast, and Saturation in the selected area. Sliders can be adjusted by dragging the handles (●) left or right or by placing the mouse cursor over a handle and rotating the scroll wheel. You can choose the adjustment sliders displayed from the color model menu for the retouch palette Color Control Point tool.
Color Model
You can click the triangle at the bottom or top of the sliders to switch between the current color model (BCS, RGB, or HSB) and ALL.

Using Color Control Points
Follow the steps below to add and adjust color control points.
-
Click the
button to enter color control point mode (to exit color control point mode, click the button again).
-
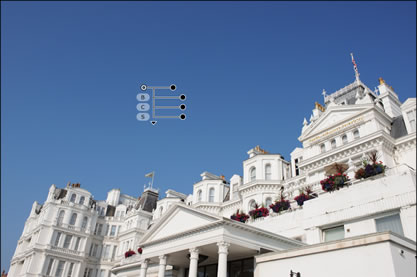
Click the image to add a color control point and drag it to the area you want to modify.
-
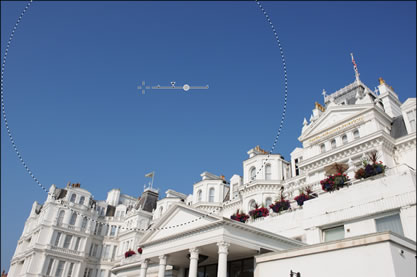
Adjust the size of the control point by dragging the handle of the size slider left or right: the longer the slider, the greater the area affected. The effect applies to the area shown by a dotted line and diminishes with the distance from the control point.
-
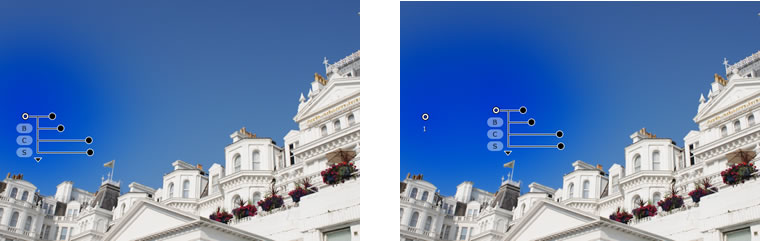
Drag the handles of the adjustment sliders left or right to adjust the selected color. The illustration shows the brightness slider being used to adjust the brightness of the sky: the effect applies only to the blue of the sky, leaving the color of the building unaffected, and diminishes with the distance from the control point.
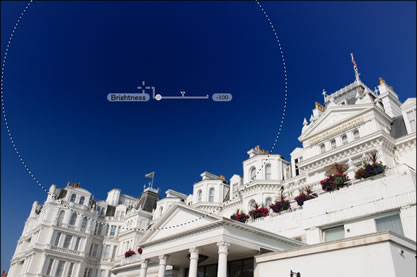
The size and adjustment sliders can be fine-tuned using the color control point tool in the retouch palette.
-
Repeat Steps 2 through 4 to add color control points as needed.
Adding Control Points
The practical maximum for the number of control points that can be added to a single image is about 100.
Zoom
You cannot zoom in by double-clicking the preview image while color control point mode is in effect. Use the navigation palette or the zoom commands in the View menu.
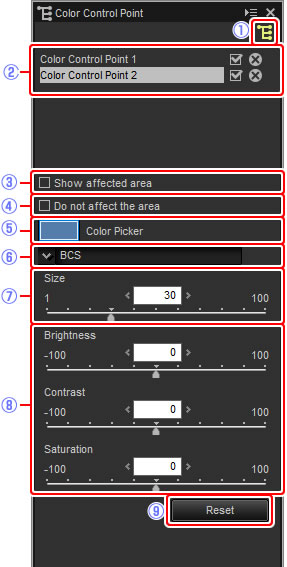
The Color Control Point Tool
Color control points can be fine-tuned using the color control point tool in the retouch palette.

- This button performs the same function same as the button in the toolbar.
 Color control points
- Select a control point and use the check box to show or hide it or the
 button to delete it. To select multiple control points, keep the Ctrl (or on Mac computers, the
  /command) key pressed while clicking each control point in turn.
Deselecting Control Points
To deselect the current color control point, click it while pressing the Ctrl (or on Mac computers, the /command key) or choose Deselect in the Edit menu.
 Show affected area
-
View the area affected by the color control point. The area in which the effects are most noticeable is shown in white, unaffected areas in black.

 Do not affect the area
- Disable the adjustment sliders for the selected control point and prevent changes to other control points affecting the colors in the selected area. The size of the area protected can be adjusted using the size slider.
 Color picker
- Use a color picker to choose the target color for the selected control point. Objects affected by the control point will be converted to the selected color.
 Color model
-
Choose the type of adjustment sliders displayed with the selected control point.
- BCS: Display sliders for Brightness, Contrast, and Saturation.
- RGB: Display sliders for Red, Green, and Blue.
- HSB: Display sliders for Hue, Saturation, and Brightness.
- ALL: Display sliders for Hue, Saturation, Brightness Contrast, Red, Green, Blue, and Warmth.
 Size
Size- Adjust the size of the selected control point.
 Adjustment sliders
- Use the sliders to make adjustments to colors in the area affected by the selected control point. The sliders displayed vary with the color model selected.
 Reset
Reset- Reset values for the selected slider to those in effect before any changes were made.
Copying Color Control Points
Copy and paste can be used to create multiple control points with the same size and type of effect. To copy a color control point, select it in the preview display or retouch palette and use the Copy and Paste commands in the Edit menu.