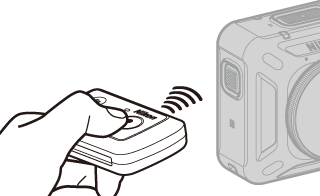
Using the ML-L6 Remote Control (Available Separately)
You can use the ML-L6 Remote Control to record movies and take pictures from a distance.
- Parts and Functions of the Remote Control
- Inserting the Battery in the Remote Control
- Pairing the Camera and Remote Control
- Shooting with a Remote Control
- Switching from Remote Control to Smart Device
- Notes About Waterproof Performance of the Remote Control
- Notes About Condensation and Waterproof Performance of the Remote Control
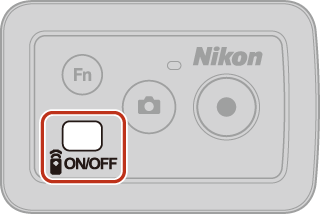
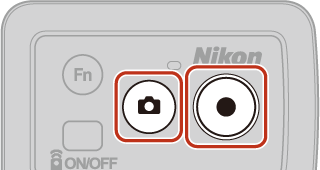
Parts and Functions of the Remote Control
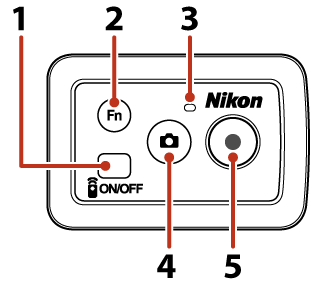
Battery-chamber cover
| Part | Function | |
|---|---|---|
| 1 | Power button |
Used to turn the remote control on or off, and for pairing with the camera. Also turns off the camera. |
| 2 | w button |
Switches the connection from the remote control to a paired smart device. |
| 3 | Status lamp |
Displays the shooting status in conjunction with the status lamps on the camera.
|
| 4 | Photo button |
Captures a still image. You can also use it to turn on the camera. |
| 5 | Movie button |
Starts/stops movie recording. You can also use it to turn on the camera. |
Notes About Using the Remote Control
The remote control cannot be used underwater.
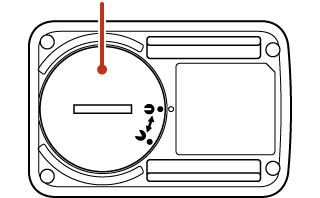
Inserting the Battery in the Remote Control
Insert a 3V CR2032 lithium battery.
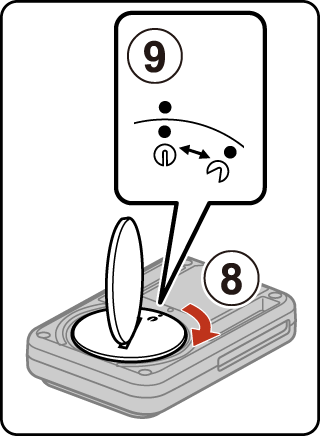
- Use a coin (
 ) to turn the battery-chamber cover counterclockwise (
 ) and open it.
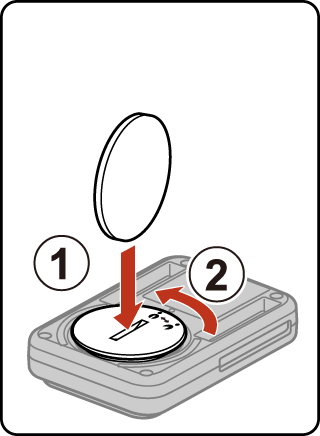
 - Insert the battery with the positive side face up (
 ). Make sure that the battery is firmly inserted at the center of the battery chamber (
 ).
). - Align the N mark of the battery-chamber cover with the R mark of the remote control (
 ), and press the battery-chamber cover with your thumbs (
 ). The battery-chamber cover rotates clockwise slightly and stops (
 ).
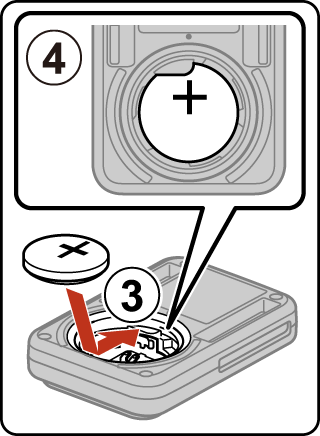
). - Use a coin to turn the battery-chamber cover clockwise (
 ) to securely lock it. Make sure that the X mark of the battery-chamber cover is aligned with the R mark of the remote control (
 ).
).
Notes When Closing the Battery-Chamber Cover
Make sure that no foreign substance such as lint is caught in the battery-chamber cover. Failure to observe this precaution could impair the waterproof performance and cause water to seep inside the remote control.
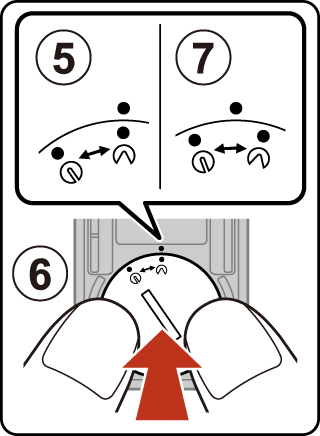
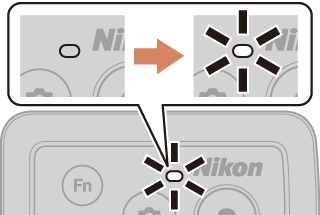
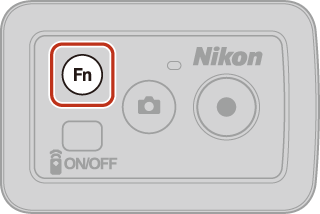
Pairing the Camera and Remote Control
Before using the remote control for the first time, it must be paired with the camera.
- The camera can only be paired with one remote control at a time. When the camera is paired to a different remote control, only the most recently paired remote control is enabled.
-
Check that both the power-on lamp of the camera and the status lamp of the remote control are off.

-
Press and hold down the photo button (about 7 seconds) on the camera.
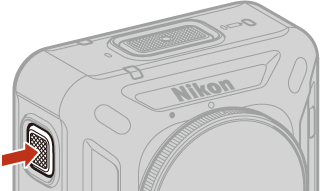
- Press and hold down the photo button until the status lamps flash green at the same time, even if you hear the startup sound.
-
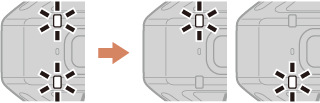
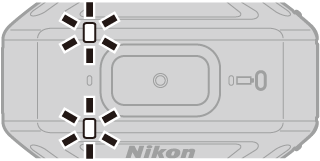
The status lamps flash green at the same time for a while and then alternately flash green (the camera is in pairing standby mode).
-
Press and hold down the power button (at least 3 seconds) on the remote control.
- Press and hold down the power button until the status lamp on the remote control changes from quick flashing to slow flashing.
-
If pairing is successful, the status lamp on the remote control changes from slow flashing to off.

- If pairing fails, the status lamps on the camera flash red six times at the same time. Perform the procedure again from step 1.
For information about using a remote control, see Shooting with a Remote Control.
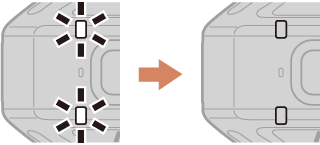
Shooting with a Remote Control
To use a remote control, it must be paired with the camera (APairing the Camera and Remote Control).
-
Press and hold down the power button (about 1 second) on the remote control to turn it on.
-
The status lamp on the remote control flashes quickly.
If you press and hold down longer than 3 seconds, the status lamp changes from quick flashing to slow flashing. When it changes to slow flashing, press and hold down the power button on the remote control until the flashing stops, and then repeat the procedure from step 1.
-
-
Press the photo button or movie button on the remote control to turn on the camera.
-
You can also press and hold down the movie button (about 3 seconds) on the camera to turn it on.
-
If the connection is successful, the status lamp on the remote control changes from quick flashing to off.
-
-
Press the photo button or movie button on the remote control to shoot.
- To end movie recording, press the movie button on the remote control again.
- To turn off the remote control, press and hold down the power button (about 1 second) on the remote control. When the power-on lamp on the camera turns off, the camera and remote control turn off.
Switching from Remote Control to Smart Device
The camera cannot be operated by both the remote control and a smart device at the same time.
Follow the procedure below to switch the camera connection to a paired smart device.
- See Pairing with a Smart Device when connecting to a smart device that has never been paired.
-
Follow the procedure Shooting with a Remote Control from step 1 to 2 to connect the camera and remote control.
-
Press and hold down the w button (at least 3 seconds) on the remote control.
- The camera and remote control are disconnected.
-
The status lamps on the camera flash green at the same time (once in 5 seconds) until the camera is reconnected with the smart device.
-
Launch SnapBridge 360/170 on a paired smart device.
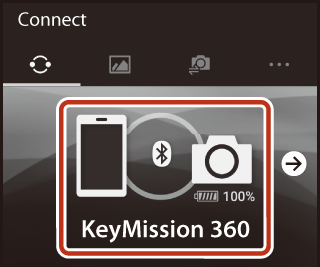
- When the connection switches to a smart device, the B icon is displayed in the a Connect screen.
-
When the connection switches to the smart device, the status lamps on the camera change from flashing to off.
Switching from Smart Device to Remote Control
You can switch the connection from a smart device to a paired remote control by selecting SnapBridge 360/170 M c Camera tab M Remote options M Choose connection.
Notes About Waterproof Performance of the Remote Control
The remote control is rated equivalent to JIS/IEC waterproof class 7 (IPX7), and it is confirmed that water does not seep inside when soaked underwater at a depth of 1 m (3.2 ft) for up to 30 minutes.
- The remote control cannot be used underwater.
Notes About Condensation and Waterproof Performance of the Remote Control
- Do not drop the remote control, strike it against a hard object such as a rock, or throw it against a water surface.
-
Do not take the remote control underwater.
- If the remote control is dropped in water by accident, immediately pick it up and wipe it off with a soft dry cloth.
-
Do not insert a wet battery in the remote control.
- Do not open the battery-chamber cover when the remote control or your hands are wet. Doing so may cause water to seep inside the remote control and result in malfunction.
- If moisture such as water droplets or a foreign substance adheres to the outside of the remote control or the inside of the battery-chamber cover, immediately wipe it off with a soft dry cloth.
-
Make sure that the battery-chamber cover is firmly closed.
- Make sure that the battery-chamber cover is in the CLOSE position.
- Make sure that no foreign substance such as lint is caught in the battery-chamber cover. Failure to observe this precaution could cause water to seep inside the remote control.
-
Do not leave the remote control in cold conditions or in hot conditions of 40°C (104°F) or more for a long period of time.
- Doing so could cause deterioration of the waterproof performance.
-
Do not suddenly bring the remote control to high-humidity environment if it is exposed to extreme cold for an extended period.
- Condensation may form inside the remote control.