The NX Tether Window
The elements of the NX Tether's control window are shown below. The control window display will vary depending on whether or not the connected camera supports the NX Tether's live view feature.
When Connecting a Camera that Supports Live View
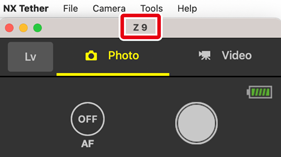
Examples in this section show images of the software connected to a Z9.
 Cameras that Support Live View
Z9, Z8, Z7II, Z7, Z6III, Z6II, Z6, Z5II, Zf, ZR, D6, and D780
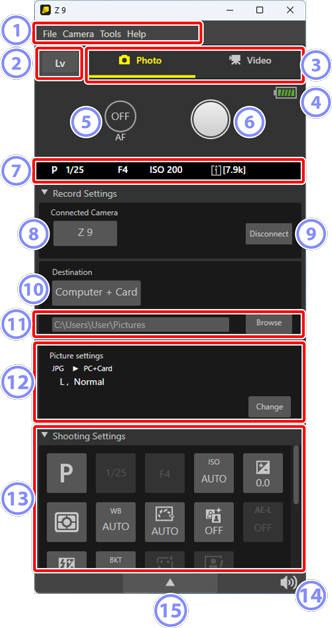
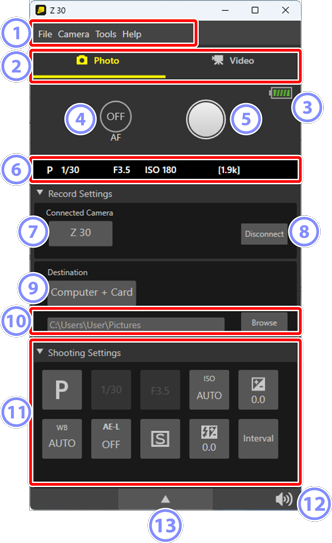
 The Menu Bar
- Select menu options (
 Menu List).
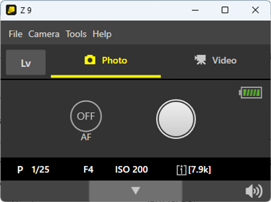
  [Lv]
[Lv]- Click to view the live view window (The Live View Window).
 Photo/Video Selector
- Click to toggle between photo and video modes for the camera when [Enable Controls on Camera Body] is disabled.
 The Battery Indicator
Shows the level of the camera battery.
- Green: Battery fully or mostly charged.
- Yellow: Battery partially discharged.
- Red: Battery low. Charge the battery.
A warning will be displayed when the battery is nearing exhaustion. Insert a spare battery or charge the current one. For information on charging batteries, see the documentation provided with the camera.
 [AF]
[AF]- Click to turn autofocus [ON] or [OFF]. If [ON] is selected when you click the shutter-release button, the camera will focus before the shutter is released ( Step 8: Enable (or Disable) Autofocus).
 The Shutter-Release/Video-Record Button
- Click to take photographs or record videos with the current settings ( Step 9: Take Pictures). In video mode, click the button again to end recording.
 The Shooting Information Display
- Shows the camera’s current values for shooting (exposure) mode, shutter speed, aperture, and ISO sensitivity, and the number of exposures remaining (photo mode) or available recording time (video mode) with the memory card inserted in the camera.
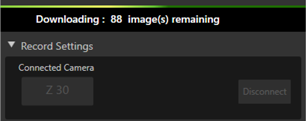
- During download, the display shows the number of pictures remaining and an animated green bar.
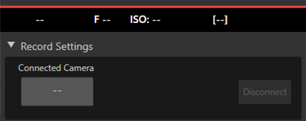
- A red bar is displayed if NX Tether currently has no connection to a camera.
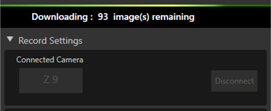
Download in progress

No camera connected
 [Connected Camera]
- The camera to which NX Tether currently has a connection. When multiple cameras are connected to the computer, you can choose a camera for use with NX Tether by clicking the camera name ( Step 3: Choose a Camera).
 [Disconnect]
- End NX Tether’s connection to the camera.
 [Destination]
- Choose where pictures taken with the camera are saved; your options are [Computer], [Computer + Card], and [Card] ( Step 4: Choose a Destination).
 The Destination Folder
- The path to the folder where pictures are stored when [Computer] or [Computer + Card] is selected for [Destination]. To choose a different folder, click [Browse] ( Step 4: Choose a Destination).
 [Picture settings]
- Displays current settings, including image size and quality for photography and video recording. Click [Change] to adjust settings ( Step 5: Adjust Picture Settings).
 [Shooting Settings]
- Adjust camera settings ( The [Shooting Settings] Pane).
 The Sound Notifications Button
- Enable or disable notification sounds in NX Tether ( Enabling and Disabling Notification Sounds).
 Collapse
Click to collapse the NX Tether window. Click again to expand back to the standard display.
Display collapsed
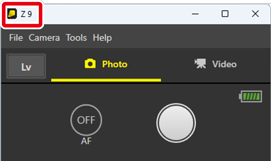
The Camera Name and Status Displays
When NX Tether is connected to a camera, the camera name appears at the top of the NX Tether window.
Windows
macOS
- A
 (status) icon appears in the notification area of the task bar (Windows) or menu bar (macOS).
 If NX Tether currently has no connection to a camera, the
icon in the taskbar notification area will change to  .
.
During self-timer and interval-timer photography, the
icon changes to  .
.
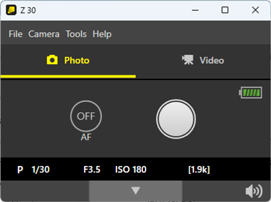
When Connecting a Camera that Does Not Support Live View
Examples in this section show images of the software connected to a Z30.
Cameras that Do Not Support Live View
Z5, Z50II, Z50, Z30, and Zfc
- The Menu Bar
- Select menu options ( Menu List).
- Photo/Video Selector
- Click to toggle between photo and video modes for the camera when [Enable Controls on Camera Body] is disabled.
- The Battery Indicator
Shows the level of the camera battery.
- Green: Battery fully or mostly charged.
- Yellow: Battery partially discharged.
- Red: Battery low. Charge the battery.
A warning will be displayed when the battery is nearing exhaustion. Insert a spare battery or charge the current one. For information on charging batteries, see the documentation provided with the camera.
- [AF]
- Click to turn autofocus [ON] or [OFF]. If [ON] is selected when you click the shutter-release button, the camera will focus before the shutter is released ( Step 8: Enable (or Disable) Autofocus).
- The Shutter-Release/Video-Record Button
- Click to take photographs or record videos with the current settings ( Step 9: Take Pictures). In video mode, click the button again to end recording.
- The Shooting Information Display
- Shows the camera’s current values for shooting (exposure) mode, shutter speed, aperture, and ISO sensitivity, and the number of exposures remaining (photo mode) or available recording time (video mode) with the memory card inserted in the camera.
- During download, the display shows the number of pictures remaining and an animated green bar.
- A red bar is displayed if NX Tether currently has no connection to a camera.
Download in progress
No camera connected
- [Connected Camera]
- The camera to which NX Tether currently has a connection. When multiple cameras are connected to the computer, you can choose a camera for use with NX Tether by clicking the camera name ( Step 3: Choose a Camera).
- [Disconnect]
- End NX Tether’s connection to the camera.
- [Destination]
- Choose where pictures taken with the camera are saved; your options are [Computer], [Computer + Card], and [Card] ( Step 4: Choose a Destination).
- The Destination Folder
- The path to the folder where pictures are stored when [Computer] or [Computer + Card] is selected for [Destination]. To choose a different folder, click [Browse] ( Step 4: Choose a Destination).
- [Shooting Settings]
- Adjust camera settings ( The [Shooting Settings] Pane).
- The Sound Notifications Button
- Enable or disable notification sounds in NX Tether ( Enabling and Disabling Notification Sounds).
- Collapse
Click to collapse the NX Tether window. Click again to expand back to the standard display.
Display collapsed
The Camera Name and Status Displays
When NX Tether is connected to a camera, the camera name appears at the top of the NX Tether window.
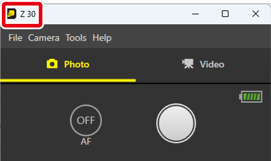
Windows
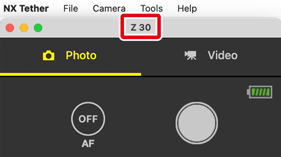
macOS
- A (status) icon appears in the notification area of the task bar (Windows) or menu bar (macOS).
If NX Tether currently has no connection to a camera, the
icon in the taskbar notification area will change to .During self-timer and interval-timer photography, the
icon changes to .