The [Shooting Settings] Pane
Shooting settings for photo and video modes can be adjusted using the buttons in the NX Tether [Shooting Settings] pane.
Available items and settings in the [Shooting Settings] pane vary by camera. See the documentation provided with the camera for details on shooting settings and functions.
Shooting Settings Available in Photo Mode
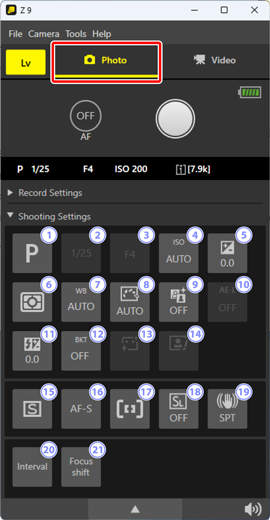
 [Shooting mode]: Select the camera shooting (exposure) mode.
 [Shutter Speed]: Choose the shutter speed. Bulb photography is available in mode M (
 Bulb Photography).
 [Aperture]: Choose the aperture.
 [ISO sensitivity (photos)]: Adjust ISO sensitivity. If [Auto ISO Sensitivity Control] is enabled, the camera will adjust ISO sensitivity automatically.
 [Exposure Compensation]: Adjust exposure.
 [Metering]: Select a metering option for photography.
 [White balance (photos)]: Select the white balance for photographs.
 [Picture Control]: Select the Picture Control for photographs.
- If a camera that has a [Tone mode] in the photo shooting menu is connected, available Picture Control settings will vary with the selected [Tone mode] option.
 [Active D-Lighting]: Select an Active D-Lighting option for photographs.
 [AE Lock]: Select [ON] to lock exposure at current settings. Exposure will not change to reflect changes in composition or brightness.
 [Flash Compensation]: Adjust flash output.
 [Auto bracketing]: Select [ON] to automatically adjust exposure, flash level, Active D-Lighting (ADL), or white balance with each shot by “bracketing” the current value.
 [Skin softening (photos)]: Select the amount of skin softening for photographs.
 [Portrait impression balance]: Fine-tune the hue and brightness settings of human portrait subjects for photographs. You can also individually adjust the settings for [Mode 1] through [Mode 3].
 [Release Mode]: Choose a release mode ( Release Mode).
 [Focus mode (photos)]: Select the focus mode for photography.
 [AF-area mode]: Select the AF-area mode for photography. If a camera that has an [AF subject detection options] or [AF/MF subject detection options] in the photo shooting menu is connected, you can also select priority subjects for autofocus.
 [Silent photography]: Select [ON] to enable silent photography.
 [Vibration reduction (photos)]: Select a vibration reduction option for photographs. Available options vary depending on the lens attached to the camera.
 [Interval Timer Shooting]: Adjust settings for interval-timer photography ( Interval-Timer Photography).
 [Pixel shift shooting]: Select [ON] to enable pixel shift photography at selected settings. To end the pixel shift photography before all shots have been taken, click [Stop].
 [Focus shift shooting]: Click [Start] to use focus shift photography at the current camera settings. Only the number of shots can be viewed and none of focus shift options can be changed in NX Tether. To end the focus shift photography before all shots have been taken, click [Stop].
 [Save and load power zoom position]: Save up to three zoom positions while a power zoom lens is attached ( Save and Load Power Zoom Position). This item is not displayed if a power zoom lens is not attached.
 Viewing and Hiding the [Shooting Settings] Pane
To view or hide [Shooting Settings], click the gray bar at the top of the pane.
[Aperture]
Aperture cannot be adjusted while the lens is removed or a non-CPU lens is attached.
Bulb Photography
For long exposures, select [Bulb Photography] in the [Shutter Speed] display.
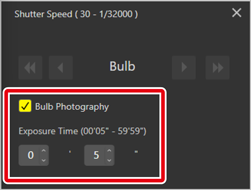
- The shutter speed for bulb photography can be chosen from values between 5 seconds and 59 minutes 59 seconds.
- Click the shutter-release button to take pictures at the selected speed.
- To end the exposure early, click [Stop].

Release Mode
When
 (continuous low-speed) or
  (continuous high-speed) is selected, you can choose the number of shots taken with each click of the shutter-release button. The settings available vary with the camera connected.
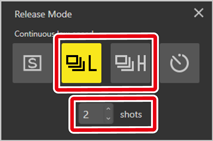
When
 (self-timer) is selected, you can choose a shutter-release delay of from 0 to 59 seconds.
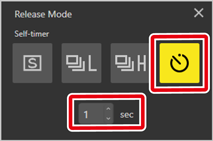
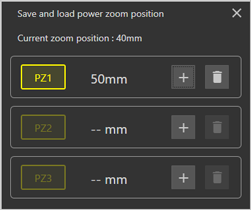
Save and Load Power Zoom Position
Save up to three zoom positions as [PZ1], [PZ2], and [PZ3] while a power zoom lens is attached.
- You can zoom the lens in and out in the live view window ( Zoom position).
- Click
 to save the current zoom position. If a position is already saved, the zoom position will be overwritten.
 - Clicking [PZ1], [PZ2], or [PZ3] will move the lens to the corresponding saved zoom position.
- Use the pull-down menu in the live view window to set the amount of movement of the zoom position ( Zoom position).
- Click
 to delete a saved zoom position.
Save and Load Power Zoom Position
This feature is available only when connecting to a camera that meets all the following conditions:
- A NIKKOR Z 28-135mm f/4 PZ lens or a NIKKOR Z DX 12-28mm f/3.5-5.6 PZ VR lens with lens firmware (LF) version 1.10 or later is attached.
- The camera Custom Settings f2 [Custom controls (shooting)] and g2 [Custom controls] support [Save and load power zoom position].
Shooting Settings Available in Video Mode
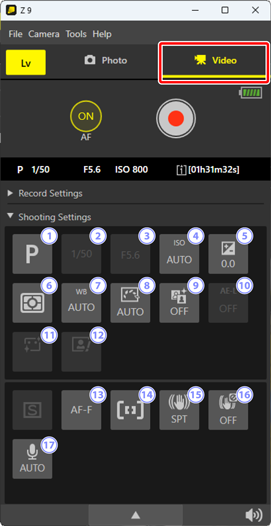
- [Shooting mode]: Select the camera shooting (exposure) mode.
- [Shutter Speed]: Choose the shutter speed. If the camera Custom Setting [Shutter mode] is set to [Shutter angle], this item is disabled and “--” is displayed.
- [Aperture]: Choose the aperture.
- [ISO sensitivity-(videos)]: Select the upper ISO sensitivity limit during video recording. If [Auto ISO control (mode M)] is disabled, the ISO sensitivity for shooting (exposure) mode M can be selected.
- [Exposure Compensation]: Adjust exposure.
- [Metering]: Select a metering option for video recording.
- [White balance (videos)]: Select the white balance for videos.
- [Picture Control]: Select the Picture Control for videos.
- [Active D-Lighting]: Select an Active D-Lighting option for videos.
- [AE Lock]: Select [ON] to lock exposure at current settings. Exposure will not change to reflect changes in composition or brightness.
- [Skin softening (videos)]: Select the amount of skin softening for videos.
- [Portrait impression balance]: Fine-tune the hue and brightness settings of human portrait subjects for videos. You can also individually adjust the settings for [Mode 1] through [Mode 3].
- [Focus mode (videos)]: Select the focus mode for video recording.
- [AF-area mode]: Select the AF-area mode for video recording. If a camera that has an [AF subject detection options] or [AF/MF subject detection options] in the video recording menu is connected, you can also select priority subjects for autofocus.
- [Vibration reduction (videos)]: Select a vibration reduction option for videos. Available options vary depending on the lens attached to the camera.
- [Electronic VR]: Select [ON] to enable electronic vibration reduction during video recording.
- [Audio recording]: Adjust microphone sensitivities and other audio settings during video recording.
- [Save and load power zoom position]: Up to three zoom positions can be saved while a power zoom lens is attached ( Save and Load Power Zoom Position). This item is not displayed if a power zoom lens is not attached.