The [Tools] Menu

- [Keep in Front]
- Select this option to keep NX Tether displayed in front of all other windows in the computer monitor. NX Tether will not be hidden behind other applications when they are launched and is always available for use.
- [Mute]
- Select this option to disable notification sounds.
- [Options]
- View the [Options] display (
 The [Options] Display).
 - [Display alignment]
- Select this option to align the live view window with the control window. This option is available only when a camera that supports the NX Tether's live view feature is connected.
The [Options] Display
You can change NX Tether settings. Click [OK] to save changes and return to the NX Tether window.
[Interface]
Assign keyboard shortcuts and adjust settings for notification sounds and text and icon size.
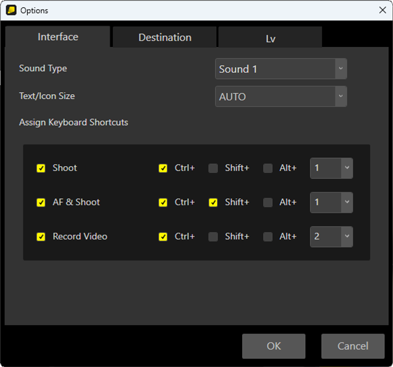
- [Sound Type]: Choose the notification sounds used to alert you to such events as the camera being disconnected ( Notification Sounds in NX Tether).
- [Text/Icon Size]: Choose the size of the text and icons in the display.
- [Assign Keyboard Shortcuts]: Choose keyboard shortcuts for [Shoot], [AF & Shoot], and [Record Video]. Check the option for which a shortcut is desired and select a key from the pop-up menu. You can also select the key or keys to be used in combination with the shortcut; choose from “Ctrl”, “Shift”, and “Alt” (Windows) or “control”, “shift”, “option”, and “command” (macOS).
[Destination]
Select the application used to display pictures after shooting and choose how files are named.
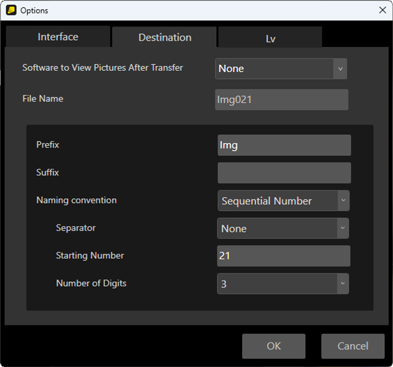
[Software to View Pictures After Transfer]: Select the application used to display pictures automatically after shooting.
- [None]: Pictures will not automatically be displayed after shooting.
- [NX Studio]: After shooting, pictures will automatically be displayed in NX Studio (if installed).
- [Register App]: Choose the application used to display pictures after shooting.
If desired, pictures taken using NX Tether can be viewed in third-party applications (
Viewing Pictures in Third-Party Applications).[File Name]: Choose how image files are named.
- [Prefix]: Enter the string that will appear at the beginning of file names.
- [Suffix]: Enter the string that will appear at the end of file names.
- [Naming convention]: Choose the type of identifier used to generate unique file names; your choices are [Sequential Number], [Date], [Date & Time], [Same as camera], and [None]. The prefix, suffix, and identifier can be joined without separators or by underscores, hyphens, or spaces. When [Sequential Number] is selected, you can choose the starting number and the number of digits (two to eight).
 Viewing Pictures in Third-Party Applications
As of December 2023, the following third-party applications will, if installed, support automatic display of pictures taken in NX Tether:
Capture One
- Select [None] for [Destination] > [Software to View Pictures After Transfer] in NX Tether.
- Enable the hot folder feature in Capture One and select the NX Tether destination folder as the hot folder.
Adobe Lightroom Classic
- Select [None] for [Destination] > [Software to View Pictures After Transfer] in NX Tether.
- Enable auto import in Adobe Lightroom Classic and select the NX Tether destination folder as the folder Lightroom monitors for auto import.
Adobe Bridge/Adobe Photoshop
- Select [Register App] for [Destination] > [Software to View Pictures After Transfer] in NX Tether.
- Choose the application used to display pictures after shooting.
[Lv]
You can change the action when clicking a live view image and adjust the settings for the framing grid displayed on the live view images. This tab is available only when a camera that supports the NX Tether's live view feature is connected.
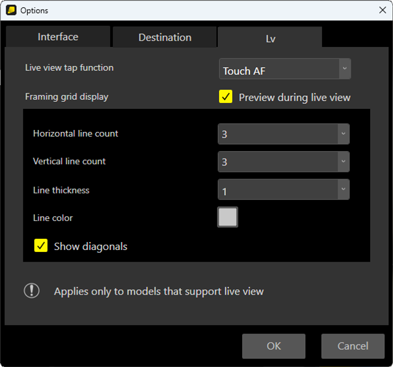
[Live view tap function]: Select the action when clicking a live view image. In video mode, even when [Touch AF] or [Touch shutter/touch AF] is selected, only the position of focus point can be changed.
- [Move focus point]: Click the live view image to move the focus point to the selected position. Does not focus or apply exposure controls.
- [Touch AF]: Click the live view image to move the focus point to the selected position, focus, and apply exposure controls.
- [Touch shutter/touch AF]: Click the live view image to move the focus point to the selected position, focus, apply exposure controls, and take a picture.
- [Off]: Clicking the live view image has no effect.
[Framing grid display]: Adjust the framing grid settings on live view images.
- [Preview during live view]: When this option is selected, the changes made with framing grid settings are reflected as a preview in real time when the live view window is displayed.