

- Home
- Detailed Operations of Picture Control Utility 2
- Creating/Editing Custom Picture Control
- About Level Adjustment
Font size
- S
- M
- L
About Level Adjustment
To create a custom Picture Control, edit the settings of a Nikon Picture Control, optional Picture Control, or Creative Picture Control, or edit the settings of a custom Picture Control that has already been created.
If you turn on the [Reflect Changes] button in the preview operation tools, the settings will be applied instantly when you adjust them.
Editing the Picture Controls
- Select one of the Picture Controls listed in [List: Picture Controls].
 You may not be able to select certain Picture Controls depending on the product that is selected in the [Product] list.
- Adjust the Picture Control with [Quick Adjust], [Effect Level], or [Adjust Sharpness].

- The adjustment items and adjustment range displayed on the [Adjustments] palette depend on the Picture Control that is selected.

- 1. When [NCP] or [NP2] is selected: [Quick Adjust]
- 2. When Creative Picture Control is selected: [Effect Level] and [Adjust Sharpness]
- 3. When [NP3] is selected: [Adjust Sharpness]
- Choose [Quick Adjust] to optimize overall contrast, saturation, hue, and other settings for well-balanced results.
- [Adjust Sharpness] adjusts sharpness in detail.
- [Effect Level] mutes or heightens the effect of Creative Picture Control.
- Checking [Auto] sets the most suitable value automatically.
- Select [Manual Adjustments] and drag the slider of each item horizontally to make detailed adjustments.
 Checking [Auto] sets the most suitable value automatically.
- Use a tone curve to make a detailed adjustment of brightness or contrast.
 The tone curve allows for adjustment of either or both input (original color of the image) and output (color of the image that is finally produced).For details on the settings of each item, refer to "Settings for level adjustment". For details on tone curves, refer to "About Custom Curve".
Note
- When [Neutral], [Monochrome], [Flat], or a custom Picture Control is used as a base Picture Control, [Quick Adjust] cannot be selected. Use [Manual Adjustments] for adjustment.
- [Custom Curve] is not available when the base Picture Control is [Auto].
Settings for level adjustment
The items described below may vary depending on the selected Picture Control.
- The displayed setting items may vary. You cannot adjust items that are grayed out.
- The display area, adjustment range, or adjustment steps may vary, even when the setting items are the same.
Quick Adjust
Use this item to adjust the level of each item automatically. Drag the slider horizontally to adjust them. You can also enter a numeric value in the input box.
Effect Level
Mute or heighten the effect of Creative Picture Control. Drag the slider to the left to decrease the effect, and drag it to the right to increase the effect. You can also enter a numeric value in the input box.
Adjust Sharpness
Adjust the sharpness level manually.
[Quick Sharp]
Quickly adjust the levels for [Sharpening], [Mid-range Sharpening] and [Clarity]. Drag the slider to the left to decrease the sharpness, and drag it to the right to increase the sharpness. You can also enter a numeric value in the input box.
- [Auto]
- Automatically adjusts sharpness.
[Mid-range Sharpening]
Adjust mid-tones affected by [Sharpening] and [Clarity]. Drag the slider to the left to decrease the sharpness, and drag it to the right to increase the sharpness. You can also enter a numeric value in the input box.
Manual Adjustments
Adjust the level of each item manually.
[Sharpening]
Adjust the sharpening of the outline. If you drag the slider to the left, the image outline blurs, and if you drag it to the right, it is sharpened. You can enter a numeric value in the input box.
- [Auto]
- Automatically adjusts sharpening.
[Clarity]
Adjust the level of clarity. Drag the slider to the left to decrease the clarity, and drag it to the right to increase the clarity. You can also enter a numeric value in the input box.
- [Auto]
- Automatically adjusts clarity.
[Contrast]
Adjust contrast. Adjust it by dragging the slider horizontally. You can also enter a numeric value in the input box. This option cannot be selected when [Use Custom Curve] is selected.
- [Auto]
- Automatically adjusts contrast.
[Brightness]
Adjust brightness. Adjust it by dragging the slider horizontally. You can also enter a numeric value in the input box. This option cannot be selected when [Use Custom Curve] is selected.
[Use Custom Curve]
Manually adjust saturation and hue. [Contrast] and [Brightness] cannot be selected when this item is selected.
[Saturation]
Adjust saturation. Drag the slider horizontally to adjust it. You can also enter a numeric value in the input box. This item cannot be selected when [Monochrome] is used as the base Picture Control.
- [Auto]
- Automatically adjusts saturation.
[Hue]
Adjust hue. Drag the slider horizontally to adjust it. You can also enter a numeric value in the input box. This item cannot be selected when [Monochrome] is used as the base Picture Control.
[Filter Effects]
Enabled only when [Monochrome] is selected for the Nikon Picture Control. Click  to select filter effect.
to select filter effect.Items selectable for Filter Effect
- Off
- Yellow
- Orange
- Red
- Green
[Toning]/[Adjust Saturation]/[Toning]
Enabled only when [Monochrome] is selected for the Nikon Picture Control. Click to select the tint, and drag the slider horizontally to adjust saturation. Saturation control is not available when [B&W] is selected. You can also enter a numeric value in the input box.
to select the tint, and drag the slider horizontally to adjust saturation. Saturation control is not available when [B&W] is selected. You can also enter a numeric value in the input box.[Toning] is available when certain types of Creative Picture Control are selected.
Items selectable for Toning
- B&W
- Sepia
- Cyanotype
- Red
- Yellow
- Green
- Blue Green
- Blue
- Purple Blue
- Red Purple
Types of Creative Picture Control for which [Toning] can be adjusted
- Sepia
- Blue
- Red
- Pink
Custom Curve
When the [Use Custom Curve] is selected, adjust brightness and contrast using tone curve. For details of the custom curve, refer to "About Custom Curve".
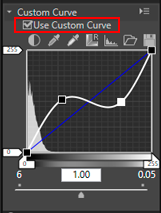
(Tone Curve)
Adjust brightness and contrast by dragging an anchor point on the tone curve. Up to 20 anchor points can be added. To add an anchor point, drag the line to any point. To delete an anchor point, drag it outside [Custom Curve] or press the "Delete" key. For details on tone curves, refer to "About Custom Curve".
Memo
If you edit the tone curve, the displayed histogram may have vertical lines. This is a phenomenon caused by quick display of the edited results. This kind of tone skipping phenomenon does not necessarily occur in the actual image.

- Automatically adjusts contrast.

- Changes the cursor to the dropper tool. If you click the black point of the image, you can adjust the tone.

- Changes the cursor to the dropper tool. If you click the white point of the image, you can adjust the tone.

- Resets the tone curve.

- Displays the adjusted histogram. Another clicking displays the pre-adjustment histogram.

- Loads an existing custom tone curve to Picture Control Utility 2. Files with the .ntc, .ncv, or .set extension can be loaded.

- Saves the created custom tone curve to Picture Control Utility 2. The file is saved with the .ntc extension.
File extensions appended to custom tone curves
- .ntc: Custom tone curve created using Camera Control Pro 2 or Picture Control Utility 2
- .ncv: Custom tone curve created using Nikon Capture
- .set: Custom tone curve created using Capture NX or Capture NX 2
Settings related to saving and adding
[Reset]
When a Nikon Picture Control, optional Picture Control, or Creative Picture Control is selected, all items are reset to their default settings. When a custom Picture Control is selected, all items are reset to their previous values before adjustment.
[Add to List]
Registers the adjusted Picture Control with a new name. The registered Picture Control is added to the Picture Control list.
[Overwrite]
Overwrites the current Picture Control with the settings that you adjusted. You cannot select [Overwrite] when the adjusted settings are based on a Nikon Picture Control, optional Picture Control, or Creative Picture Control.