

- Home
- Basic Operations of Picture Control Utility 2
- Basic Operations of the Picture Control Utility 2 Windows
- Using Preview Images
Font size
- S
- M
- L
Using Preview Images
- About the preview image area
- Applying adjustments
- Displaying histograms
- Changing display magnification
- Displaying advanced functions for image preview
- Changing the preview image
- Adjusting preview
- Rotating
- Changing the view mode
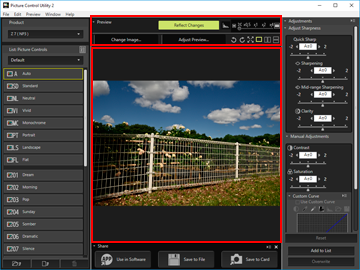
About the preview image area
The center of the Picture Control Utility 2 window is the preview image area.
The preview image displayed by default varies depending on the product selected in the [Product] list.
You can use the preview operation tools to change how preview images are displayed.
Applying adjustments
You can click [Reflect Changes] to choose whether or not the adjustments made to the Picture Control are applied to the preview image.
Displaying histograms
Click  to display the histogram of the displayed image. Click
  in the upper right of Histogram to change the details that are displayed.
to display the histogram of the displayed image. Click in the upper right of Histogram to change the details that are displayed.- RGB: Displays the histograms of all RGB channels.
- R/G/B: Displays the [Histogram] of the selected R/G/B channel only.
- Brightness: Displays the [Histogram] of the brightness distribution only.
About [Histogram]
"Histogram" is a curve chart showing the distribution of brightness in an image. The horizontal axis shows image brightness, and the vertical axis shows the number of pixels. For bright images, the peak of the curve is located toward the right side of the chart, and for dark images, the peak of the curve is located toward the left side of the chart. If the curve does not drop to the bottom before reaching the far right side of the chart, the image has lost highlights. If it does not drop to the bottom before reaching the far left side, the image has lost shadows.
Changing display magnification
Drag the slider horizontally to magnify/reduce the preview image.
Set the slider to  to display the full image in the preview image area.
to display the full image in the preview image area.Displaying advanced functions for image preview
Click [Preview] to display/hide advanced functions. By displaying advanced functions, you can change, adjust, and rotate the preview image, and change the view mode.
Changing the preview image
Click [Change Image...] to change the image used for preview. Select the desired image via the file selection dialog.
Only RAW images in NEF format captured on a Nikon digital single-lens reflex camera, mirrorless camera, or COOLPIX A can be used as preview images.
- RAW images are displayed with the currently selected Picture Control applied.
- The exposure, white balance, and Active D-Lighting of a preview image is displayed with the settings at the time of shooting.
- Images that are edited using NX Studio, Capture NX-D, or ViewNX-i software after shooting are displayed without the changes applied.
- NEF (RAW) pictures shot with [HLG] selected for tone mode will not display at the correct exposure if selected.
Notes
- A confirmation dialog is displayed when the Picture Control of the product selected in the [Product] list differs from that of the image that you want to display.
- An image taken with a camera that does not support Picture Controls and custom Picture Controls can be displayed as a preview image, but it cannot be used to create a custom Picture Control.
Adjusting preview
Click [Adjust Preview...] to adjust the preview image quality. Use the [Adjust Preview] window to make adjustments.
For details, refer to "Editing Preview Images".
Adjustments made using the [Adjust Preview] window will not be applied to the custom Picture Control that you are creating.
Rotating
Click  /
/  to rotate the displayed image in the corresponding direction 90 degrees.
/ to rotate the displayed image in the corresponding direction 90 degrees.Changing the view mode
Change the view mode of the preview window.
 : Use the entire screen to display the enlarged preview image. To return to the original window, click the
  button or press the Esc key.
 /
/  : Vertically or horizontally align the adjusted preview image along with the image that uses the Picture Control selected in [Compare with] in the [Preview] menu.
 : Return to single image display.