Creating Wired LAN Network Profiles on a Computer
-
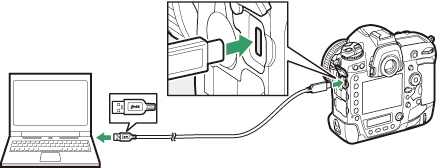
Connect the computer to the camera.
After turning the computer on and waiting for it to start up, connect the camera using the supplied USB cable and then turn the camera on. Exit Nikon Transfer 2 if it starts.
Z8 Cameras
Connect the USB cable to the camera’s USB data connector. The computer will not detect the camera when connected via the camera’s USB Power Delivery connector.
Connecting to Wired LANs Using the UT-1
Connecting the camera to a wired LAN using the UT-1 requires UT-1 firmware version 1.1 or later. To check the UT-1 firmware version, connect the UT-1 to the camera and select Network > Options > Firmware version.
-
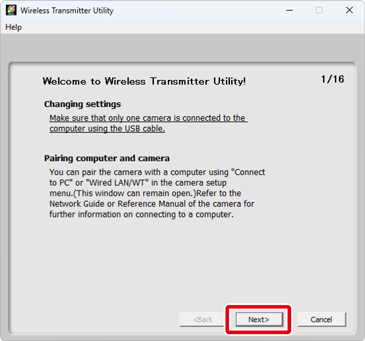
Launch the Wireless Transmitter Utility.
Click Next once the Wireless Transmitter Utility launches.
-
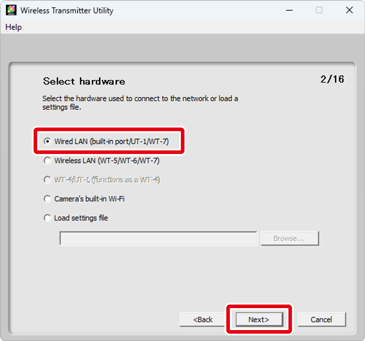
Select Wired LAN (built-in port/UT-1/WT-7) and click Next.
Importing Existing Profiles
Network profiles stored on the computer can be loaded by selecting Load settings file in Step 3 and clicking Browse to select the file. For information on saving network profiles, see “Saving Network Profiles”. The Load settings file option can also be used to load network profiles created with a camera, which are stored in the root directory of the camera memory card.
-
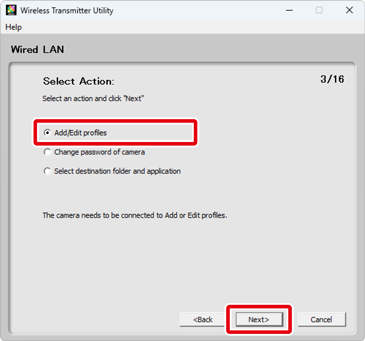
Select Add/Edit profiles and click Next.
Changing the Camera Password
Selecting Change password of camera before clicking Next in Step 4 displays a password-entry dialog. Entering a password in this dialog will cause the Wireless Transmitter Utility to display a password prompt when the camera is connected to other computers. Once the correct password has been entered, the prompt will not be displayed again.
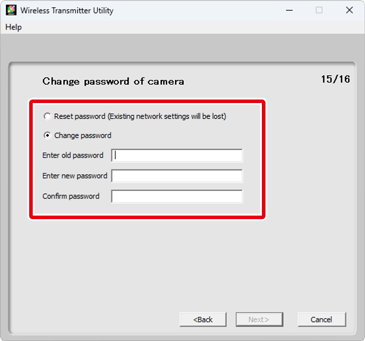
At default settings, the camera is not password protected; after selecting Change password of camera for the first time, you will need to leave the Enter old password field blank. To change an existing password, enter the old password before typing the new password. To remove the password, select Reset password (profiles will be lost) and click Next. Please note that resetting the password deletes all existing device profiles from the camera. Click Back to exit without changing password settings.
Choosing the Destination Folder and Application
If Select destination folder and application is selected in Step 4, clicking Next will display a dialog where you can choose the destination folder for pictures downloaded from the camera in image transfer mode. Click Browse to select from a list of available folders. A sub-folder can be entered in the field below.
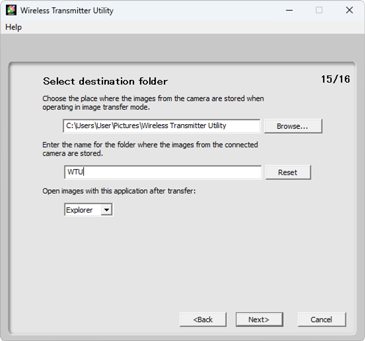
The default destination is:
- Windows: \Users\“user name”\Pictures\Wireless Transmitter Utility
- macOS: /Users/“user name”/Pictures/Wireless Transmitter Utility
The application used to display pictures when transfer is complete can be selected from Open images with this application after transfer menu; choose from Windows Explorer (or in macOS, the Finder), NX Studio, Capture NX-D, and ViewNX-i. Applications that are not installed will not be listed.
-
Select Add new profile and click Next.
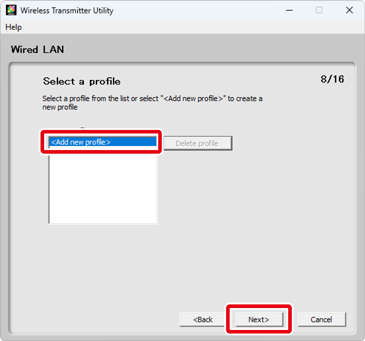
To edit an existing network profile, select it and click Next. To delete an existing profile, select it and click Delete profile. The Wireless Transmitter Utility cannot be used to alter profiles that have been protected using the camera Password protection option. Choose Off for Password protection before deleting or modifying profiles.
-
Enter a profile name and choose a connection type.
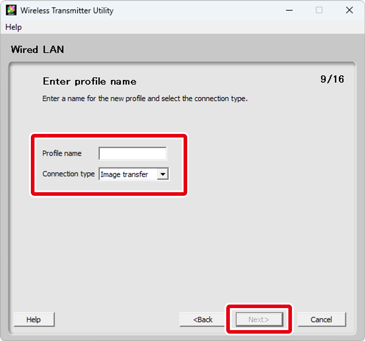
Enter a profile name of up to 16 characters and choose a connection type from FTP upload, Image transfer, Camera control, or HTTP server. Click Next when settings are complete.
Z9, Z8, and Z6III Cameras
When a Z9, Z8, or Z6III camera is connected, the Wireless Transmitter Utility can be used only to create profiles for FTP upload. Use the camera to create profiles for Image transfer and Camera control.
HTTP Server Mode
HTTP server mode is not available when the camera is connected to the network using the UT-1.
-
Select Manual setup (for advanced users) and click Next.
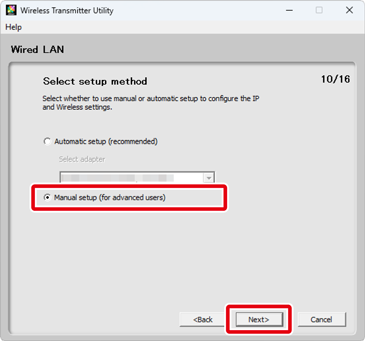
If the dialog shown in the illustration is not displayed, proceed to Step 8.
Automatic Setup
If you chose Automatic setup (recommended) in Step 7, TCP/IP settings will be adjusted automatically. Proceed to Step 9. Note that Automatic setup (recommended) will not be available if:
- you are editing an existing network profile,
- you are using a third-party wireless LAN adapter, or
- the computer uses a static IP.
-
Adjust TCP/IP settings.
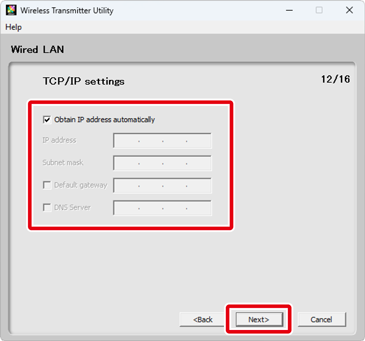
Click Next when settings are complete. For more information, refer to the table below.
Option Description Obtain IP address automatically Select this option if the network includes a DHCP server. Remove the check from this option if the network does not include a DHCP server or if the IP address is to be configured manually. IP address Enter the camera IP address. Subnet mask Enter the camera subnet mask. Default gateway If a gateway is required, select this option and enter the gateway IP address. DNS server If a DNS server is required, select this option and enter the DNS server IP address. Choosing an IP Address
The camera IP address must not be the same as that of the computer or FTP server. For example, if the computer has the IP address “192.168.1.2”, the camera can be assigned “192.168.1.3”. The addresses assigned to the camera and computer or FTP server must, however, belong to the same class.
-
Adjust FTP server settings.
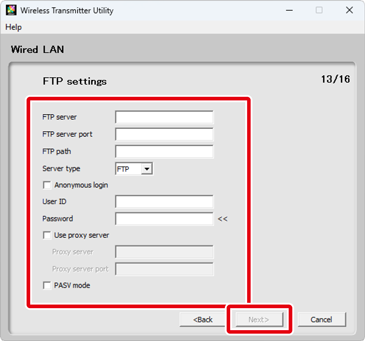
FTP server settings will only be available if FTP upload is selected in Step 6. Proceed to Step 10 if another option is selected. After adjusting settings, click Next. For more information, refer to the table below.
Option Description FTP server Enter the IP address (or URL) of the FTP server. FTP server port Enter the port number for the FTP server. FTP path Choose the folder to which images will be uploaded. Server type Select an operation mode from FTP and SFTP. The Z8, Z6III, and (from firmware version 3.00) Z9 also offer a choice of FTPS. Anonymous login Select this option if the FTP server permits anonymous login. User ID Enter a valid login name for the FTP server. Password Enter a valid password for the FTP server. Use proxy server If a proxy server is required, select this option and enter the proxy server’s IP address and port number. The Z8, Z6III, and (from firmware version 3.00) Z9 support this option only when FTP is selected for Server type. PASV mode Select this option when connecting in PASV mode. -
Click Next when settings are complete.
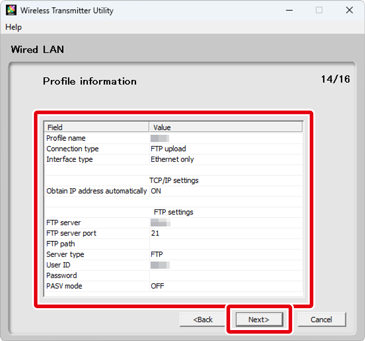
Profile information will be displayed; to return to the confirmation dialog and adjust settings, click Back.
-
Select Finish wizard and click Next.
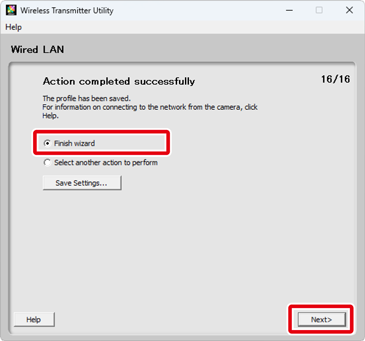
Choose Select another action to perform and click Next to save the profile and return to Step 3.
-
Turn the camera off and disconnect the USB cable.
Ethernet (wired LAN) setup is now complete. For information on connecting to the network from the camera, see “Connecting Using Profiles Created on a Computer”.
Saving Network Profiles
Click Save Settings in Step 11 to save network profiles in “wts” or “txt” format. To load saved profiles, click Load settings file in Step 3, click Browse, and select the desired file.

- Text (“txt”) format network profiles for FTP upload and HTTP server modes (only FTP upload can be used with the Z9, Z8, and Z6III) can be loaded onto the camera. Be sure to copy them to the root directory of the camera memory card. The menus used to load profiles vary with the camera models:
- Connect to FTP server in the network menu (Z9, Z8, and Z6III cameras),
- Wireless transmitter (WT‑7) in the setup menu (Z7II, Z6II, Z7, and Z6 cameras),
- Wired LAN/WT in the setup menu (D6 cameras), or
- Network in the setup menu (other cameras).
- The saved network profiles do not include passwords for the FTP server. You can configure the settings on the camera after loading the profiles to the camera.