Cameras Connected via Built-in Ethernet or Network Accessories
Follow the steps below to connect to a computer via Ethernet.
Z8 and Z6III Cameras
The Z8 and Z6III cameras can be connected to Ethernet networks using a third-party USB (Type C) to Ethernet adapter.
- Z9, Z8, and Z6III Cameras
- D6 Cameras
- Z7II, Z7, Z6II, Z6, D5, D4-series, D850, D810, D810A, D800, D800E, D780, D750, D500, D7200, D7100, and D7000 Cameras
Z9, Z8, and Z6III Cameras
Launch the Wireless Transmitter Utility after creating a network profile on the camera. Click Cancel to exit the Wireless Transmitter Utility if it has already launched.
-
Connect the camera to a computer or router using an Ethernet cable and turn the camera on.
- When using a Z8, attach a third-party USB-to-Ethernet adapter to the camera’s USB data connector and plug the Ethernet cable into the adapter.
- When using a Z6III, attach a third-party USB-to-Ethernet adapter to the camera’s USB connector and plug the Ethernet cable into the adapter.
- When connecting the Ethernet cable, do not use force or attempt to insert the connectors at an angle.
-
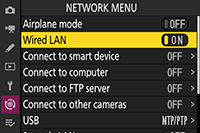
Enable wired LAN.
- Z9: Select ON for Wired LAN in the camera network menu.
- Z8: Select USB-LAN for USB data connection in the camera network menu.
- Z6III: Select USB-LAN for USB in the camera network menu.
-
Create a new network profile using Connect to computer > Network settings in the network menu.
Follow the on-screen instructions to create a network profile. For more information, see the camera Reference Guide.
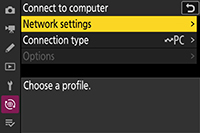
The camera name will be displayed when a network or host is detected.
-
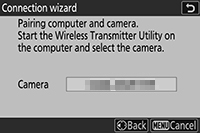
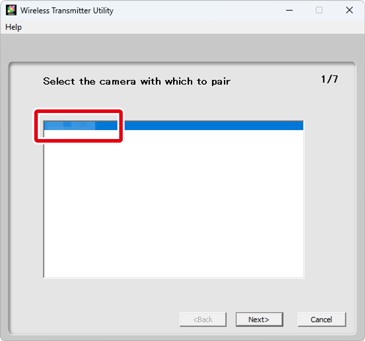
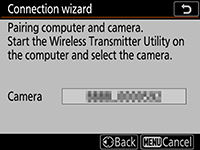
Launch the Wireless Transmitter Utility.
After confirming that the camera name shown in Step 3 is listed, click Next.
-
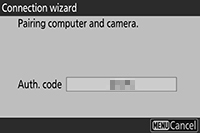
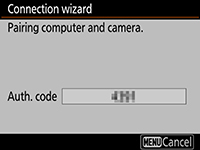
Note the authentication code.
Note the authentication code displayed in the camera monitor.
-
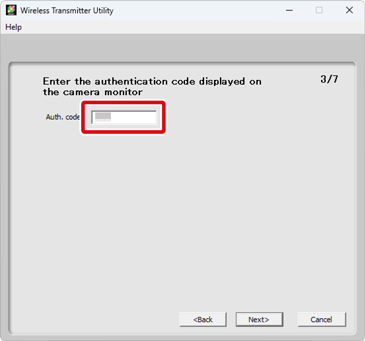
Enter the authentication code.
Enter the authentication code in the Wireless Transmitter Utility and click Next.
-
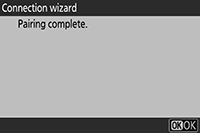
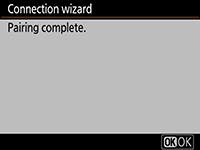
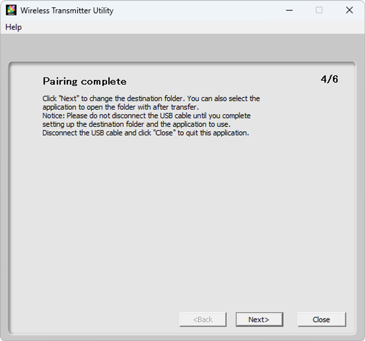
Complete pairing.
The Wireless Transmitter Utility will pair the camera and computer automatically. When pairing is complete, the camera and Wireless Transmitter Utility will display messages to that effect; press the OK button on the camera and click Next in the Wireless Transmitter Utility.

-
Choose the destination folder and application.
You can choose the destination folder for pictures downloaded from the camera in image transfer mode. Click Browse to select from a list of available folders. You cannot choose a sub-folder in this dialog.
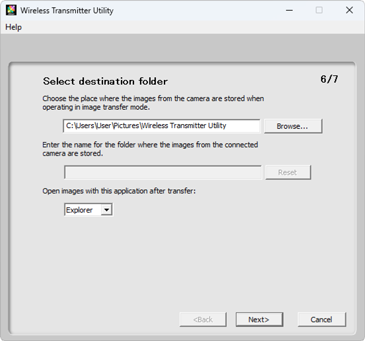
The default destination is:
- Windows: \Users\“user name”\Pictures\Wireless Transmitter Utility
- macOS: /Users/“user name”/Pictures/Wireless Transmitter Utility
The application used to display pictures when transfer is complete can be selected from Open images with this application after transfer menu; choose from Windows Explorer (or in macOS, the Finder), NX Studio, Capture NX-D, and ViewNX-i. Applications that are not installed will not be listed.
After completing this step, click Next and follow the on-screen instructions.
Choosing a Sub-folder
To choose a sub-folder for pictures downloaded from the camera, close the window, connect the camera and computer via USB, and then relaunch the Wireless Transmitter Utility. When prompted to choose hardware, select Wired LAN (built-in port/UT-1/WT-7), click Next, and select Select destination folder and application in the action dialog. Clicking Next will then take you to a dialog where you can select a sub-folder under the destination folder.
D6 Cameras
Launch the Wireless Transmitter Utility after creating a network profile on the camera. Click Cancel to exit the Wireless Transmitter Utility if it has already launched.
-
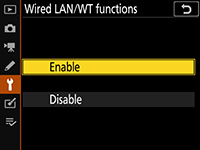
Enable Ethernet or wireless LAN on the camera.
Select Enable for Wired LAN/WT > Wired LAN/WT functions in the camera setup menu.
-
Create a new network profile.
Select Wired LAN/WT > Network settings in the camera setup menu and follow the on-screen instructions to create a network profile. For information on creating Ethernet profiles, see the camera Reference Manual. For information on using the WT-6, see the camera Reference Manual or the manual for the WT-6.
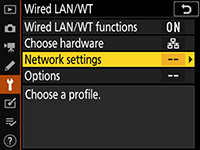
The camera name will be displayed when a network or host is detected.
-
Launch the Wireless Transmitter Utility.
After confirming that the camera name shown in Step 2 is listed, click Next.
-
Note the authentication code.
Note the authentication code displayed in the camera monitor.
-
Enter the authentication code.
Enter the authentication code in the Wireless Transmitter Utility and click Next.
-
Complete pairing.
The Wireless Transmitter Utility will pair the camera and computer automatically. When pairing is complete, the camera and Wireless Transmitter Utility will display messages to that effect; press the OK button on the camera and click Next in the Wireless Transmitter Utility.
-
Choose the destination folder and application.
You can choose the destination folder for pictures downloaded from the camera in image transfer mode. Click Browse to select from a list of available folders. You cannot choose a sub-folder in this dialog.
The default destination is:
- Windows: \Users\“user name”\Pictures\Wireless Transmitter Utility
- macOS: /Users/“user name”/Pictures/Wireless Transmitter Utility
The application used to display pictures when transfer is complete can be selected from Open images with this application after transfer menu; choose from Windows Explorer (or in macOS, the Finder), NX Studio, Capture NX-D, and ViewNX-i. Applications that are not installed will not be listed.
After completing this step, click Next and follow the on-screen instructions.
Choosing a Sub-folder
To choose a sub-folder for pictures downloaded from the camera, close the window, connect the camera and computer via USB, and then relaunch the Wireless Transmitter Utility. When prompted to choose hardware, select Wired LAN (built-in port/UT-1/WT-7), click Next, and select Select destination folder and application in the action dialog. Clicking Next will then take you to a dialog where you can select a sub-folder under the destination folder.
Z7II, Z7, Z6II, Z6, D5, D4-series, D850, D810, D810A, D800, D800E, D780, D750, D500, D7200, D7100, and D7000 Cameras
Use the built-in Ethernet connection if you are using a D5 or D4-series camera. Other cameras can connect using the following wireless transmitters:
- D810 / D810A / D750: WT-7 or UT-1 with WT-5
- Z7II / Z7 / Z6II / Z6 / D850 / D780 / D500 / D7200: WT-7
- D800 / D800E / D7100 / D7000: UT-1 with WT-5
-
Follow the on-screen instructions to create a network profile.

For information on creating Ethernet profiles, see the Network Guide supplied with the camera. For information on compatible wireless transmitters or the UT-1, see the documentation provided with the device.
-
Follow the on-screen instructions.
Follow the on-screen instructions to establish a connection and launch the Wireless Transmitter Utility. The Wireless Transmitter Utility will automatically pair the camera with the computer.
Click Next when pairing is complete.
-
Choose the destination folder and application.
You can choose the destination folder for pictures downloaded from the camera in image transfer mode. Click Browse to select from a list of available folders. A sub-folder can be entered in the field below.

The default destination is:
- Windows: \Users\“user name”\Pictures\Wireless Transmitter Utility
- macOS: /Users/“user name”/Pictures/Wireless Transmitter Utility
The application used to display pictures when transfer is complete can be selected from Open images with this application after transfer menu; choose from Windows Explorer (or in macOS, the Finder), NX Studio, Capture NX-D, and ViewNX-i. Applications that are not installed will not be listed.
After completing this step, click Next and follow the on-screen instructions.