
- Home
- Various Uses of Images and Movies
- Other Useful Functions
- Converting and Outputting Files
Font size
- S
- M
- L
Converting and Outputting Files
You can convert a JPEG, TIFF, or RAW image (NEF, NRW) into a JPEG or TIFF image. You can also convert multiple images at the same time.
You can also change the image size, delete the camera settings and XMP/IPTC information, or delete color profile when converting the file format. In addition, you can change the file size or delete various information by converting the file to the same file format.
You cannot convert movie files, voice recording files (WAV), or image dust-off data files (NDF).
- Select an image to convert.
- Click
 on the Output bar.
 The [Convert Files] screen is displayed.The settings specified in the last session are stored.
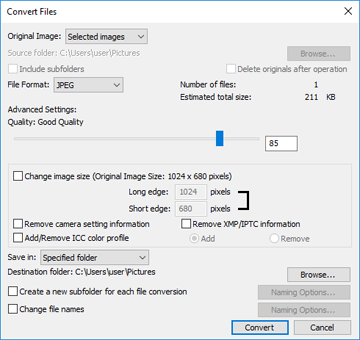
- Configure the settings on the [Convert Files] screen.
For specifiable items, refer to "Settings for file conversion".
- Click [Convert].
The converted image is output to the specified location. The pre-conversion image remains as it is.If the same file name already exists in the output destination folder, the converted file is saved with " _01" automatically added to the end of its file name.
Notes on file conversion
- Conversion of a JPEG image into a JPEG image recompresses the image; this may deteriorate the image quality.
- File conversion of images edited by some applications may not be possible.
- Focus Point may not be displayed correctly.
- AF-Area Mode information may not be displayed.
- When a RAW+JPEG image is selected, only the RAW file is converted while the JPEG file is not.
- When adjustment files are associated with the image, the metadata (File & Camera Information and XMP/IPTC Information) will be embedded directly in the file output by file conversion. You can choose not to embed the metadata when converting files.
You cannot convert the following RAW images:
- RAW images edited with Nik Color Efex Pro series
- RAW images shot or adjusted using an optional Picture Control that has not been installed in ViewNX-i.
- When you try to select and convert multiple images that contain unavailable ones, to another format, only the available images will be converted.
Settings for file conversion
Convert Files
Original Image:
Sets the target of file conversion.
- [Selected images]
- The selected images are the targets of file conversion.
- [Selected folder]
- Click the [Browse...] button to select the target folder of file conversion and click [OK]. To include the subfolders, check [Include subfolders]. To delete the original images from the folder after file conversion, check [Delete originals after operation].
File Format:
Select a format of a file to be output.
- [JPEG]
- Outputs an image converted into JPEG format. If the original image is a JPEG image, it is recompressed.
- [TIFF (16 Bit)]
- Outputs an image converted into TIFF format (16 bits).
- [TIFF (8 Bit)]
- Outputs an image converted into TIFF format (8 bits).
Use LZW Compression
When [TIFF (16 Bit)] or [TIFF (8 Bit)] is selected for [File Format:], TIFF images are compressed with LZW.
LZW compression of TIFF images
Using LZW compression makes TIFF image files smaller without deteriorating their image quality.
- Compressing a 16-bit TIFF image file using LZW compression may increase the file size.
- Images compressed using LZW compression may not open depending on the application.
Quality:
When [JPEG] is selected for [File Format:], specify the image quality (compression ratio). Drag the slider horizontally to specify the quality.
The quality can be specified in the following order starting from the left: [Highest Compression Ratio] - [Good Compression Ratio] - [Good Balance] - [Good Quality] - [Excellent Quality].
You can set the compression ratio by entering a numeric value from 0 to 100 in the input box on the right of the slider.
Compression ratio of JPEG images
Specifying [Highest Compression Ratio] for a JPEG image makes the file size small but the image quality deteriorates. On the contrary, specifying [Excellent Quality] will result in rather large compressed file but the image quality will not be so deteriorated.
Number of files:
The number of selected images is displayed.
Estimated total size:
The estimated size of the files after conversion is displayed.
Change image size
Resizes the converted image.
Enter a converted image size for pixel in the [Long edge:] input box. [Short edge:] length is automatically set according to [Long edge:] length. You cannot change the ratio of [Long edge:] to [Short edge:].
About the [Change the image size] settings
- When [Selected images] is selected in [Original Image:], the original size of the selected images is displayed. However, if images with different sizes are selected, only "(Images with different sizes are selected)" is displayed.
- The last input value is remaining in the input box. The remaining value and the longest edge value of the currently selected images are compared, displaying the smaller value in the input box.
- A size larger than the original image size cannot be specified.
- The minimum value that can be applied to long side is 320 pixels.
- You cannot change the size of an image whose long edge is less than 320 pixels.
- When selecting multiple images whose aspect ratios or image sizes are different, the conversion sets the long edge lengths of all selected images to the specified length set in [Long edge:], keeping the aspect ratio of each image. The [Short edge:] input box becomes disabled. If an image whose long edge is shorter than specified is selected, its image size remains the same after the conversion.
Remove camera setting information
Removes camera settings and converts.
Remove XMP/IPTC information
Removes XMP/IPTC information and converts.
Add/Remove ICC color profile
Check to add or remove a color profile for output. The color matching profile set in the color management settings in the [Options] (or [Preferences] in Mac OS) dialog is added. For details on the color profile, refer to "Color Management".
Save in:
Select a destination to save the converted image to.
- [Same folder as originals]
- Outputs to the folder where the original image is stored. An increasing number "_01" is automatically added to the end of the output file name.
- [Specified folder]
- Specify a destination to save converted images to. Click [Browse...] to display the screen to select a folder to save it to.
Create a new subfolder for each file conversion
Automatically creates a subfolder in the specified destination folder to save, and then saves the image.
Click [Naming Options...] to specify the naming rules for the automatically created subfolder. For settings, refer to "Folder Naming".
Change file names
Renames the converted file name, and then saves it.
Click [Naming Options...] to specify the naming rules for the files to be converted. Specify the same items that are required for changing image names. For these settings, refer to "File Naming".