The [Options] Pane
Perform a variety of tasks, including selecting the source device (the device from which pictures will be downloaded) and choosing a destination folder. The [Options] pane contains the following tabs: [Source], [Primary Destination], [Backup Destination], and [Preferences].
The [Source] Tab
This tab lists devices connected to the computer, including cameras, card readers, and card slots. When multiple cameras or removable media are connected, you can click a device containing pictures for download to select it as the source.
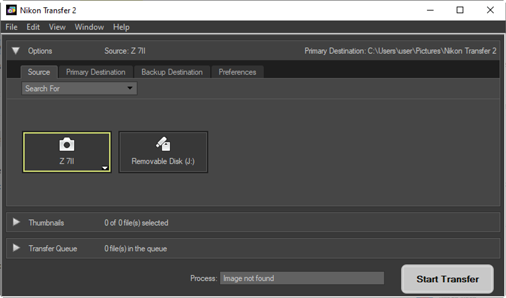
Multi-Slot Cameras
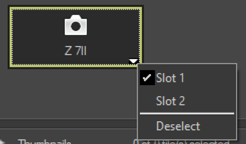
Click the ![]() at the bottom right corner of the camera icon to choose a slot; the pictures on the card in the chosen slot will be displayed in the [Thumbnails] pane.
at the bottom right corner of the camera icon to choose a slot; the pictures on the card in the chosen slot will be displayed in the [Thumbnails] pane.
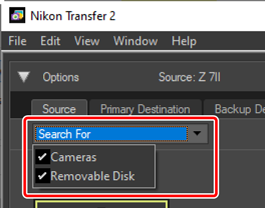
Limiting Device Selection
Use the [Search For] pull-down menu to choose the types of devices displayed in the [Source] tab from [Cameras] and [Removable Disk]. The tab will list buttons only for devices of the selected type.
The [Primary Destination] Tab
Choose a destination folder for the downloaded pictures. The tab also offers options for sub-folders and renaming downloaded pictures.
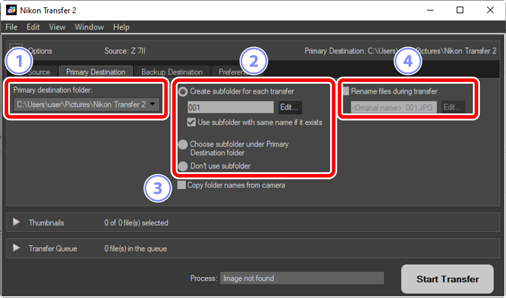
[Primary destination folder]
- Choose a destination folder for pictures downloaded from the source device. Folders that have previously served as destinations for downloaded pictures can be chosen from the pull-down menu. You can also choose a destination by selecting [Browse]. The path to the selected folder is listed as the [Primary Destination] in the top right corner of the pane.
Subfolder Options
-
Choose whether to download files to sub-folders within the destination folder.
- [Create subfolder for each transfer]: With each transfer, a new sub-folder will automatically be created within the folder selected for [Primary destination folder]. To choose how the sub-folders are named, click [Edit]; a [Folder Naming] dialog will be displayed (0 Folder Naming). To only create a new sub-folder if one with the selected name does not already exist, select [Use subfolder with same name if it exists].
- [Choose subfolder under Primary Destination folder]: Download pictures to a sub-folder within the folder selected for [Primary destination folder]. Enter the name of the sub-folder at the end of the [Primary Destination] path at the top of the transfer options area. If the selected sub-folder does not already exist, a new sub-folder will be created under the chosen name. You can also choose a previously-used sub-folder from the pull-down menu.
- [Don’t use subfolder]: Download pictures directly to the folder selected for [Primary destination folder] instead of to a sub-folder within it.
[Copy folder names from camera]
- Download pictures to the folder selected for [Primary destination folder] employing the folder hierarchy and folder names used on the camera.
[Rename files during transfer]
- Select this option to rename files automatically during download. To choose how files are named, click [Edit]; a [File Naming] dialog will be displayed (0 File Naming).
Folder Naming
Choose from the following naming options: [Sequential number], [Date Transferred], [Date/Time Transferred], and [Date Shot]. The selected option forms the middle portion of the name, to which prefixes and suffixes can be added as desired.
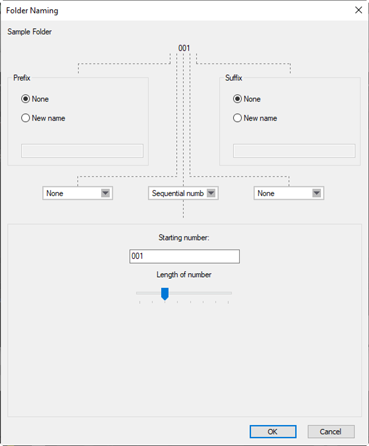
- The items available vary with the option selected for the middle portion. They are listed in the lower part of the dialog.
- You can enter strings up to 110 characters long. Characters not permitted by the operating system cannot be used.
- An example of the names generated by the selected rules appears in the [Sample Folder] field at the top of the dialog. The sample updates automatically as you edit the rules.
File Naming
Choose from the following naming options: [Sequential number], [Date/Time Transferred], and [Date Shot]. The selected option forms the middle portion of the name, to which prefixes and suffixes can be added as desired. You can also opt not to include a middle portion by selecting [None].
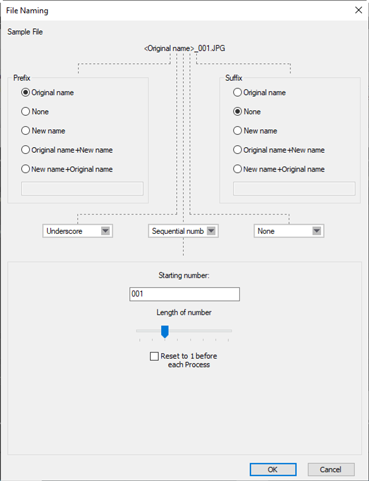
- The items available vary with the option selected for the middle portion. They are listed in the lower part of the dialog.
- You can enter a string up to 110 characters long. Characters not permitted by the operating system cannot be used.
- An example of the names generated by the selected rules appears in the [Sample File] field at the top of the dialog. The sample updates automatically as you edit the rules.
The [Backup Destination] Tab
Pictures can be backed up to a separate folder during download.
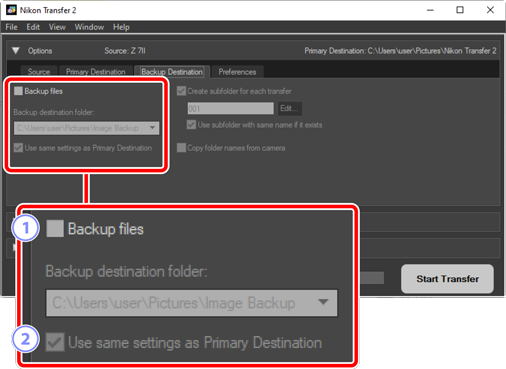
[Backup files]
- Select this option to create backup copies of pictures during download. The pictures will be copied to the folder selected for [Backup destination folder]. You can choose a previously-used folder from the pull-down menu or click [Browse] and select a new folder.
[Use same settings as Primary Destination]
- Select this option to use the sub-folder options selected in the [Primary Destination] tab when creating backups.
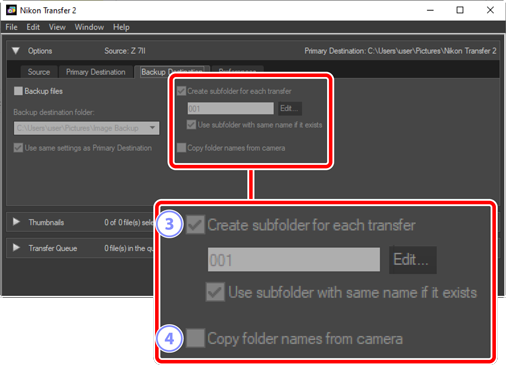
[Create subfolder for each transfer]
- A new sub-folder will automatically be created within the folder selected for [Backup destination folder] with each transfer. To choose how the sub-folders are named, click [Edit]; a [Folder Naming] dialog will be displayed (0 Folder Naming). To only create a new sub-folder if one with the selected name does not already exist, select [Use subfolder with same name if it exists].
[Copy folder names from camera]
- Copy pictures to the folder selected for [Backup destination folder] employing the folder hierarchy and folder names used on the camera.
Choosing a Backup Folder
A warning will be displayed and no backup copies will be created if the backup folder is either:
- the same as the folder selected in the [Primary Destination] tab, or
- contained within the download destination folder.
The [Preferences] Tab
Perform such tasks as choosing the information added to pictures during download and the operations performed after download.
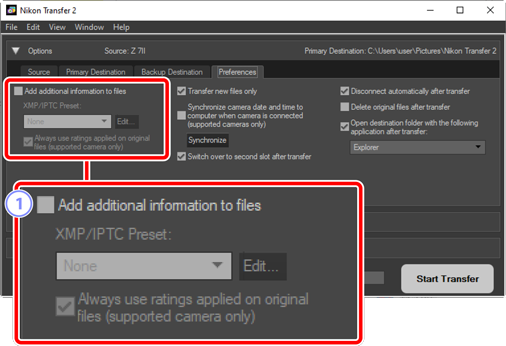
[Add additional information to files]
-
Select this option to add XMP/IPTC metadata to files during download.
- [XMP/IPTC Preset]: Choose a saved preset from the pull-down menu. To manage XMP/IPTC presets, click [Edit] (0 XMP/IPTC Presets).
- [Always use ratings applied on original files (supported camera only)]: Select this option to give ratings assigned using the camera priority over the ratings in XMP/IPTC presets.
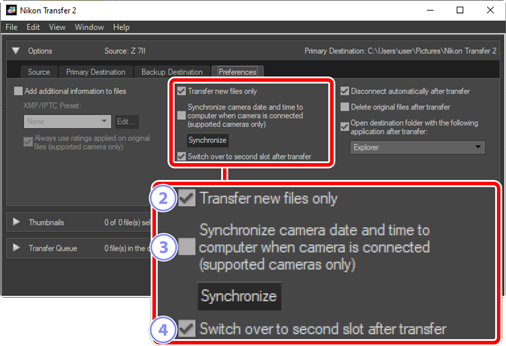
[Transfer new files only]
- Select this option to prevent previously-downloaded files being downloaded again when you click [Start Transfer].
[Synchronize camera date and time to computer when camera is connected (supported cameras only)]
- Select this option to automatically synchronize the camera to the computer clock when the devices are connected. Clicking [Synchronize] sets the clocks on connected cameras to the time currently reported by the computer.
[Switch over to second slot after transfer]
- If this option is selected when a camera with multiple card slots is connected, you will be prompted to download pictures from the second card once all pictures on the first card have been downloaded.
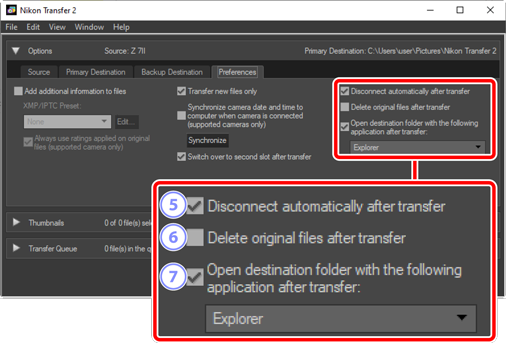
[Disconnect automatically after transfer]
-
If this option is selected, connections to all memory cards not inserted in a camera will end automatically when download is complete.
- Connections to cameras are not affected.
- Note that this option applies to all memory cards currently inserted in card slots or in card readers connected to the computer.
[Delete original files after transfer]
- Select this option to automatically delete files from the camera or memory card when download is complete. Files not included in the download or that are marked as protected on the camera will not be deleted.
[Open destination folder with the following application after transfer]
- Select this option to launch the software chosen in the pull-down menu when transfer is complete.
XMP/IPTC Presets
The following options are available for managing XMP/IPTC presets.
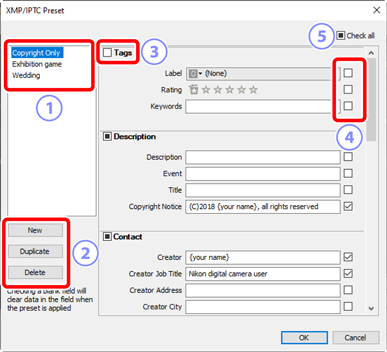
The Preset List
- A list of existing presets.
[New]/[Duplicate]/[Delete]
- Create, duplicate, or delete XMP/IPTC presets.
Category Check Boxes
- Select or deselect all items in the chosen category.
Item Check Boxes
- The selected items will be added to picture metadata during download. Selecting an item while leaving the field blank sets the field to “Clear”. Any previously-chosen values for the selected item will be deleted when the pictures are downloaded.
[Check all]
- Select or deselect all items in the XMP/IPTC preset.
