The Download Process
The basic steps involved in using Nikon Transfer 2 are as follows.
Step 1: Connect the Camera and Computer
After checking that there is a memory card inserted in the camera and turning the camera off, connect the camera to the computer using a compatible USB cable. Alternatively, you could insert the memory card in the computer’s memory card slot (if available) or a third-party card reader.
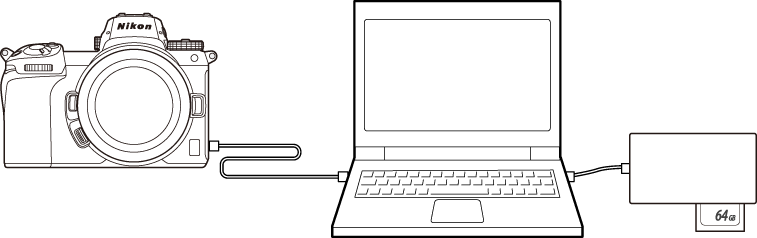
Using a Card Reader?
Confirm that it supports the type of memory card used in the camera.
Step 2: Launch Nikon Transfer 2
Turn the camera on; Nikon Transfer 2 should launch automatically. If it fails to launch automatically, you can launch it manually as described below.
- Windows: Double-click the Nikon Transfer 2 icon on the desktop.
- macOS: Go to the Launchpad and click the Nikon Transfer 2 icon in the “Nikon Software (Other)” folder.
![]()
Windows 10
Depending on how it is configured, Windows 10 may display a prompt like this one.

In this event, click the dialog and then click [Import File/Nikon Transfer 2] to select Nikon Transfer 2. Nikon Transfer 2 will launch automatically the next time the computer detects the camera or its memory card.

macOS
If Nikon Transfer 2 does not start automatically, confirm that the camera is connected and then launch Image Capture (software that comes with macOS) and select Nikon Transfer 2 as the software that starts when the camera is detected.
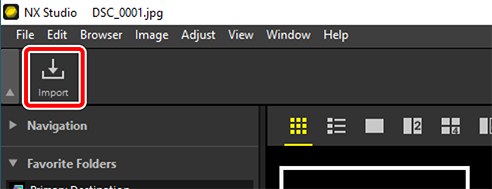
Launching Nikon Transfer 2 from NX Studio
If NX Studio is running, you can launch Nikon Transfer 2 by clicking [Import].
Step 3: Click [Start Transfer]
Click [Start Transfer] to start downloading the pictures from the memory card.
![]()
Current download status is shown in the [Process] bar as the number of pictures downloaded versus the total number of files in the queue. To pause download, click [Pause].
![]()
If no source is selected, Nikon Transfer 2 will display [No Transfer Source Selected.]. Expand the [Options] pane and select a source in the [Source] tab (0 The [Source] Tab).
Step 4: View Progress in the [Transfer Queue] Pane
The [Transfer Queue] pane lists the files being transferred and awaiting download. It also lists the time remaining, source, and destination.
![]()
When download is complete, the destination folder will open automatically and you will be prompted to exit Nikon Transfer 2. Click [OK] to exit.
Once downloaded, pictures can be viewed in NX Studio. NX Studio can be used to browse large numbers of pictures trouble-free and put the finishing touches on pictures by enhancing them in a variety of ways or adjusting RAW processing options. For information on using NX Studio, see NX Studio online help.