

- Home
- Detailed Operations of Picture Control Utility 2
- Creating/Editing Custom Picture Control
Font size
- S
- M
- L
Creating/Editing Custom Picture Control
You can create a new custom Picture Control. To create a custom Picture Control, edit the settings of a Nikon Picture Control, optional Picture Control, or Creative Picture Control, or edit the settings of a custom Picture Control that has already been created.
For details on the types of custom Picture Controls and supported products, refer to "About Custom Picture Controls".
Selecting the product to use
- Select [Add product...] in [Product].
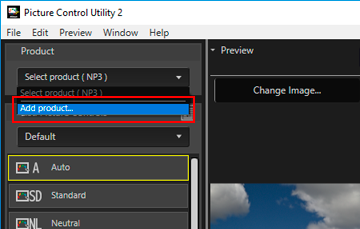 The [Add Product] window is displayed.
- Select the camera or application to use in [Product Category:] and [Product:], and click the [Add] button.
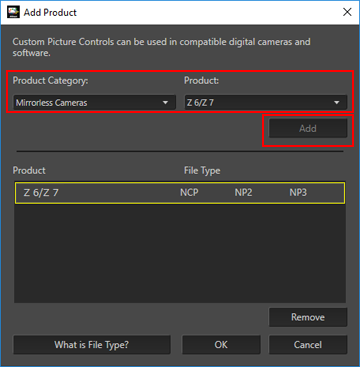 The product is added to the [Product] list.
- Click [OK].
The [Add Product]window is closed.
- Select the product to use from the [Product] list.
About [Product]
- When the product selected in the [Product] list is changed, a confirmation dialog may be displayed.
- If the Picture Control changes when the product selected in the [Product] list is changed, the available adjustment items, adjustment range, and adjustment steps corresponding to the changed Picture Control are applied.
- You may not be able to select certain products in the [Product] list depending on the Picture Control that is selected.
Selecting the Picture Control
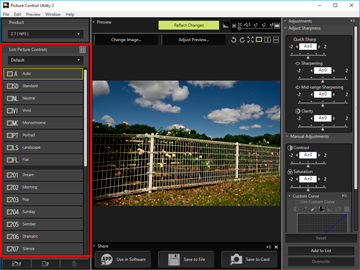
- In the [List: Picture Controls] list, select the Picture Control on which to base the new custom Picture Control.
 You may not be able to select certain Picture Controls depending on the product that is selected in the [Product] list.
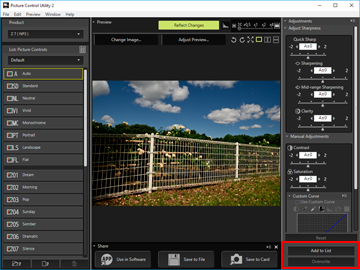
Adjusting
- Configure each item on the [Adjustments] palette.
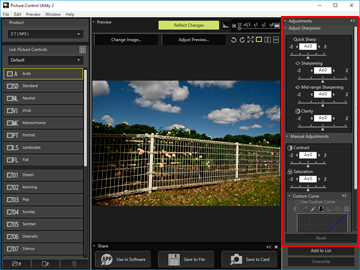 For settings for the items, refer to"About Level Adjustment".If you turn on the [Reflect Changes] button in the preview operation tools, the settings will be applied instantly when you adjust them.
Saving
- Click [Add to List] or [Overwrite].
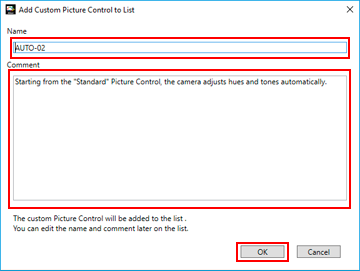
 Use [Add to List] to save the newly configured settings to [List: Picture Controls] as a new custom Picture Control. Use [Overwrite] to overwrite the base custom Picture Control with the new settings.Clicking [Add to List] will display the screen to name a new picture control. Follow to Step 2.Clicking [Overwrite] will display the confirmation screen for overwriting. The selected custom picture control will be overwritten if you click [OK].
- If you are creating a new custom Picture Control, enter a name and comment, and click [OK].
Custom Picture Control names can be up to 19 English one-byte characters and symbols.
 The new custom Picture Control is created. It is added under Creative Picture Control on the [List: Picture Controls] palette, in the order that it was created.
Available characters
- Up to 256 single-byte or double-byte characters can be entered as a comment on a custom Picture control.
- A string of up to 19 single-byte characters can be entered as a custom Picture Control name. The characters listed below are available.
- Alphabet: A to Z (upper case or lower case)
- Numbers: 0 to 9
- Symbols: ! " # $ % & ' ( ) * + , - . / : ; < = > ? @ [ \ ] ^ _ ` { | } ~ single space
Note
You cannot overwrite a Nikon Picture Control, optional Picture Control, or Creative Picture Control. You can click [Overwrite] only when you have modified a custom Picture Control.
[Flat] and [Auto] cannot be selected in [List: Picture Controls].
[Flat] and [Auto] cannot be selected when "(NCP)" is displayed next to the product name in the [Product] list. They can be selected only for products with "(NP2)" or "(NP3)" displayed next to the product name.
[Auto] is available only with cameras released in or after June 2017.
Regarding [Auto]
- The range of adjustment is from -2 to +2.
- Adjustments are made in steps of 1.
- [Custom Curve] is not available.
- This item may not be available, depending on the camera used for shooting.
Creative Picture Control cannot be selected in [List: Picture Controls]
You can use Creative Picture Control when [NP3] is selected in the [Product] list.