
 |
Upgrading the Firmware for the |
|
—Macintosh— |
||
| Thank you for choosing a Nikon product. This guide describes how to upgrade the firmware for the COOLPIX S520 digital camera. If you are not confident that you can perform the update successfully, the update can be performed by a Nikon service representative. |
 |
Get ready |
|
| To upgrade the camera firmware, you will need: | ||
| • | The camera | |
| • | A computer equipped with an SD card reader or card slot | |
| • | One of the following power sources: | |
| — An EH-62D AC adapter | ||
| — A fully-charged EN-EL10 rechargeable Li-ion battery | ||
| • | A Nikon-approved memory card that has been formatted in the camera (note that formatting permanently deletes any data the card may contain; be sure to back up any important files to a computer before formatting the card) | |
| • | The camera User's Manual | |
 |
Check the current camera firmware version |
|
| 1 | Turn the camera on. | |
| 2 | Press the * (favorites) button to display the favorites menu (mode menu). Select a mode and choose Set up from the menu for the selected mode. | |
| 3 | 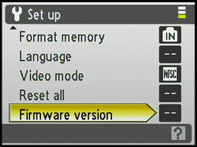 The setup menu will be displayed in the camera monitor. Select Firmware version. The setup menu will be displayed in the camera monitor. Select Firmware version. |
|
| 4 |
|
|
| 5 | Exit to the setup menu and turn the camera off. | |
 |
Download and extract the new firmware |
|||
| Click the I agree - Begin download link on the download site to download the file “F-S520-V12M.sit”. This file will then be automatically extracted to create the folder “S520Update.” If extraction is successful, the folder “S520Update” will contain the following files: | ||||
|
||||
 |
||||
| Mac OS X Version 10.4, 10.5 Automatic extraction requires archive expansion software compatible with StuffIt Expander, available from Allume Systems, Inc. If the firmware update is not automatically extracted, install StuffIt Expander or other compatible archive expansion software and extract the update. |
 |
Copy the firmware to the memory card |
|
| The firmware can be copied to the camera memory card using a computer equipped with an SD card reader. | ||
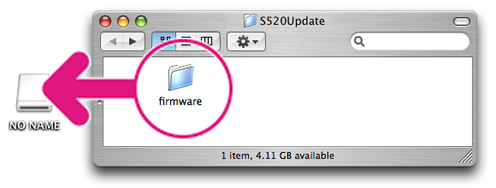
| 1 | Connect the card reader to the computer and insert a formatted memory card. If Nikon Transfer is installed, it may start automatically; select Quit from the application menu to exit Nikon Transfer. | |
| 2 | An untitled volume will appear on the desktop. Copy the “firmware” folder from the “S520Update” folder to this untitled volume. | |
 |
||
| In Mac OS X, untitled volumes are labeled “NO NAME” | ||
| When copying is complete, open the “firmware” folder on the untitled volume and confirm that it contains the file “firmware.bin”. | ||
| 3 | Drag the untitled volume into the Trash and remove the memory card from the card reader. | |
 |
Update the camera firmware |
||||||
| During the update, do not: | |||||||
| • | Remove the memory card | ||||||
| • | Turn the camera off | ||||||
| • | Unplug or disconnect the AC adapter | ||||||
| • | Remove the battery | ||||||
| • | Subject the camera to powerful electromagnetic noise | ||||||
| Any of the above actions could cause the camera to become inoperable. | |||||||
| 1 | Insert the memory card containing the firmware into the camera memory card slot. | ||||||
| 2 | Turn the camera on. | ||||||
| 3 | Press the * (favorites) button to display the favorites menu (mode menu). Select a mode and choose Set up from the menu for the selected mode. | ||||||
| 4 | The setup menu will be displayed in the camera monitor. Select Firmware version. |
||||||
| 5 |
|
||||||
 The message shown at right will be displayed while the update is in progress. The message shown at right will be displayed while the update is in progress. |
|||||||
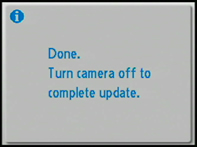 The message shown at right will be displayed when the update is complete. The message shown at right will be displayed when the update is complete. |
|||||||
| 6 | Confirm that the update was completed successfully.
|
||||||
| If the update was not successful, contact a Nikon service representative. | |||||||
| 7 | Format the memory card. | ||||||
| This completes the firmware update. | |||||||
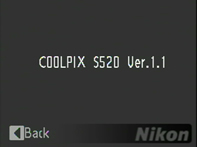 The current firmware version will be displayed. This upgrade can be used with firmware version 1.1.
 A firmware update dialog will be displayed. Select Yes and press the center of the OK button at the center of the multi selector to begin the update.
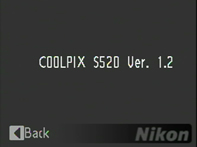 If the version displayed is 1.2, the update was successful.