|
Copy the firmware to the memory card |
| |
The firmware can be copied to the camera memory card either by connecting the computer directly to the camera using the USB cable, or by removing the memory card from the camera and inserting it in a card reader. |
| |
Important
Only one of the two sets of firmware (A or B) can be updated at a time. Use separate memory cards for each set of firmware, or update one set as described below, then format the memory card and repeat the process for the second set. |
| |
| Direct USB Connection |
| |
| Note: Use the EH-5/EH-5a AC adapter and EP-5 AC adapter connector or a fully-charged EN-EL9 rechargeable Li-ion battery. |
| |
| 1 |
Turn the camera off and insert a formatted memory card.
For information on formatting memory cards, see the camera Guide to Digital Photography. |
| |
| 2 |
 After turning the camera on, press the MENU button, select the setup menu, and set the USB option to Mass Storage. After turning the camera on, press the MENU button, select the setup menu, and set the USB option to Mass Storage. |
| |
| 3 |
Turn the camera off and connect the USB cable as shown below. |
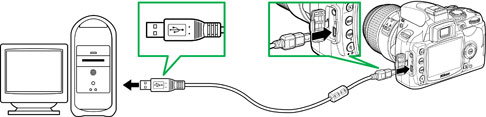 |
| UC-E4 USB cable |
|
| |
| 4 |
Turn the camera on. |
| • |
If Nikon Transfer is installed, it will start automatically; to exit, select Quit Nikon Transfer from the Nikon Transfer menu. |
| • |
If PictureProject is installed, it will start automatically; click Cancel to exit. |
| |
| 5 |
Copy the firmware to the memory card. |
| 5-1. |
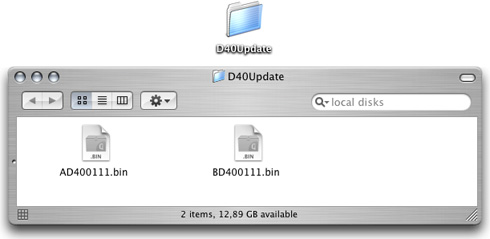
Copy the firmware to the “NIKON D40” volume corresponding to the camera.
When the camera is connected and turned on, the volume “NIKON D40” will appear on the desktop. Copy “AD400111.bin” (A firmware) or “BD400111.bin” (B firmware) from the “D40Update” folder to this volume. |
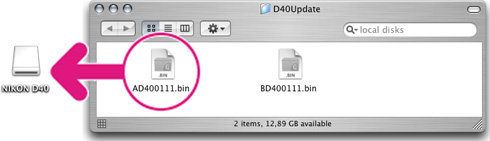 |
| Illustration shows A firmware |
|
| |
| 5-2. |
When copying is complete, confirm that the “NIKON D40” volume contains the “AD400111.bin” (A firmware) or “BD400111.bin” (B firmware). |
| |
| 6 |
Disconnect the camera from the computer. For more information, see the Guide to Digital Photography. |
| |
Important
Be sure to copy the firmware to the root directory of the memory card. The camera will not recognize the new firmware if it is placed in a folder under the root directory. |
| |
| Card Reader |
| |
| 1 |
Connect the card reader to the computer and insert a formatted memory card. |
| • |
If Nikon Transfer is installed, it will start automatically; to exit, select Quit Nikon Transfer from the Nikon Transfer menu. |
| • |
If PictureProject is installed, it will start automatically; click Cancel to exit. |
|
| |
| 2 |
A camera volume will appear on the desktop. Copy the “firmware” folder from the “Update” folder to this untitled volume as described in Step 5 of “Direct USB Connection.” |
| |
| 3 |
Drag the camera volume into the Trash and remove the memory card from the card reader. |
| |
Important
Be sure to copy the firmware to the root directory of the memory card. The camera will not recognize the new firmware if it is placed in a folder under the root directory. |
 |
Update the camera firmware
|
| |
During the update, do not: |
| • |
Remove the memory card |
| • |
Turn the camera off |
| • |
Operate any of the camera controls |
| • |
Attach or remove lenses |
| • |
Unplug or disconnect the AC adapter |
| • |
Remove the battery |
| • |
Subject the camera to powerful electromagnetic noise |
| Any of the above actions could cause the camera to become inoperable. |
| |
| 1 |
Insert the memory card containing the firmware into the camera. |
| |
| 2 |
Turn the camera on. |
| |
| 3 |
  Press the MENU button and select Firmware version in the setup menu. Press the MENU button and select Firmware version in the setup menu. |
| |
| 4 |
 The current firmware version will be displayed. Highlight Version up and press the multi selector to the right.
 |
| |
| 5 |
A firmware update dialog will be displayed. Highlight Yes and press OK to begin the update. |
 
| * |
Illustration shows dialog displayed when A firmware is updated. Follow the same steps to update B firmware. |
|
| |
| 6 |
 The update may take anywhere from two to five minutes. Do not perform any operations while the messages shown at right are displayed. The update may take anywhere from two to five minutes. Do not perform any operations while the messages shown at right are displayed. |
| |
| |
 The messages will clear from the display when the update is complete. The messages will clear from the display when the update is complete. |
| |
| 7 |
Once the messages have cleared from the display, confirm that the update was completed successfully.
| |
| 7-1. |
Turn the camera off and remove the memory card. |
| |
| 7-2. |
Check the camera firmware version as described in Step2, “Check the current camera firmware version.” |
| |
| 7-3. |
 If the version displayed is 1.11, the update was successful. If the version displayed is 1.11, the update was successful.
| * |
Illustration shows dialog displayed when updates for both A firmware and B firmware are completed. |
|
|
| |
| 8 |
Format the memory card. |
| |
| |
After upgrading A firmware, return to Step 4 and upgrade B firmware. |
| |
| 9 |
If you changed the USB setting from MTP/PTP to Mass Storage to update the camera firmware, return to the USB menu and select MTP/PTP. |
| |
| This completes the firmware update. |


 Two firmware versions (A and B) will be displayed. Both should be earlier than 1.10.