|
Copy the firmware to the memory card
|
| |
The firmware can be copied to the camera memory card using a computer equipped with a card reader or card slot. |
| |
| 1 |
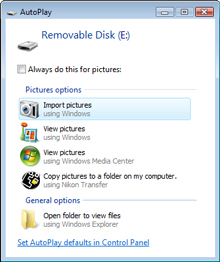
Insert a formatted memory card in the card reader or card slot. If Nikon Transfer or ViewNX 2 is installed, Nikon Transfer or Nikon Transfer 2 may start automatically; exit the application before proceeding. |
Windows 7/Windows Vista
Under Windows 7/Windows Vista, an AutoPlay dialog may be displayed. Click  . . |
 |
| |
|
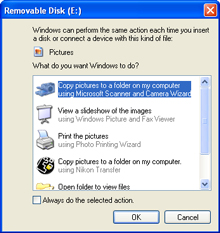
Windows XP
Under Windows XP, a Removable Disk dialog may be displayed. Click Cancel. |
 |
|
| |
| 2 |
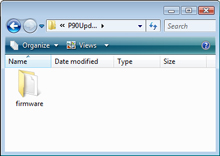
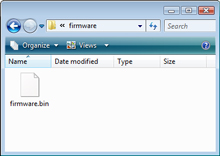
The memory card will appear in “Computer” (Windows 7/Windows Vista) or “My Computer” (Windows XP) as a removable disk. Copy the “firmware” folder from the “P90Update” folder to the removable disk. |
 |
|
|
| |
| When copying is complete, open the “firmware” folder on the removable disk and confirm that it contains the file “firmware.bin”. |
| |
| 3 |
Right click the removable disk and select Eject from the menu that appears. Remove the memory card from the card reader or card slot. |
 |
Update the camera firmware |
| |
During the update, do not: |
| • |
Remove the memory card |
| • |
Turn the camera off |
| • |
Unplug or disconnect the AC adapter |
| • |
Remove the battery |
| • |
Subject the camera to powerful electromagnetic noise |
| Any of the above actions could cause the camera to become inoperable. |
| |
| 1 |
Insert the memory card containing the firmware into the camera memory card slot. |
| |
| 2 |
Turn the camera on. |
| |
| 3 |
Press the  button to display the menus. Press the multi selector left and select the button to display the menus. Press the multi selector left and select the  (setup) tab. (setup) tab. |
| |
| 4 |
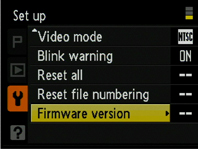 The Set up menu will be displayed in the camera monitor. Select Firmware version. The Set up menu will be displayed in the camera monitor. Select Firmware version. |
| |
| 5 |
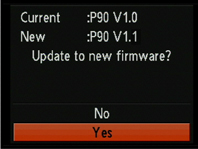 A firmware update dialog will be displayed. Select Yes and press the A firmware update dialog will be displayed. Select Yes and press the  button at the center of the multi selector to begin the update. button at the center of the multi selector to begin the update. |
| |
| |
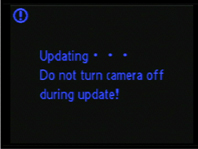 The message shown at right will be displayed while the update is in progress. The message shown at right will be displayed while the update is in progress. |
| |
| |
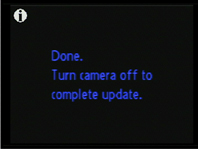 The message shown at right will be displayed when the update is complete. The message shown at right will be displayed when the update is complete. |
| |
| |
| 6 |
Confirm that the update was completed successfully.
| 6-1. |
Turn the camera off and remove the memory card. |
| 6-2. |
Check the camera firmware version as described in Step 2, “Check the current camera firmware version”. |
| 6-3. |
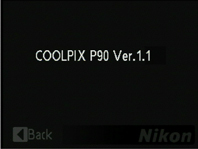 If the version displayed is 1.1, the update was successful. If the version displayed is 1.1, the update was successful. |
|
| |
| If the update was not successful, contact a Nikon service representative. |
| |
| 7 |
Format the memory card. |
| |
| This completes the firmware update. |


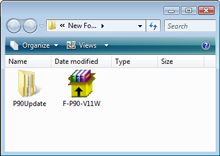
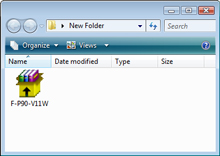 Open the folder created in Step 3-1 and double-click the downloaded “F-P90-V11W.exe” file to extract the following files to an “P90Update” folder in the new folder:
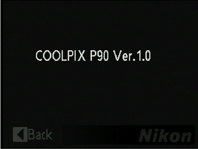 The current firmware version will be displayed. This upgrade can be used with firmware version 1.0.