- Android
- iOS
Direct Wi‑Fi Connection
The SnapBridge app can be used for direct Wi‑Fi connections that do not require you to first pair the camera and smart device. See here for information on the cameras that support this feature.
Before Connecting
Before proceeding:
- Enable Wi‑Fi on the smart device (see the documentation provided with your device for details),
- Be sure the batteries in the camera and smart device are fully charged to prevent unexpected loss of power, and
- Check that there is space remaining on the camera memory card
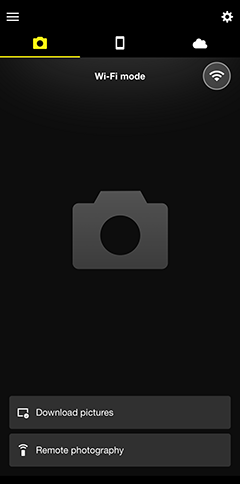
Wi‑Fi Mode
The following are unavailable in Wi‑Fi mode:
- Features accessed via Auto link in the
 tab (auto download, clock synchronization and location data)
 - Manual location data download
- The Create a Nikon ID account option in the
 tab
tab - The Nickname option in the SnapBridge menu
- Bluetooth remote control
To use these features, exit Wi‑Fi mode and pair the camera and smart device via Bluetooth.
Wi‑Fi Mode Not Available
Wi‑Fi mode cannot be enabled while pictures are being downloaded from the camera. After downloading pictures or interrupting transfer, wait at least three minutes before switching to Wi‑Fi mode.
Unable to Connect via Wi-Fi
If you are unable to connect via Wi-Fi, follow the steps here to try again.
Backgrounding SnapBridge While Connected in Wi-Fi Mode
Sending the SnapBridge app to the background while certain cameras are connected in Wi-Fi mode will end the Wi-Fi connection (the app does, however, continue running in Wi-Fi mode). You will be prompted to re-establish the connection if you attempt to import pictures or perform other actions that require a Wi-Fi connection. Follow the on-screen instructions.
- Nikon Z Mount Mirrorless Cameras
- Digital SLR Cameras That Support Wi-Fi Mode
- Cameras That Support the Wireless Mobile Utility
Nikon Z Mount Mirrorless Cameras
Follow the steps below to connect to a Z mount camera via Wi‑Fi.
-
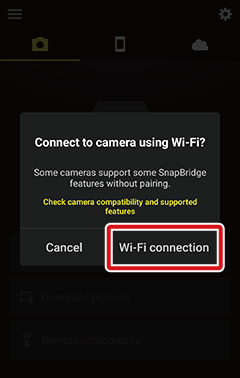
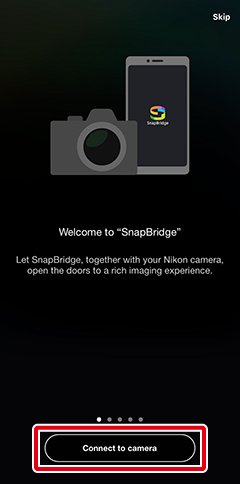
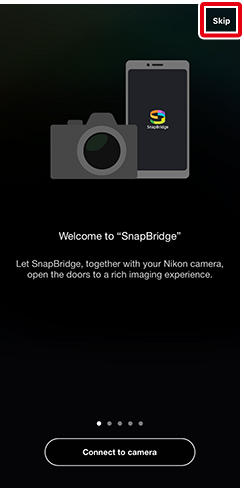
Smart device: Launch the SnapBridge app. If this is the first time you have launched the app, tap Connect to camera and proceed to Step 2.
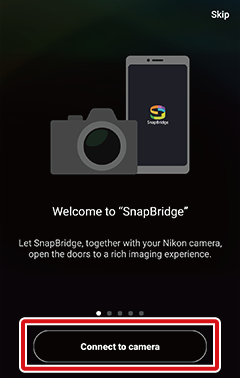
No “Connect to Camera” Button?
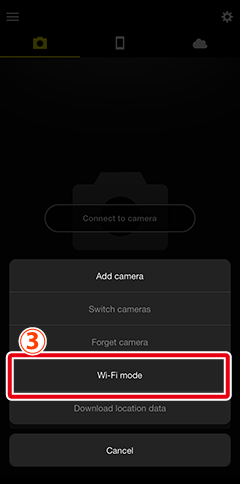
If you tapped Skip or have previously launched the SnapBridge app, tap
 in the tab, select Wi‑Fi mode, and proceed to Step 3.
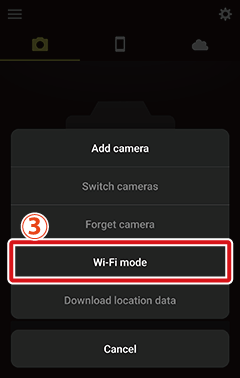
No “Wi‑Fi mode” Option?
Check that the SnapBridge app is up to date. If you are using the latest version and the Wi‑Fi mode option is still missing, exit the app, confirm that it is not running in the background (the procedure varies with the smart device; see the documentation provided with your device for details), check that the device is connected to the Internet, and then re-launch the app.
-
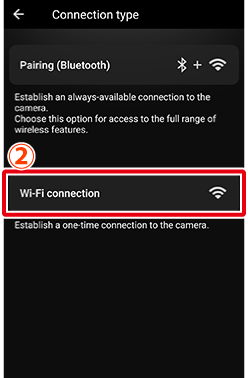
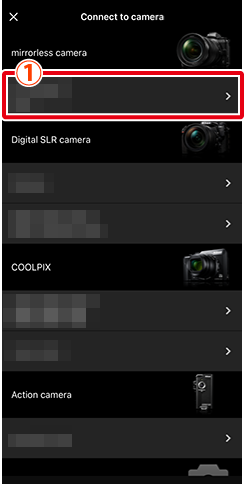
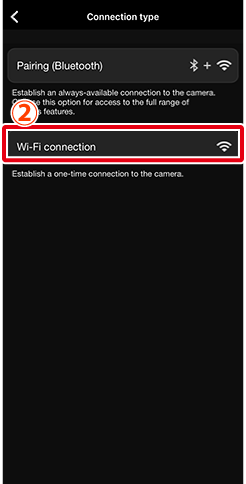
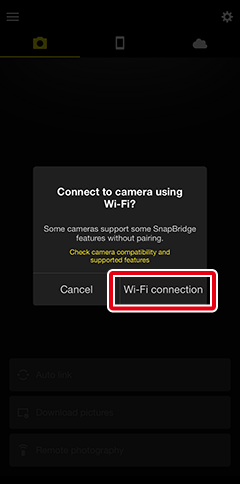
Smart device: When prompted to select the camera type, tap the desired model, and then tap Wi-Fi connection when prompted.
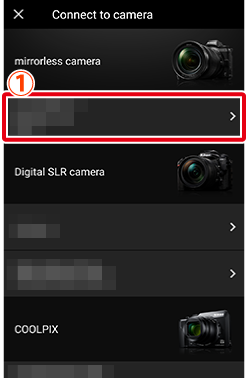
Supported Camera Not Displayed?
Check that the SnapBridge app is up to date. If you are using the latest version and no option for your camera is displayed, exit the app, confirm that it is not running in the background (the procedure varies with the smart device; see the documentation provided with your device for details), check that the device is connected to the Internet, and then re-launch the app.
-
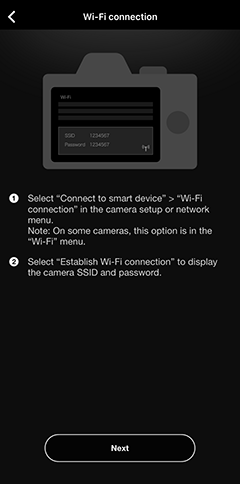
Smart device: The smart device will instruct you to ready the camera. Turn the camera on. Do not tap Next until you have completed Steps 4–5.
-
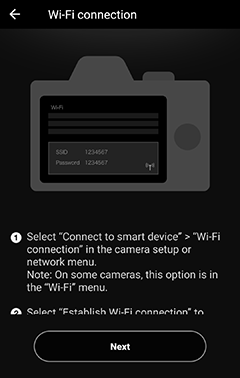
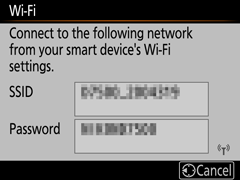
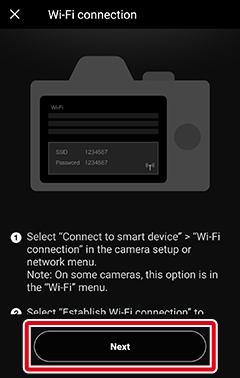
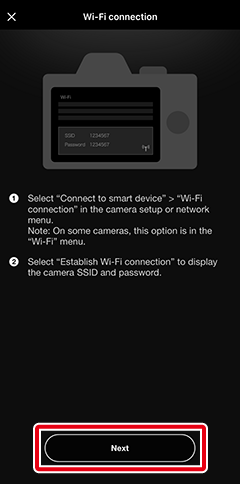
Camera: Highlight Wi‑Fi connection in the camera menus and press J (on some cameras, Wi‑Fi connection is in the Connect to smart device menu).
-
Camera: Highlight Establish Wi‑Fi connection and press J. The camera SSID and password will be displayed. Note that some cameras will not display an Establish Wi‑Fi connection option, in which case you should enable Wi‑Fi and proceed to Step 6 (see the camera manual for details).
-
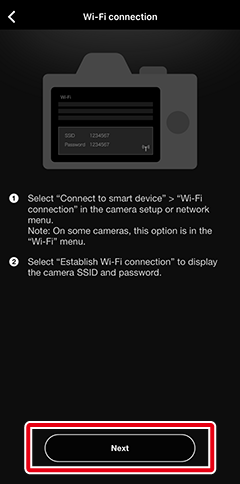
Smart device: After completing Steps 4–5 on the camera, return to the smart device and tap Next.

-
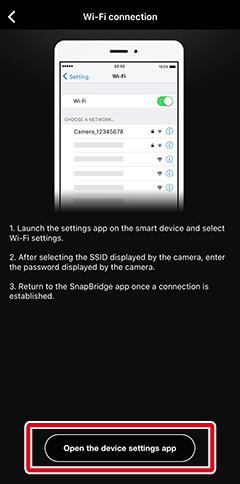
Smart device: After reading the instructions displayed by the smart device, tap Open the device settings app.
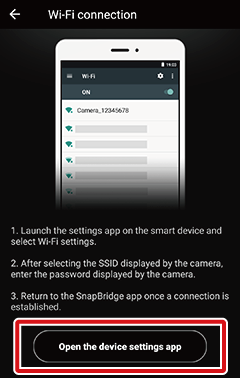
The smart device Wi‑Fi settings dialog will be displayed.
-
Smart device: Select the camera SSID and enter the password (the SSID and password can be viewed in the camera menus; for more information, see the camera manual).
You will not be required to enter the password when next you connect to the camera unless the password has changed in the interim.
-
Smart device: Return to the SnapBridge app and wait for the smart device to connect. Wi‑Fi mode options will be displayed once a connection is established.
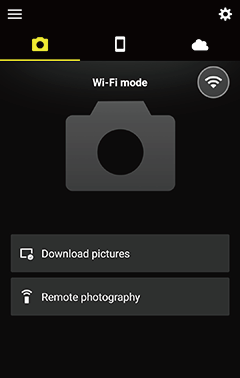
The Connection Status Icon
Connection status is shown by the following icons in the top right corner of the
tab: : The SnapBridge app is in Wi-Fi mode without a Wi-Fi connection to the camera.
 : The smart device is connected to the camera via Wi-Fi.
Digital SLR Cameras That Support Wi-Fi Mode
Follow the steps below if you are using a digital SLR camera that supports Wi-Fi mode. For information on supported cameras, see here.
-
Smart device: Launch the SnapBridge app and tap Skip.
- If you have launched the app before, the welcome dialog will not be displayed; proceed to Step 2.
- Tapping Connect to camera displays a Bluetooth pairing dialog. Tap the
 button at the top left corner to return to the welcome dialog. See here for information on connecting via Bluetooth.

-
Tap
in the tab and select Wi‑Fi mode.No “Wi‑Fi mode” Option?
Check that the SnapBridge app is up to date. If you are using the latest version and the Wi‑Fi mode option is still missing, exit the app, confirm that it is not running in the background (the procedure varies with the smart device; see the documentation provided with your device for details), check that the device is connected to the Internet, and then re-launch the app.
-
Smart device: Tap Wi‑Fi connection when prompted. The smart device will instruct you to ready the camera. Do not tap Next until you have completed Step 4.

-
Camera: In the menus, select Wi-Fi or Connect to smart device > Wi-Fi connection, then highlight Establish Wi-Fi connection and press J to display the camera SSID and password. If Establish Wi-Fi connection is not displayed even though the camera supports Wi-Fi mode, update to the latest version of the camera firmware.
-
Smart device: After completing Step 4 on the camera, return to the smart device and tap Next.
Wi-Fi connection instructions will be displayed.
-
Smart device: After reading the instructions, tap Open the device settings app.
The smart device Wi‑Fi settings dialog will be displayed.
-
Smart device: Select the SSID displayed by the camera in Step 4 and enter the password.
Reconnecting
Unless the password has changed in the interim, you will not be required to enter the password when next you connect to the camera.
-
Smart device: Return to the SnapBridge app and wait for the smart device to connect. Wi‑Fi mode options will be displayed once a connection is established.
The Connection Status Icon
Connection status is shown by the following icons in the top right corner of the
tab:- : The SnapBridge app is in Wi-Fi mode without a Wi-Fi connection to the camera.
- : The smart device is connected to the camera via Wi-Fi.
Cameras That Support the Wireless Mobile Utility
See here for more information.
Before Connecting
Before proceeding:
- Enable Wi‑Fi on the smart device (see the documentation provided with your device for details),
- Be sure the batteries in the camera and smart device are fully charged to prevent unexpected loss of power, and
- Check that there is space remaining on the camera memory card
Wi‑Fi Mode
The following are unavailable in Wi‑Fi mode:
- Features accessed via Auto link in the tab (auto download, clock synchronization and location data)
- Manual location data download
- The Create a Nikon ID account option in the tab
- The Nickname option in the SnapBridge menu
- Bluetooth remote control
To use these features, exit Wi‑Fi mode and pair the camera and smart device via Bluetooth.
Wi‑Fi Mode Not Available
After downloading pictures or interrupting transfer, wait at least three minutes before switching to Wi‑Fi mode.
Unable to Connect via Wi-Fi
If you are unable to connect via Wi-Fi, follow the steps here to try again.
Backgrounding SnapBridge While Connected in Wi-Fi Mode
Sending the SnapBridge app to the background while certain cameras are connected in Wi-Fi mode will end the Wi-Fi connection (the app does, however, continue running in Wi-Fi mode). You will be prompted to re-establish the connection if you attempt to import pictures or perform other actions that require a Wi-Fi connection. Follow the on-screen instructions.
Nikon Z Mount Mirrorless Cameras
Follow the steps below to connect to a Z mount camera via Wi‑Fi.
-
iOS device: Launch the SnapBridge app. If this is the first time you have launched the app, tap Connect to camera and proceed to Step 2.
No “Connect to Camera” Button?
If you tapped Skip or have previously launched the SnapBridge app, tap
in the tab, select Wi‑Fi mode, and proceed to Step 3.
No “Wi‑Fi mode” Option?
Check that the SnapBridge app is up to date. If you are using the latest version and the Wi‑Fi mode option is still missing, exit the app, confirm that it is not running in the background, check that the device is connected to the Internet, and then re-launch the app.
-
iOS device: When prompted to select the camera type, tap the desired model, and then tap Wi-Fi connection when prompted.
Supported Camera Not Displayed?
Check that the SnapBridge app is up to date. If you are using the latest version and no option for your camera is displayed, exit the app, confirm that it is not running in the background, check that the device is connected to the Internet, and then re-launch the app.
-
iOS device: The smart device will instruct you to ready the camera. Turn the camera on. Do not tap Next until you have completed Steps 4–5.
-
Camera: Highlight Wi‑Fi connection in the camera menus and press J (on some cameras, Wi‑Fi connection is in the Connect to smart device menu).
-
Camera: Highlight Establish Wi‑Fi connection and press J. The camera SSID and password will be displayed. Note that some cameras will not display an Establish Wi‑Fi connection option, in which case you should enable Wi‑Fi and proceed to Step 6 (see the camera manual for details).
-
iOS device: After completing Steps 4–5 on the camera, return to the smart device and tap Next.
-
iOS device: After reading the instructions displayed by the smart device, tap Open the device settings app to launch the iOS Settings app.
-
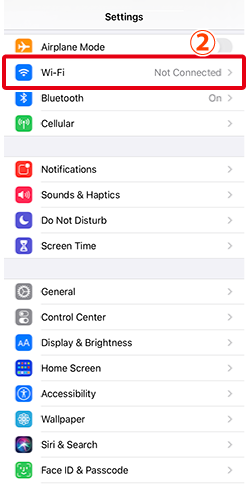
iOS device: Tap < Settings to open the “Settings” app. Next, scroll up and tap Wi-Fi, which you’ll find near the top of the settings list.
-
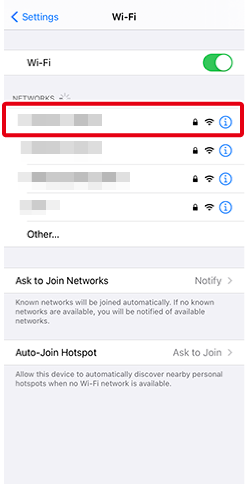
iOS device: Select the camera SSID and enter the password (the SSID and password can be viewed in the camera menus; for more information, see the camera manual).
You will not be required to enter the password when next you connect to the camera unless the password has changed in the interim.
-
iOS device: Return to the SnapBridge app and wait for the smart device to connect. Wi‑Fi mode options will be displayed once a connection is established.
The Connection Status Icon
Connection status is shown by the following icons in the top right corner of the
tab:- : The SnapBridge app is in Wi-Fi mode without a Wi-Fi connection to the camera.
- : The iOS device is connected to the camera via Wi-Fi.
Digital SLR Cameras That Support Wi-Fi Mode
Follow the steps below if you are using a digital SLR camera that supports Wi-Fi mode. For information on supported cameras, see here.
-
iOS device: Launch the SnapBridge app and tap Skip.
- If you have launched the app before, the welcome dialog will not be displayed; proceed to Step 2.
- Tapping Connect to camera displays a Bluetooth pairing dialog. Tap the button at the top left corner to return to the welcome dialog. See here for information on connecting via Bluetooth.
-
Tap
in the tab and select Wi‑Fi mode.No “Wi‑Fi mode” Option?
Check that the SnapBridge app is up to date. If you are using the latest version and the Wi‑Fi mode option is still missing, exit the app, confirm that it is not running in the background, check that the device is connected to the Internet, and then re-launch the app.
-
iOS device: Tap Wi‑Fi connection when prompted. The smart device will instruct you to ready the camera. Do not tap Next until you have completed Step 4.

-
Camera: In the menus, select Wi-Fi or Connect to smart device > Wi-Fi connection, then highlight Establish Wi-Fi connection and press J to display the camera SSID and password. If Establish Wi-Fi connection is not displayed even though the camera supports Wi-Fi mode, update to the latest version of the camera firmware.
-
iOS device: After completing Step 4 on the camera, return to the smart device and tap Next.
Wi-Fi connection instructions will be displayed.
-
iOS device: After reading the instructions, tap Open the device settings app.
The iOS settings app will launch.
-
iOS device: Tap < Settings to open the “Settings” app. Next, scroll up and tap Wi-Fi, which you’ll find near the top of the settings list.
-
iOS device: Select the SSID displayed by the camera in Step 4 and enter the password.
Reconnecting
Unless the password has changed in the interim, you will not be required to enter the password when next you connect to the camera.
-
iOS device: Return to the SnapBridge app and wait for the smart device to connect. Wi‑Fi mode options will be displayed once a connection is established.
The Connection Status Icon
Connection status is shown by the following icons in the top right corner of the
tab:- : The SnapBridge app is in Wi-Fi mode without a Wi-Fi connection to the camera.
- : The iOS device is connected to the camera via Wi-Fi.